• Skip to primary navigation
  • Skip to main content
  • Skip to footer
Printing for Less

Printing for Less

Satisfaction Guarantee

At Printing for Less, we've offered high quality online printing services since 1996. Shop business cards, booklets, stickers, and more!

800-930-2423
Get A Quote
  • Products
    • Announcements
    • Banners
    • Booklets
    • Booklet Envelopes
    • Bookmarks
    • Branded Box Printing
    • Brochure Holders
    • Brochures
    • Buck Slips
    • Business Cards
    • Calendar Printing
    • Campaign Printing
    • Carbonless Forms
    • Catalogs
    • CD Covers
    • Club Cards
    • Coil Bound Booklets
    • Custom Printing
    • Digital Printing
    • Door Hangers
    • EDDM Postcards
    • Envelopes
    • File Folders
    • Flyers
    • Folded Business Cards
    • Folders
    • Forms
    • Greeting Cards
    • Hang Tags
    • Holiday Cards
    • Invitations
    • Labels
    • Large Envelopes
    • Large Format
    • Large Posters
    • Letterhead/Envelope
    • Magnets
    • Mailer Printing
    • Mailing Envelopes
    • Mailing Services
    • Memo Pads
    • Menus
    • NCR Forms
    • Newsletters
    • Note Cards
    • Notepads
    • Offering Envelopes
    • Packaging
    • Plastic Cards
    • Pocket Folders
    • Postcards
    • Posters
    • Post-it® Notes
    • Presentation Folders
    • Rack Cards
    • Recieipt Books
    • Remittance Envelopes
    • Sell Sheets
    • Signs
    • Statement Stuffers
    • Stationery
    • Stickers
    • Table Tents
    • Tickets
    • Variable Data Printing
    • Vinyl Banners
    • Yard Signs
  • Industries
    • Advertising & Design
    • Real Estate
    • Medical
    • Food & Beverage
    • Non-Profit
    • University
    • Technology
    • Enterprise
  • Services
    • Reseller Program
    • Fulfillment
    • Digital Printing
    • Mailing Services
    • Custom Solutions
    • Design Services
    • Hybrid Experience Platform
  • Resources
    • Marketing & Design Tips
    • Templates
    • Blog
    • Help & FAQs
    • Printing Terms & Glossary
    • Video Library
  • Get Samples
  • My Login
  • Contact
  • About
    • Why Printing for Less?
    • Our Team
    • Sustainable Practices

Graphic Design

Build a Calendar in InDesign

Build a Calendar in InDesign

Everyone needs a calendar sooner or later. Learn how to easily build one inside InDesign using a script we’ve provided for you.
by: David Blatner

I’m always amazed at how many people need to make calendars: big calendars, small calendars, one-month calendars, full-year calendars. Fortunately, InDesign offers a “make me a calendar” feature… no, sorry, not really. But it’s so easy to make a calendar in InDesign that it’s as though the program did have such a feature. The trick is to download a template or script that does a lot of the work for you.


Use a Template

One of the best and easiest ways to make a calendar is to use a template designed by someone else. Search for the word “calendar” in the InDesign section at the Adobe exchange and you’ll find a number of free templates. While most are year-specific, there are a couple called “25-year calendars,” such as the clever one rusty Wright built. these contain 28 different master pages, each of which reflect one possible month layout. For example, if January 1 begins on a Monday, you’d apply that particular master page layout to your January document page. You can also find calendar templates for a small fee. Chuck Green’s The InDesign Ideabook includes several calendars on its accompanying disc. note that most of these templates have paragraph styles for each calendar element, so changing the typefaces and overall look and feel of the calendar is typically as simple as editing a few styles.

Use a Script

If you need more flexibility than a template offers, consider using a script to build your calendar for you. One of the most popular and easiest scripts available is called Calendar Wizard, written by Scott Selberg (based on ideas and code written by Jan Suhr, Robert Cornelius, and Steve Nichols). Here’s how it works.

1 – Download, install, and run

Calendar Wizard is available here. After you download and unzip it, install it by putting it inside the InDesign > Presets > Scripts folder (in CS2) or inside the InDesign > Scripts > Scripts Panel folder (in CS3). Note that this gives you four files: the script to make the calendar, a script to realign the calendars, a script to fit a calendar to a frame, and a readMe file with lots of good information on how the script works and how to use it. After installation, you’ll immediately find it in InDesign’s Scripts panel (Window > Automation > Scripts). To run it, double-click on it in the panel (Figure 1). If you get an error at this point, simply open a document, then double-click on the script again.

2 – Choose the Date Range

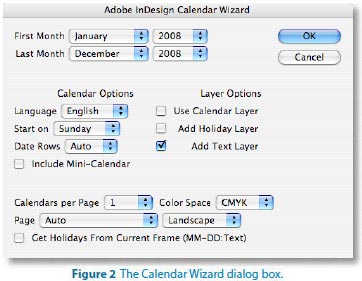
The first two items in the Calendar Wizard dialog box (Figure 2) are straightforward: They let you choose the starting and ending months and year(s) for your calendar. You can pick any year from 2004 to 2017. If you were hoping for 2018, you’ll have to wait until next year; the script looks only 10 years ahead.

InDesign Calendar Wizard


3 – Pick the Calendar Options

You can choose English, German, French, or Spanish from the Language pop-up menu to change the way the text appears (Figure 3). Next, pick whether you want the left column to be a Sunday or a Monday. Note that some months take up only five rows and some take six. (If February 1 lands on a Sunday, it’ll take 4 rows.) In general, you should choose Auto from the Date Rows pop-up menu, but if you want to force all the months to the same number of rows, you can choose that here. If you turn on the Include Mini-Calendar checkbox, you’ll get small versions of the previous and next month’s calendars inset into each month’s calendar. This takes longer to build and creates many more objects on your page, but it can be a good addition to one-month-per-page wall calendars.

Adding Holidays to Your Calendar

While version .9 of Calendar Wizard is on the Adobe Exchange, the script’s author, Scott Selberg, has provided us with the newest version of Calendar Wizard at http://downloads.indesignmag.com/supportfiles/. Version 2.0 has several new features, including creating and applying table styles and the ability to insert the names of holidays into the proper date locations automatically. The trick to adding holiday names to your calendar is to type them using a special format into an InDesign text frame. Each holiday should be on its own line, and in this format:
 
1-1:New Year’s Day
 
2-14:Valentine’s Day Don’t put a zero at the beginning of each month! Just the month, hyphen, then date.
 
You can find lists of holidays on the Web at timeandate.com and on Wikipedia.
 

4 – Choose Layer Options

One of the coolest things about CalendarWizard is that it can make good use of the Layers panel. If you turn off all the checkboxes in the Layer Options section, the whole calendar is placed on Layer 1. However, I prefer to turn on all three checkboxes to produce the following:

  • The calendar grid (along with numbers and text) on a layer called “calendar”
  • An empty duplicate of the grid on a layer called “calText,” which lets you easily add text at the top of each calendar cell.
  • An empty duplicate of the grid on a layer called “calHolidays,” which lets you easily add the names of holidays at the bottom of each cell. If you add holidays automatically (see the sidebar “Adding Holidays to Your Calendar”), this layer is always created for you.

5 – Pick a Page Setup

The last settings in the dialog box control how calendars are laid out on the page. You can pick how many months should fit on each page, whether the page layout should be portrait or landscape, and whether to create a new document or fit the calendar into the current document (Figure 4). If you had a text frame selected on your page when you launched the script, you can also choose Current Text Frame from the Page pop-up menu. In that case, the script places the calendar (but only a single month) into that frame. That’s particularly handy when you need a calendar to fit a specific size and position on your page. When the pop-up menu is set to Auto, and you have a text frame selected, the script automatically places the calendar into that frame.

6 – Create the Calendar

When you click OK, the script jumps into action and builds the calendar (Figure 5). This can take up to a minute or more (especially with minicalendars), so be patient.

Unless you’ve targeted a text frame for a singlemonth calendar or you have a text frame selected in your current document, the script builds a new document for you. The size and margins of that document are based on the last-used document preset (that is, whatever you last chose in the Document Preset pop-up menu in the New Document dialog box).

7 – Add Custom Text

This script creates calendars as tables inside text frames. The numbers and text are in the cells of one table, and—if you added a calHoliday layer or a calText layer—you’ll find one or more duplicate tables on other layers. If you want to insert additional holidays into the calendar, open the Layers panel and Option/Alt-click on the lock column next to calHolidays layer (Figure 6). This locks all the other layers, and leaves this layer unlocked. Now you can click with the Type tool inside a table cell and type the holiday. Similarly, to add to the Text layer, Option/Alt-click next to the calText layer to lock all the other layers.

8 – Format the Calendar

The calendars that CalendarWizard creates aren’t exactly beautiful right out of the box. Fortunately, the script builds a number of paragraph styles, table styles (CS3 only), and color swatches. Edit the styles and your calendars update to look far better. If you’re going to print your calendar, check the color space of the three color swatches it creates: DayCellBackground, DayTextColor, and Holiday. In the publicly available version .9, they’re all specced as RGB colors. If you use the script attached to this PDF, they’re likely in CMYK mode. But if they’re RGB, then right-click (or Control-click with a one-button mouse on a Mac) on each of these colors in the Swatches panel, choose Swatch Options, and set the Color Mode to CMYK. The two DayCell swatches control the color of the text and the cells behind the day names (“Monday,” “Tuesday,” and so on). The Holiday swatch controls the color of any holidays you type on the calHoliday layer. The first paragraph style you should change is the “cal_base” style, on which all the other styles are based. By default, the font is set to 12-point Times. Change this font, and it will change throughout the calendar. If you’re using Calendar Wizard 2.0 in InDesign CS3, you can also edit the styles in the Cell Styles and Table Styles panels (Figure 7). For example, if you want the cell containing the month name to have a particular fill color, change the cal_header cell style. To change the border around the frames, change the table style called “calendar.”

InDesign Calendar layout example

Laying out a Document Vertically

InDesign is so flexible, you’d think it would be easy to lay out a spread vertically instead of horizontally—so that the spine is at the top and bottom, which many wall calendars require. Unfortunately, it isn’t easy. However, Anne-Marie Concepción came up with a great workaround you can read in full at InDesignSecrets.com. Here’s the gist:
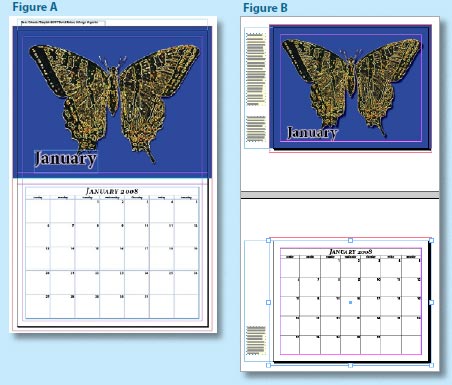
  1. Lay out the entire spread on a single page. For a 12-month calendar, you’d create 12 tall pages, each containing the image and calendar (Figure A).
  2. Save the InDesign document.
  3. Create a new InDesign document at the finished page size (half the height of the calendar).
  4. Place the original InDesign document into the new one. (If you’re using CS2 or earlier, you’ll need to export a PDF of the tall document first and import that instead.) The first page of the new document should contain the top half of the tall document; the second page contains the lower half; and so on. If you used bleed guides in the original, full-height document, you’ll need to adjust for that in the Import Options dialog box when you import it.
In this model, you design in the tall document and print from the half-height one (Figure B). Then, whenever you edit the tall document, update the modified links in the Links panel of the print version.

By the way, if you’re making more than one calendar, just set the styles in one document and then choose Load Paragraph Styles in the Paragraph Styles panel menu to copy them from one file to another.

9 – Resize or Realign the Calendars

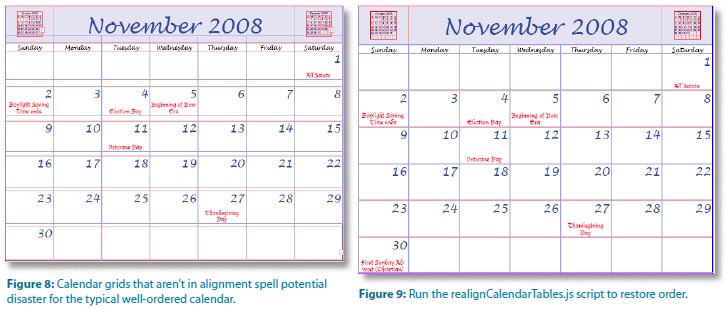
When you’ve created holiday and text layers, it can be frustrating if one of the grids gets out of alignment (Figure 8). Let’s say you change the height of the month name to be too large for its row. You can use the Type tool to adjust the row height, but now the holiday and text tables are out of alignment. Simply turn to a second script called realignCalendarTables.js, which comes with CalendarWizard. Double-click the realignCalendarTables.js script to launch it. If you have one of the tables selected, it assumes that the selected table is the master—the one all other tables should match. If no calendar frames are selected, the script asks which calendars you want to realign (I usually choose All) and which layer should it assume is the master calendar. This script is easy and painless and saves a huge amount of time (Figure 9). If your frame size changes, you’ll want to use the fitCalendarToFrame.jsx script, which does pretty much exactly what it says: The calendar stretches out to match the new frame size. Note that if you’ve adjusted rows or columns, those changes are lost—all the cells are of equal size after you use this script. Figure 7: CS3’s Cell Styles and Table Styles panels.

InDesign Calendar Page Examples


Cool Calendars

Building calendars will never be a snap, but with these tools you can change it from a painful, time consuming chore to one you can accomplish quickly. Whether you use a template or a script, you’ll no longer curse under your breath when a client needs a new calendar.


David Blatner is the Editorial Director of InDesign Magazine, the co-author of Real World InDesign CS3, and the co-host of indesignsecrets.com. More InDesign Tips and Tutorials. Get instant pricing on full color calendar printing from your InDesign file.


Order Calendars

RELATED MARKETING & DESIGN TIPS

Color Management 101 – Monitor Calibration

We demystify certain elements of color management and suggest helpful tools for monitor calibration and profiling for better printing accuracy

Read More >


What is EDDM

One of the best tools for reaching customers in a geographical area is Every Door Direct Mail, a cost-effective way to market locally.

Read More >


How to Design Print Materials for Foil Stamping Effects

We share the top best practices for designing for foil stamped or metallic printing effects to insure that you get the best printed piece possible

Read More >


Sustainable by Choice, Eco-Friendly by Design

Sensible sustainable printing alternatives are used in our state of the art eco-friendly printing facility in Montana to get you the greenest printing possible

Read More >


Printing Options

Learn about using full color commercial printing options to market your business

Read More >


Door Hanger Marketing and Door Hanger Design

Printed samples of door hangers showing different designs and uses for targeted local door to door personalized marketing

Read More >


Perfect Binding

Get Perfect Binding done on your high page count catalogs and booklets for added durability and class

Read More >


Color Printing Design Tips

Read More >


Point of Purchase Displays

These patented easy to erect custom point of purchase displays can complement your literature graphics and communicate your brand messaging better

Read More >


Fair and Square Binding

Get Square Back Binding on your catalogs and booklets for added usability and class

Read More >


Digital Printing vs Offset Printing

What are digital printing and offset printing? Knowing the difference between digital and offset printing can save costs in the long run.

Read More >


Magnetic Calendars and Schedules Printing

Need to print a custom magnetic calendar or schedule that actually sticks? At Printing for Less, we’ve got those covered. Talk to our printing experts today!

Read More >


Foil Business Cards

Add sleek eye catching flair to your business card! Custom foil accenting elevates your business card design to a whole new level. Learn more.

Read More >


UV Coating for Printing

Check out the advantages and benefits of UV coating.

Read More >


Complete Guide to Creating Press Ready Print Files

We put together everything you need to know about creating a successful commercial print ready file. Learn about bleed, color, image formats, folds, & more.

Read More >


Business Printing Shouldn’t be an Oversight

Your business cards, stationery, brochures, spec sheets and business printing in general, are integral to your new venture.

Read More >


Using Die Cutting on Postcards

Get unique die cut postcards that will cut through the clutter in the mailbox and get your message noticed

Read More >


Box Toppers Printing

Box toppers are a great way to share coupons, information, and new menu items with your customers. Print custom box toppers with Printing for Less.

Read More >


How to Create a Small Business Marketing Plan

Need help creating a small business marketing plan? We created a detailed step by step guide to get your marketing out into the world. Learn more!

Read More >


Printing Production Speed

How to get your printing order into your hands more quickly

Read More >


How to Edit PDFs in Adobe Illustrator

How to Edit PDFs in Adobe Illustrator

For years, editing PDFs was discouraged. There were too many things that could go wrong. Ideally, edits are made in the original application to avoid any compatibility issues and the potential nightmare of keeping track of changes between formats.

But improvements to the PDF format (thanks to Adobe Acrobat’s ever-increasing functionality) in recent years has meant much more flexibility in editing workflow.

So which Adobe programs can you use to edit a PDF? Because other Adobe Creative Cloud programs like Adobe Illustrator can also save as the PDF file format, it’s understandable that you’d assume that “any CC program goes” when it comes to editing PDFs.

But while Adobe Illustrator is the gold standard of vector graphics programs, and while it can handle both graphics and type, it’s not a dedicated PDF editing application.

Yes, if you have a native Illustrator file and you’ve simply generated a PDF from that source file and checked “Preserve Illustrator Editing Capabilities” when saving it, you’re pretty much safe making additional edits in Illustrator.

Much of the time, though, Acrobat is the way to go.

Making PDF Edits in Adobe Acrobat

If you’re going to edit a PDF in Adobe Acrobat, launch Adobe Acrobat Pro and then open the file you need to edit.

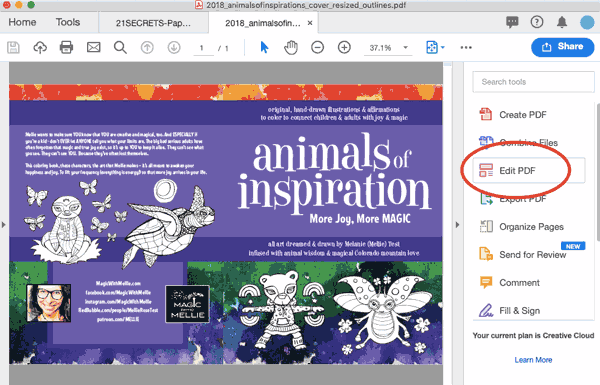
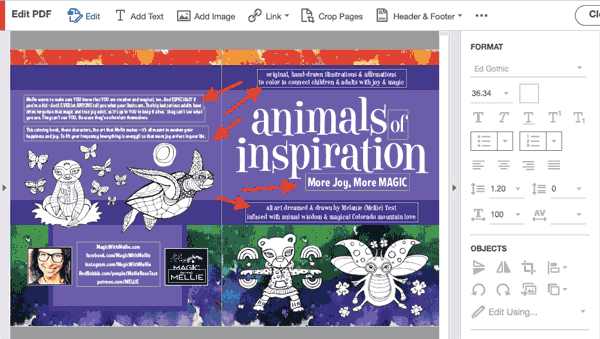
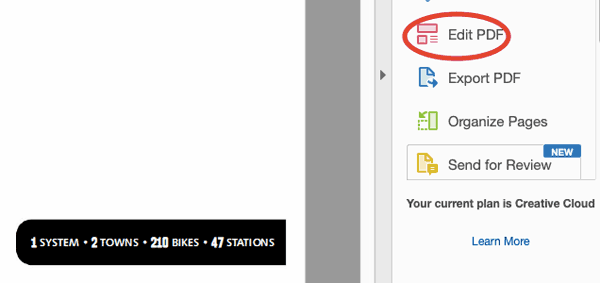
Once the PDF document you’d like to edit is open, you can either click “Edit PDF” in the right hand pane:

Editing a PDF in Adobe Acrobat

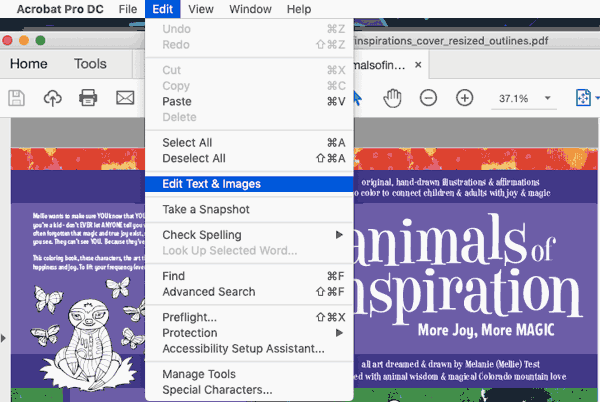
…or use the Edit menu to choose “Edit Text and Images” from the dropdown:

editing text in a PDF in Adobe Acrobat

Now, you’ll see that bounding boxes have appeared around any sections of editable text.

bounding boxes in Adobe Acrobat

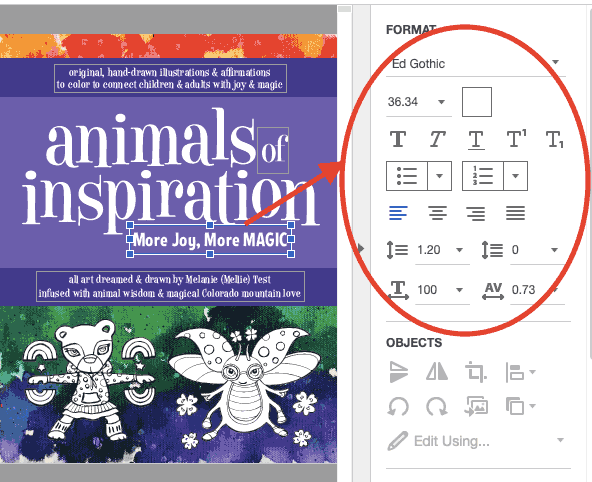
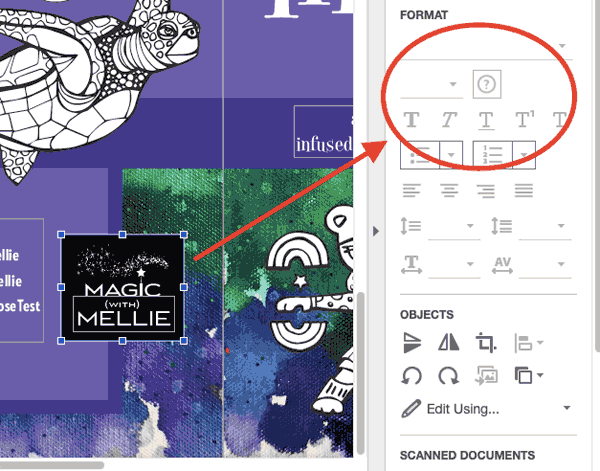
Once you select (click on or within) a bounding box, you’ll notice that the greyed-out text options are suddenly populated and active.

edit text options in Adobe Acrobat

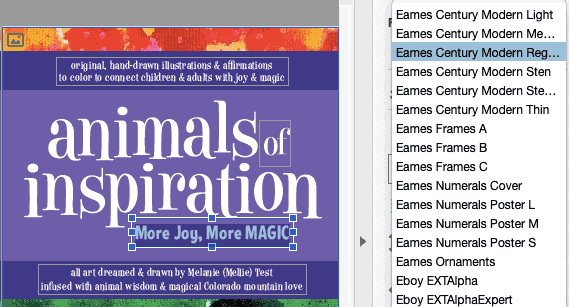
You can highlight the text you want to change and use the font dropdown to choose a new font.

adding a new font in Adobe Acrobat

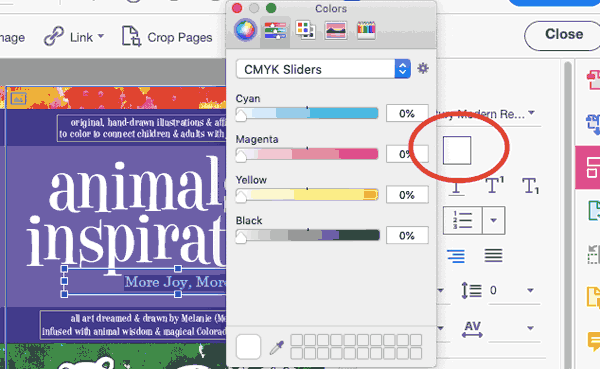
You can change the font size, the paragraph alignment, and the leading and line spacing. You can also change the color of the type by clicking the square next to the type size (which is in this case white because the text is white) and then moving the color sliders to get the new color you’ve chosen.

CMYK sliders in Adobe Acrobat

Adobe Acrobat Pro is a robust PDF editor and has numerous editing capabilities. That said, Acrobat hits a wall when it comes to editing vector and raster graphics. Acrobat alone isn’t the best choice if you want to edit images.

When your document images include vector artwork, Adobe Illustrator will be your best friend. You’re probably going to feel like you’re taking the long way around, but trust us. We’re going to give you the safest way to make spot changes and keep your document’s integrity intact.

How to Edit a PDF in Illustrator

What Adobe Acrobat can’t handle is complex graphic edits. The good news for us all is that, assuming you’re using the Adobe Creative Cloud, you’ll be able to make edits pretty seamlessly across the Adobe Cloud applications. Over the years, Acrobat has learned how to talk to Illustrator and Photoshop, and even when edits can’t be made directly in Adobe Acrobat Pro, the appropriate applications can be launched (and edits made) without ever closing your PDF file.

To get an idea of how seamless this process can be, first launch Adobe Acrobat Pro and then open a PDF that’s stored on your computer. Here, we’re opening a PDF cover spread for a coloring book. Once your document is open in Acrobat, click “Edit PDF” in the right hand panel.

edit a pdf

Now that the edit functions have been activated, click around your document to select items that you might want to edit. As you do this, start to compare the available editing options. Notice that with some elements, the editing features in the right hand editing panel remain greyed out and inactive.

greyed out editing tools in Adobe Acrobat

This is a case where, for vector graphics, Illustrator can come to your rescue.


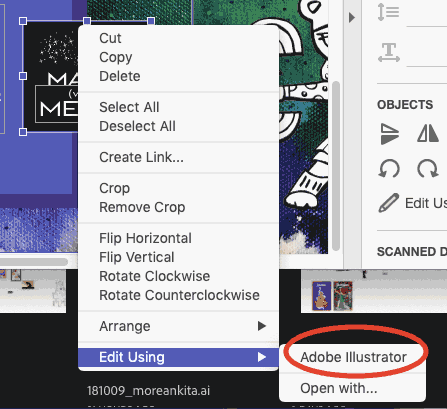
To edit any vector graphics in your PDF with the Illustrator program, first make sure a relevant graphic has been selected (click on the graphic to select it). Then, right-click on the graphic, or control-click on a Mac, go down to “Edit Using” and choose “Adobe Illustrator” from the flyout.

edit a PDF in Adobe Illustrator command

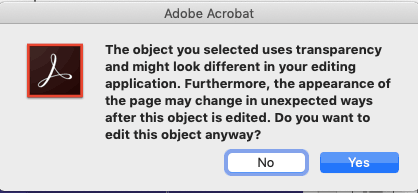
Note: you may see a warning dialog box. If you accept the risks, then go ahead and proceed. Please click “Yes.”

v

If Illustrator isn’t already open on your computer, it will now automatically begin to launch, and a document containing the graphic you’ve chosen to edit will open within the Illustrator interface. What has happened is that you’ve now extracted editable content from Adobe Acrobat.

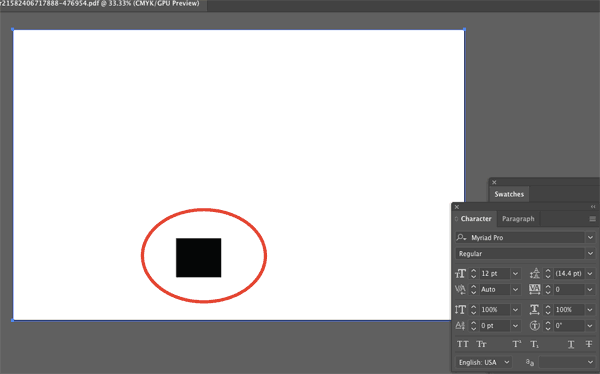
You’ll probably notice that the artboard looks huge — it’s taken on the dimensions of your Adobe Acrobat file, and your editable artwork has also carried over its same positioning within the larger artboard space.

large artboard in Adobe Illustrator

The size of this artboard is extremely important. Keeping these artboard dimensions will ensure that any edits you make in Illustrator will seamlessly be written back into your Acrobat file.

Don’t change the bounding box, either, if you want your positioning to stay intact within the original PDF. (Yes, there’s a lot going on here, but as long as you take the proper steps, your artwork and files — and all your hard work — will be safe.)

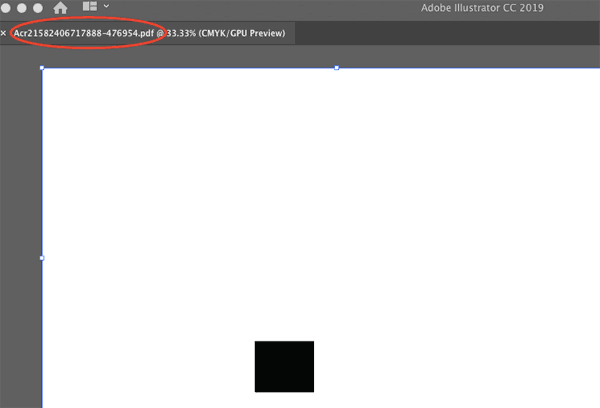
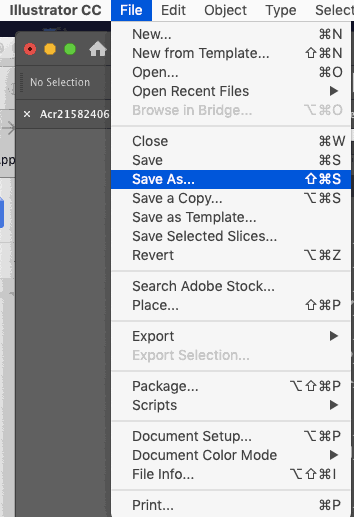
You also may notice that when Acrobat launched Illustrator, it created a new file with a crazy name made up of random letters and numbers. The file that has been generated and appears in Illustrator is is called a “touch up file,” and only exists in your computer’s memory. This means it’s not saved locally at the moment (but can be, of course, with the File –> Save As command).

weird name generated by Adobe Illustrator

From within Illustrator, go ahead and make your changes to this touch up file.


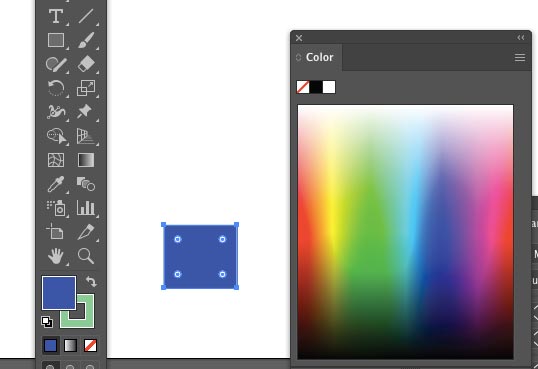
We’re going to change the color of this logo background box.

changing color in Adobe Illustrator

You may notice some odd behavior when you’re making your changes. Because we’re communicating back and forth between two programs, that’s totally normal — it just takes some getting used to.

When you’re done with your vector edits and ready to head back to Acrobat, you’ll go to File –> Save. Remember, you’re in the touch-up file, so you’re saving these changes right back into Acrobat, NOT onto your hard drive.

saving changes in Adobe Illustrator

Do note that if you think you might need your changes on their own for use in the future, you can also choose File –> Save As and create a standalone vector file, saved on your hard drive.

illustrator save as screenshot

For our current purposes, though, simply saving will immediately export your changes back into your Acrobat document without requiring any additional steps.


Here’s a summary of the steps if you need to harness Illustrator’s vector editing power:

  • Open your PDF file in Adobe Acrobat.
  • Choose “Edit PDF” from the right hand panel.
  • Select the vector artwork you’d like to change.
  • Right- (or control-) click and edit using Adobe Illustrator.
  • Make your changes to the graphic without changing anything else about the touch up document as launched.
  • Save your changes.
  • Confirm your changes in your open Acrobat document.

How to Edit PDF Text in Illustrator

If you’re going to edit text in a PDF, it’s usually best to stick with Adobe Acrobat. As we mentioned earlier, Adobe Illustrator is more dedicated to graphics (specifically, vector artwork).


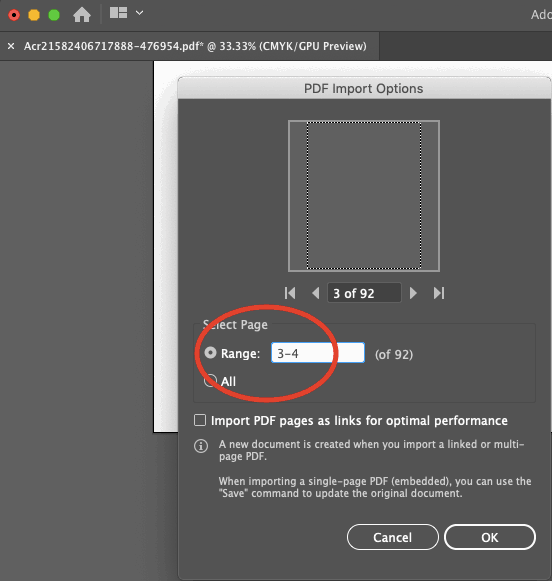
That said, if you’re going to open your PDF file in Illustrator to edit the text, you can go to File –> Open and select your PDF file. Then, if it’s a multi page PDF, you can choose the page range you’d like to open.

page range details in Adobe Illustrator

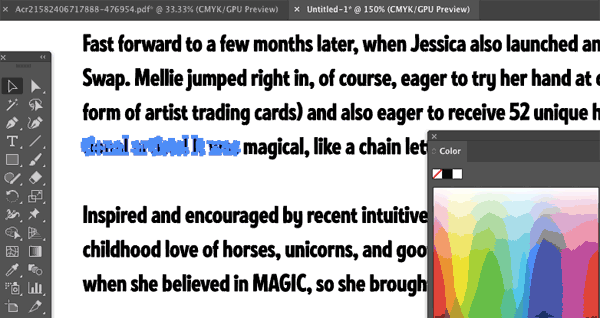
Once the pages are open, you can click on the text. On this particular document, you’ll see that the text isn’t editable, because it was converted to outlines in Illustrator before the PDF file was generated.

editing outline text in Adobe Illustrator

If this is the case and you still want to edit the text, you’ll need to have the original font on your computer and retype it.


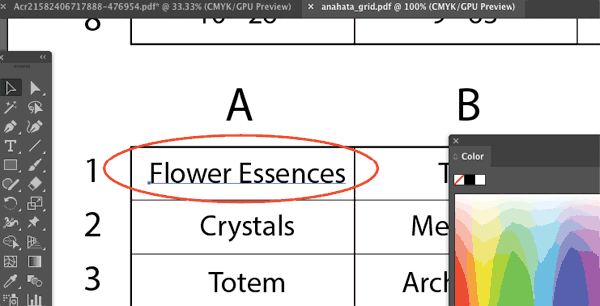
If your text is editable, though, you’ll see a line or a text box appear when the text is selected, instead of individual letter shapes.

edit text in adobe illustrator

In that case, make the text changes you need and then re-save the PDF file. Make sure it’s saving as a PDF and not an .AI file when you do this.

If you need help with getting your project ready for print, PrintingForLess can help! Learn more and place your order with Printing for Less here.


RELATED MARKETING & DESIGN TIPS

Embossed Business Cards

Embossed business cards make an impression that sets you apart from the crowd of mediocre competitors. Expert embossing design and technical assistance

Read More >


Recycle and Reuse: Repurposing Your Printed Material for Use on the Web

How to reuse your printed marketing materials for your website and other online content

Read More >


4 Color Process Printing

Explanation and description of how four color process printing works and how a color separation is made.

Read More >


How to Create a Small Business Marketing Plan

Need help creating a small business marketing plan? We created a detailed step by step guide to get your marketing out into the world. Learn more!

Read More >


Choosing a Printing Service for Your Project

Printing services types explained. Help with choosing the right printing service for your commercial printing needs

Read More >


Printing Product Descriptions

Read More >


Magnetic Calendars and Schedules Printing

Need to print a custom magnetic calendar or schedule that actually sticks? At Printing for Less, we’ve got those covered. Talk to our printing experts today!

Read More >


How to Choose the Best Paper for Your Printing Project

Paper choice is maybe the single most important decision you’ll make when it comes to creating a great printed piece.

Read More >


Envelope Sizes

Standard envelope sizes and uses for business, window, announcement, booklet, and custom envelopes. We also offer custom envelope printing!

Read More >


Preparing Photos for Print Projects

You’ll learn how to use resolution and sharpening to improve digital photos so that they look crisp and sharp in your printed projects

Read More >


Catalog and Booklet Printing Specifications and Formats

Read More >


Custom Printing Solutions

Understand the use of custom printing and finishing options to meeet your business needs

Read More >


Ordering Process

Read More >


Realities of Print: Can Paper Really Be Environmentally-Friendly?

Learn the truth about recycled paper and printing. It’s important to learn all the facts since there are many misconceptions out there

Read More >


Trade Printing 

Trade and reseller printing services and why you might want to use a trade printer for your commercial printing needs

Read More >


UV Coating for Printing

Check out the advantages and benefits of UV coating.

Read More >


Design Tips for Commercial Printing

Read More >


Image Resolution for Printing

The higher resolution, the sharper the image will be. PrintingForLess recommends resolution of 300 dpi (dots per inch) for crisp, clear results. Lower resolution images appear fuzzy, jagged and blurry.

Read More >


Help & FAQs

Need some help or have questions about your commercial printing? Our printing FAQ and help page helps make your prints perfect the first time.

Read More >


Print Folding

Read More >


Edit PDFs in Adobe Illustrator

Edit PDFs in Adobe Illustrator

For years, editing PDFs was discouraged. There were too many things that could go wrong. Ideally, edits are made in the original application to avoid any compatibility issues and the potential nightmare of keeping track of changes between formats.


But improvements to the PDF format (thanks to Adobe Acrobat’s ever-increasing functionality) in recent years has meant much more flexibility in editing workflow.

So which Adobe programs can you use to edit a PDF? Because other Adobe Creative Cloud programs like Adobe Illustrator can also save as the PDF file format, it’s understandable that you’d assume that “any CC program goes” when it comes to editing PDFs.

But while Adobe Illustrator is the gold standard of vector graphics programs, and while it can handle both graphics and type, it’s not a dedicated PDF editing application.

Yes, if you have a native Illustrator file and you’ve simply generated a PDF from that source file and checked “Preserve Illustrator Editing Capabilities” when saving it, you’re pretty much safe making additional edits in Illustrator.

Much of the time, though, Acrobat is the way to go.

Making PDF Edits in Adobe Acrobat

If you’re going to edit a PDF in Adobe Acrobat, launch Adobe Acrobat Pro and then open the file you need to edit.

Once the PDF document you’d like to edit is open, you can either click “Edit PDF” in the right hand pane:

Editing a PDF in Adobe Acrobat

…or use the Edit menu to choose “Edit Text and Images” from the dropdown:

editing text in a PDF in Adobe Acrobat

Now, you’ll see that bounding boxes have appeared around any sections of editable text.

bounding boxes in Adobe Acrobat

Once you select (click on or within) a bounding box, you’ll notice that the greyed-out text options are suddenly populated and active.

edit text options in Adobe Acrobat

You can highlight the text you want to change and use the font dropdown to choose a new font.

adding a new font in Adobe Acrobat

You can change the font size, the paragraph alignment, and the leading and line spacing. You can also change the color of the type by clicking the square next to the type size (which is in this case white because the text is white) and then moving the color sliders to get the new color you’ve chosen.

CMYK sliders in Adobe Acrobat

Adobe Acrobat Pro is a robust PDF editor and has numerous editing capabilities. That said, Acrobat hits a wall when it comes to editing vector and raster graphics. Acrobat alone isn’t the best choice if you want to edit images.

When your document images include vector artwork, Adobe Illustrator will be your best friend. You’re probably going to feel like you’re taking the long way around, but trust us. We’re going to give you the safest way to make spot changes and keep your document’s integrity intact.

How to Edit a PDF in Illustrator

What Adobe Acrobat can’t handle is complex graphic edits. The good news for us all is that, assuming you’re using the Adobe Creative Cloud, you’ll be able to make edits pretty seamlessly across the Adobe Cloud applications. Over the years, Acrobat has learned how to talk to Illustrator and Photoshop, and even when edits can’t be made directly in Adobe Acrobat Pro, the appropriate applications can be launched (and edits made) without ever closing your PDF file.

To get an idea of how seamless this process can be, first launch Adobe Acrobat Pro and then open a PDF that’s stored on your computer. Here, we’re opening a PDF cover spread for a coloring book. Once your document is open in Acrobat, click “Edit PDF” in the right hand panel.

edit a pdf

Now that the edit functions have been activated, click around your document to select items that you might want to edit. As you do this, start to compare the available editing options. Notice that with some elements, the editing features in the right hand editing panel remain greyed out and inactive.

greyed out editing tools in Adobe Acrobat

This is a case where, for vector graphics, Illustrator can come to your rescue.

To edit any vector graphics in your PDF with the Illustrator program, first make sure a relevant graphic has been selected (click on the graphic to select it). Then, right-click on the graphic, or control-click on a Mac, go down to “Edit Using” and choose “Adobe Illustrator” from the flyout.

edit a PDF in Adobe Illustrator command

Note: you may see a warning dialog box. If you accept the risks, then go ahead and proceed. Please click “Yes.”

v

If Illustrator isn’t already open on your computer, it will now automatically begin to launch, and a document containing the graphic you’ve chosen to edit will open within the Illustrator interface. What has happened is that you’ve now extracted editable content from Adobe Acrobat.

You’ll probably notice that the artboard looks huge — it’s taken on the dimensions of your Adobe Acrobat file, and your editable artwork has also carried over its same positioning within the larger artboard space.

large artboard in Adobe Illustrator

The size of this artboard is extremely important. Keeping these artboard dimensions will ensure that any edits you make in Illustrator will seamlessly be written back into your Acrobat file.

Don’t change the bounding box, either, if you want your positioning to stay intact within the original PDF. (Yes, there’s a lot going on here, but as long as you take the proper steps, your artwork and files — and all your hard work — will be safe.)

You also may notice that when Acrobat launched Illustrator, it created a new file with a crazy name made up of random letters and numbers. The file that has been generated and appears in Illustrator is is called a “touch up file,” and only exists in your computer’s memory. This means it’s not saved locally at the moment (but can be, of course, with the File –> Save As command).

weird name generated by Adobe Illustrator

From within Illustrator, go ahead and make your changes to this touch up file.

We’re going to change the color of this logo background box.

changing color in Adobe Illustrator

You may notice some odd behavior when you’re making your changes. Because we’re communicating back and forth between two programs, that’s totally normal — it just takes some getting used to.

When you’re done with your vector edits and ready to head back to Acrobat, you’ll go to File –> Save. Remember, you’re in the touch-up file, so you’re saving these changes right back into Acrobat, NOT onto your hard drive.

saving changes in Adobe Illustrator

Do note that if you think you might need your changes on their own for use in the future, you can also choose File –> Save As and create a standalone vector file, saved on your hard drive.

illustrator save as screenshot

For our current purposes, though, simply saving will immediately export your changes back into your Acrobat document without requiring any additional steps.

Here’s a summary of the steps if you need to harness Illustrator’s vector editing power:

  • Open your PDF file in Adobe Acrobat.
  • Choose “Edit PDF” from the right hand panel.
  • Select the vector artwork you’d like to change.
  • Right- (or control-) click and edit using Adobe Illustrator.
  • Make your changes to the graphic without changing anything else about the touch up document as launched.
  • Save your changes.
  • Confirm your changes in your open Acrobat document.

How to Edit PDF Text in Illustrator

If you’re going to edit text in a PDF, it’s usually best to stick with Adobe Acrobat. As we mentioned earlier, Adobe Illustrator is more dedicated to graphics (specifically, vector artwork).

That said, if you’re going to open your PDF file in Illustrator to edit the text, you can go to File –> Open and select your PDF file. Then, if it’s a multi page PDF, you can choose the page range you’d like to open.

page range details in Adobe Illustrator

Once the pages are open, you can click on the text. On this particular document, you’ll see that the text isn’t editable, because it was converted to outlines in Illustrator before the PDF file was generated.

editing outline text in Adobe Illustrator

If this is the case and you still want to edit the text, you’ll need to have the original font on your computer and retype it.

If your text is editable, though, you’ll see a line or a text box appear when the text is selected, instead of individual letter shapes.

edit text in adobe illustrator

In that case, make the text changes you need and then re-save the PDF file. Make sure it’s saving as a PDF and not an .AI file when you do this.

If you need help with getting your project ready for print, PrintingForLess can help! Learn more and place your order with Printing for Less here.

Need creative or technical advice on working with your PDF?
Call our helpful experts now at 800-930-6040
 
 
RELATED MARKETING & DESIGN TIPS

Repurposing Your Website for Print Marketing

Make your website content work for you and Learn how to effective repurpose your existing website content into you print marketing strategy. Learn more.

Read More >


Help & FAQs

Need some help or have questions about your commercial printing? Our printing FAQ and help page helps make your prints perfect the first time.

Read More >


Custom Bookmark Printing Samples

Custom bookmark printing samples printed with full color showing design ideas, standard book mark sizes and designs. See samples of 2×6 bookmarks and more.

Read More >


Begin with Finishing

Step by step tutorial on folding and finishing layouts in Adobe Indesign.

Read More >


Trade Printing 

Trade and reseller printing services and why you might want to use a trade printer for your commercial printing needs

Read More >


Roll Labels

Roll Labels and stickers printed to your specifications. Durable, high-quality full color label printing with many standard and custom options available. Use your design or have us design them for you. Printed right and delivered on time, guaranteed

Read More >


How Custom Printing can Turbo-charge your Business

Using custom printing to turbo-charge your business marketing and stand out from your competitors

Read More >


Somewhere Over the CMYK Rainbow

Using PMS Pantone colors, metallic inks, varnishes and custom paper with your InDesign project

Read More >


UV Coating for Printing

Check out the advantages and benefits of UV coating.

Read More >


Color Printing Design Tips

Read More >


Choosing the Best PDF Preset in InDesign

Choose the best Adobe InDesign PDF presets for printing. This guide covers ‘high quality print’, PDF/X-1a, PDF/X-4 presets, and custom Adobe PDF presets.

Read More >


The Scenery From Here

Read More >


Corporate Printing Solutions

Corporate printing solutions. Give more brand control and increased productivity. We also have tips on the benefits of choosing a web to print service!

Read More >


Gate Fold Brochure Design Review

Read More >


Perfect Binding

Get Perfect Binding done on your high page count catalogs and booklets for added durability and class

Read More >


Business Cards with Pantone Inks and Spot UV

Get Pantone spot color and spot UV printing on your business cards to stand out from your competitors

Read More >


Color in Process Printing

Choosing between CMYK or RBG for print? Learn which you should use for printing and how the color quality of printed materials are affected by RBG and CMYK.

Read More >


Direct Mail Service Options

Direct mail services have so many options that it can get confusing. We put everything you need to know about direct mail marketing in one place! Learn more.

Read More >


Sustainable by Choice, Eco-Friendly by Design

Sensible sustainable printing alternatives are used in our state of the art eco-friendly printing facility in Montana to get you the greenest printing possible

Read More >


Grow Your Small Business with Direct Mail

Think you don’t need mail if you market digitally? Direct mail now outperforms digital marketing by a staggering 600%.

Read More >


4 Color Process Printing

How 4 Color Process Printing (CMYK) Works


CMYK Process Printing Features

  • It uses the same 4 standardized base colors all the time (cyan, magenta, yellow and black)
  • Small dots of these colors are printed at different angles to create the printed image
  • The most widely used and cost effective color system in commercial printing
  • It’s significantly cheaper than toner based or digital printing for larger quantity runs
The use of color in print increases readership and information retention.
Studies in a major publication revealed that the use of color increased readership by 40% or more. A university study showed a 65% increase in the retention of material when full color was used instead of black and white. See more research about why color matters in marketing.
 
Also see Color in the Printing Process for more information on the use of four color process in commercial printing.
RELATED MARKETING & DESIGN TIPS

Preparing Photos for Print Projects

You’ll learn how to use resolution and sharpening to improve digital photos so that they look crisp and sharp in your printed projects

Read More >


Half Fold 11×17 Brochure Design Review

Read More >


How-To Make Environmentally-Friendly Printing Decisions

Environmentally responsible and sustainable printing practices and how to evaluate a printing company for eco-friendliness

Read More >


InTime: Play that Funky Master Page

Read More >


Business Card Design Do’s and Don’ts

Create a better and more succesful Business Card with these Design Do’s and Don’ts

Read More >


Magnetic Calendars and Schedules Printing

Need to print a custom magnetic calendar or schedule that actually sticks? At Printing for Less, we’ve got those covered. Talk to our printing experts today!

Read More >


Packaging: Box Dimension Guidelines

How to determine and specify the length, width and height for a folding box for product packaging design

Read More >


The Advantages of Self-Mailers in Direct Mail Campaigns

Learn about self-mailers as an effective but often overlooked element of a successful multi-channel marketing campaign.

Read More >


Brochure Design Tips for Business

Brochure design tips to help you choose the right paper, paper size, and coating for your brochure. Learn how to take your brochure design to the next level.

Read More >


Templates

Download free printing templates for business cards, presentation folders, door hangers, notepads, table tents, hang tags and other printing products.

Read More >


Design Tips for Commercial Printing

Read More >


Horizontal Small Catalog Design

Need help designing a small horizontal catalog (8.5 x 5.5)? This guide walks you through our process of creating a unique design and execution! Learn more.

Read More >


Hot Foil Stamping – Make Your Printing Pop

Foil stamping, hot stamping or hot foil stamping is the application of pigmented or metallic foil to paper using pressure and a heated die.

Read More >


Color in Process Printing

Choosing between CMYK or RBG for print? Learn which you should use for printing and how the color quality of printed materials are affected by RBG and CMYK.

Read More >


Custom Notepads Printing Services

Custom full color personalized notepad and memo pad printing in a variety of sizes and options. Award winning live expert assistance

Read More >


Business Card Size Specifications

See standard business card dimensions, layout specifications, and guidelines for printing business cards and folded business cards for commercial printing.

Read More >


Newsletter Design Idea Example

Read More >


Custom Size Catalog Printing

Get catalogs printed in custom sizes and shapes to make them more functional and memorable

Read More >


Low-cost graphic design programs

Guide to free and low-cost design programs for designing quality marketing materials for print or website use

Read More >


Personalized Coasters

Get custom personalized coasters for a practical way to share your branding or event. Lots of custom options, quick turnaround and great pricing

Read More >


Graphic Design Layout Specifications for Printing

Graphic Design Layout Specifications for Printing

Bleed

Bleed is the amount of printed information which extends beyond the finished size of your piece.

  • Bleed allows us to print your piece slightly oversized and cut it down to its exact size. This gives a final seamless appearance of the image “bleeding” off the edges.
  • We recommend that you build your file with bleed dimensions of an extra 1/8 inch (.125″) on each side. This increases the total width and height of your document by 1/4 inch (.25″). For example, a 3.5 x 2″ business card is designed as a 3.75 x 2.25″ file.
  • We are happy to provide templates for your use that include bleed dimensions.
  • If you do not design your piece with bleeds, we are happy to add bleed free of charge!

graphic layout bleeds

Safe Design Zone

The safe design zone is the 1/8 inch (.125″) area surrounding the inside trim edge of your piece.

  • Keeping your critical content-text, images, graphics-within the safe design zone ensures that nothing will be positioned too close to the edge, where it could be impacted by trimming variances of up to 1/32 inch. In the 3.5 x 2″ business card example, all important content should be positioned within the interior 3.25 x 1.75″.
  • The safe design zone decreases to 1/16 inch (.0625″) for envelopes, and increases to 3/16 inch (.1875″) for catalogs with more than 36 pages.
  • Borders around the outside edge should be at least 1/8 inch (.125″) wide to avoid any visual variance after trimming.
Panel Dimensions

The best way to understand panel dimensions is to make a quick mock-up of your folded piece. The panel dimensions are listed from narrowest to widest. Once you have a folded mock-up, write the dimensions on the appropriate panels, both front and back. Then translate your page and panel information into your design layout.

  • Dimensions are provided at bleed size/at trim size
  • We are happy to provide templates for your use that include fold line indicators.
Tri Fold
8.5 x 11 3.6347 3.6667 3.6987
8.5 x 14 4.6347 4.6667 4.6987
11 x 17 5.6347 5.6667 5.6987
Closed Gate Fold
8.5 x 11 2.735 2.75 2.765 2.75
8.5 x 14 3.485 3.55 3.515 3.5
11 x 17 4.235 4.25 4.265 4.25
Z Fold
8.5 x 11 3.67 3.67 3.67
8.5 x 14 4.67 4.67 4.67
11 x 17 5.67 5.67 5.67
4-Panel Barrel Roll
8.5 x 11 2.69 2.73 2.77 2.81
8.5 x 14 3.44 3.48 3.52 3.56
11 x 17 4.19 4.23 4.27 4.31
4-Panel Fold / Double Parallel
8.5 x 11 2.75 2.75 2.75 2.75
8.5 x 14 3.50 3.50 3.50 3.50
11 x 17 4.25 4.25 4.25 4.25
Accordion Fold / M Fold
8.5 x 11 2.75 2.75 2.75 2.75
8.5 x 14 3.50 3.50 3.50 3.50
11 x 17 4.25 4.25 4.25 4.25
 
Size Specifications and Layout Information
Business Card Size Specifications
CD Cover Size Specifications
Newsletter Templates
Rounded Corner Business Card Templates
Brochure Templates for Design and Layout
Envelope Printing Information
Door Hanger Design and Layout Instructions
Presentation Folder Design and Layout Instructions
Presentation Folder and Pocket Folder Templates
Brochure Holder Layout Instructions
Rack Card Holder Layout Instructions
Calendar Printing Specifications
File Folder Design
US Mail Layout Guides for Commercial Printing
Hang Tag Templates with Design and Layout Instructions
Table Tent Templates and Design with Layout Instructions
InDesign Brochure Templates for Design and Layout
Post-it® Notes Templates with Design and Layout Instructions
Carbonless NCR Form Layout and Design Templates and Instructions
Folded Business Card Templates with Design and Layout Instructions
Coil Bound Booklet and Manual Templates with Design and Layout Instructions
Church Offering and Remittance Envelopes with Design and Layout Instructions
 
Graphic Design and Layout Template Files
 
Creative Resources for Designers

Visit our Graphic Design Center for tips and articles on design, digital photography, Adobe Acrobat, Adobe Illustrator Adobe InDesign, Adobe Photoshop, Microsoft Publisher, and QuarkXPress.

Other Resources:

visit creativepro

Creativepro.com is a comprehensive online resource for creative professionals working in graphic arts and printing on the Web. The site provides news, reviews, how-to features, and analysis from experts in the fields of publishing, digital imaging, and creative workflow. Creativepro.com also includes essential resources and services to help creative pros get the job done—from one-click stock photography and font searches to book and software purchases to on-line print ordering. Creativepro.com is also the publisher of InDesign Magazine, the only publication devoted entirely to Adobe InDesign.
RELATED MARKETING & DESIGN TIPS

Box Toppers Printing

Box toppers are a great way to share coupons, information, and new menu items with your customers. Print custom box toppers with Printing for Less.

Read More >


Creating a Successful Catalog Design

Read More >


Spot UV Printing

Get exceptional Spot UV printing for your marketing materials. Numerous Spot UV coating options can enhance your printed piece and really get you noticed

Read More >


InTime: Play that Funky Master Page

Read More >


Our Partners

Add value to your customers by partnering with the leader in online commercial printing.

Read More >


Brochure Design Analysis

Read More >


Saddle Stitch Binding

What you need to know to get saddle stitching binding done on your printed catalogs and booklets

Read More >


Choosing a Printing Service for Your Project

Printing services types explained. Help with choosing the right printing service for your commercial printing needs

Read More >


Which Paper to Use

Design and technical tips for how to choose paper for printing of business cards, booklets, brochures, greeting cards, and more. See all paper options here.

Read More >


Image Resolution for Printing

The higher resolution, the sharper the image will be. PrintingForLess recommends resolution of 300 dpi (dots per inch) for crisp, clear results. Lower resolution images appear fuzzy, jagged and blurry.

Read More >


Paper Folding

Proper paper folds in print marketing can drive an effective piece. Learn more about paper folding patterns and options at Printing for Less.

Read More >


Design Postcards in InDesign to Connect

Read More >


Using Die Cutting on Brochures

Get unique die cut brochures printed that will cut through the clutter in the mailbox and get your message noticed.

Read More >


Brochure Design Tips for Business

Brochure design tips to help you choose the right paper, paper size, and coating for your brochure. Learn how to take your brochure design to the next level.

Read More >


Roll Labels

Roll Labels and stickers printed to your specifications. Durable, high-quality full color label printing with many standard and custom options available. Use your design or have us design them for you. Printed right and delivered on time, guaranteed

Read More >


How to Choose the Best Paper for Your Printing Project

Paper choice is maybe the single most important decision you’ll make when it comes to creating a great printed piece.

Read More >


Preparing Photos for Print Projects

You’ll learn how to use resolution and sharpening to improve digital photos so that they look crisp and sharp in your printed projects

Read More >


Three Reasons to Print South of the Border

Read More >


Hot Foil Stamping – Make Your Printing Pop

Foil stamping, hot stamping or hot foil stamping is the application of pigmented or metallic foil to paper using pressure and a heated die.

Read More >


Large 3 Panel Brochure Design Review

Read More >


Digital Printing vs Offset Printing

Digital Printing vs Offset Printing Explained

What’s the REAL difference, and does it matter?

So, what’s the distinction between digital and offset printing? Printing is printing, right? Not exactly… Let’s take a look at these two printing methods, their differences, and where it makes sense to choose one or the other for your next print project.


What is Offset Printing?

Offset printing technology uses plates, usually made from aluminum, which are used to transfer an image onto a rubber “blanket”, and then rolling that image onto a sheet of paper. It’s called offset because the ink is not transferred directly onto the paper. Because offset presses run so efficiently once they are set up, offset printing is the best choice when larger quantities are needed, and provides accurate color reproduction, and crisp, clean professional looking printing.

What is Digital Printing?

Digital printing doesn’t use plates the way offset does, but instead uses options such as toner (like in laser printers) or larger printers that do use liquid ink. Digital printing shines when lower quantities are needed; think of a run of 20 greeting cards or 100 flyers. Another benefit of digital printing is it’s variable data capability. When each piece needs a unique code, name or address, digital is the only way to go. Offset printing cannot accommodate this need. Learn more about digital printing options and capabilities.

While offset printing is a fantastic way to produce great-looking print projects, many businesses or individuals do not need large runs of 500 or more, and the best solution is digital printing.

What are the Advantages of Digital Printing:

  • Setup costs are lower for short runs
  • Print only the amount you need, when you need it
  • Lower minimum quantities (as low as 1, 20 or 50 pieces)
  • Inexpensive black and white digital printing
  • Variable data capability (names, addresses, codes or numbering can be done easily)
  • Improved technology has made digital quality acceptable for more uses

What are the Advantages of Offset Printing:

  • Large quantities can be printed cost effectively
  • The more you print, the cheaper the price per piece
  • A large variety of paper types with custom finishes can be used
  • Special custom inks such as metallic and Pantone colors are available
  • Highest possible printing quality, with greater detail and color fidelity
Is Digital Printing the right fit for my next print project?

Offset and digital are both useful printing methods. Each have particular benefits depending on your project’s requirements. When you need larger runs of a project, into the hundreds or thousands, or are using a specific, brand-centric Pantone color, offset printing is the only way to go. You can also use a much wider variety of custom papers and specialty inks, such as metallic or fluorescent inks in the offset process.

If a small run of less than 100 or the need for individual addresses or information is required, digital is your solution. The best part is that as a business, your needs can be met with either of these choices, and the high-level of quality means you get a printed product that will make you look great!

Digital Press
Digital Press

Offset Press
Offset Press


To get started on your next digital printing project, talk to a helpful expert now a 800-930-6040.

RELATED MARKETING & DESIGN TIPS

Choosing A Printing Company: A Partnership For Your Success

What to look for when choosing a printing company for your business marketing materials, espcially an online one.

Read More >


Printing Metallic Ink on Business Cards

Add a little flash to your business card with metallic ink! Printing for Less offers metallic printing for your business card to get you noticed! Learn more.

Read More >


How to Choose the Best Paper for Your Printing Project

Paper choice is maybe the single most important decision you’ll make when it comes to creating a great printed piece.

Read More >


Low-cost graphic design programs

Guide to free and low-cost design programs for designing quality marketing materials for print or website use

Read More >


How To Make A Super Brochure Or Mailing Piece

Read More >


SmartFlex® Synthetic Printing

Waterproof and tear-resistant synthetic paper that feels like real paper and is recyclable, great for menus, brochures, maps, labels, packaging and more

Read More >


The Advantages of Self-Mailers in Direct Mail Campaigns

Learn about self-mailers as an effective but often overlooked element of a successful multi-channel marketing campaign.

Read More >


Print Folding

Read More >


Knowledge Center: Graphic Design

Read More >


Using Die Cutting on Postcards

Get unique die cut postcards that will cut through the clutter in the mailbox and get your message noticed

Read More >


Personalized Coasters

Get custom personalized coasters for a practical way to share your branding or event. Lots of custom options, quick turnaround and great pricing

Read More >


Realities of Print: Can Paper Really Be Environmentally-Friendly?

Learn the truth about recycled paper and printing. It’s important to learn all the facts since there are many misconceptions out there

Read More >


Fair and Square Binding

Get Square Back Binding on your catalogs and booklets for added usability and class

Read More >


Graphic Design Layout Specifications for Printing

Read More >


Brochure Marketing – A Vital Component for Your Business

Read More >


Green Printing Recycled Paper

Printing for Less offers a variety of recycled papers on all of our products. We’re also always happy to accommodate requests for 100% recycled printing paper.

Read More >


Sequential Numbering Printing

Get sequential numbering printing on carbonless NCR forms, tickets, purchase orders and other items with numerous options

Read More >


Custom Size Catalog Printing

Get catalogs printed in custom sizes and shapes to make them more functional and memorable

Read More >


Saving PDF Files in Photoshop and Illustrator

Learn how to save PDF files in Adobe Photoshop and Adobe Illustrator by exporting your work as a PDF file, as well as the benefits of saving files as PDFs.

Read More >


How to Design Print Materials for Foil Stamping Effects

We share the top best practices for designing for foil stamped or metallic printing effects to insure that you get the best printed piece possible

Read More >


  • Go to page 1
  • Go to page 2
  • Go to page 3
  • Interim pages omitted …
  • Go to page 7
  • Go to Next Page »

Footer

Printing for Less

info@printingforless.com
100 P F L Way, Livingston, MT 59047

800-924-2041

  • Facebook
  • Instagram
  • LinkedIn
  • Pinterest
  • Twitter
  • YouTube
  • Home
  • Products
  • Industries
  • Services
  • Get Samples
  • Resources
  • Guides
  • Templates
  • Blog
  • Terms & Conditions
  • Contact
  • About
  • Why Printing for Less?
  • Our Team
  • Careers
  • Login

Copyright © 1998-2023 PrintingforLess.com. All Rights Reserved.

logo
  • 866-501-7488
  • Products
  • Industries
  • Services
  • Resources
  • Get Samples
  • Get a Quote
  • About
  • Contact Us
  • My Login