• Skip to primary navigation
  • Skip to main content
  • Skip to footer
Printing for Less

Printing for Less

At Printing for Less, we've offered high quality online printing services since 1996. Shop business cards, booklets, stickers, and more!

P F L.com
My LoginMy Login
800-930-2423
  • Printing
    • Postcards
    • Catalogs
    • Brochures
    • Folders
    • Letters
    • Newsletters
    • Envelopes
    • Greeting Cards
    • Print Templates
    • All Products
  • Direct Mail
    • Why Direct Mail Marketing?
    • Every Door Direct Mail® Postcards
    • Direct Mail Letters
    • Catalogs & Booklets
    • Marketing Gifts & Kits
    • Direct Mail Automation
  • Services
    • Mailing Services
    • Design Services
    • Custom Printing Services
    • Reseller Program
  • Industries
    • Advertising & Design
    • Enterprise
    • Food & Beverage
    • Healthcare Payers
    • Healthcare Providers
    • Nonprofit
    • Real Estate
    • Retail
    • Technology
    • University
  • Resources
    • Direct Mail Marketing
      Resource Center
    • Printing Resource Center
    • Blogs
    • Templates
    • Video Library
    • Have a Question?
  • Get Samples
  • Get a Quote

Printing Options

Custom Notepads Printing Services

Custom Notepads Printing Services

Get Help With Notepad Printing, Marketing and Design:

Create professional-quality personalized notepads using your company logo or photos. Custom note pads can be ordered in any size and have a variety of options. Our knowledgeable team can help you find the right solution for your custom notepad printing project. To get started, give our helpful experts a call at 800-930-2423 or check prices on our standards sizes below.


Get Notepad Pricing and Ordering

Notepad Samples

Personalized Notepads

A personalized notepad is a great little advertising device. Take a look at what you have on your desk. Aside from the obvious computer, stacks of paper, maybe a mug of coffee and a few pens, odds are you have a notepad, memo pad or scratch pad. And it is probably from someone else’s company. Each day you look at it, use it for a list of the day’s events, jot down notes, stats or figures, you are reminded of that company’s name and logo. It is like a small, practical billboard on your desk.

Everyone appreciates a small, useful pad of paper. Your company name and logo gets attention every time it’s used and one of those notes is passed along. “The business notepad is referred to almost daily, kept for 30 days or so and carries a high remembrance factor,” says Elliott Black, a Northbrook, Ill., marketing consultant who specializes in small business marketing.

Keep the Design Simple

The key to printing custom notepads is restraint. Make them stand out but keep them simple. Provide your company name and logo at the top, phone number, address and website underneath; that’s it. Notepads are a great prompt or reminder of YOUR company, and possibly just enough to stop a fickle customer from forgetting you, even for a moment. Don’t clutter it up, or use up too much of that useful space with catch phrases, designs and borders. It is, after all, a notepad — but that prime real estate at the top is for your business information. See some note pad designs and memo pad design examples.

Layout Options

Laying out and printing a notepad or memo pad is very straightforward. Decide on an attractive size, how many pages per pad the total number of pads you want, how much space at the top of the page your information will cover, whether to use color or black ink only, and the type of writing paper.

Common notepad sizes are 4.25″ x 5.5″, 4 x 6″, 3.5″ x 8.5″, 5 x 7″, 5.5 x 8.5″ and up to 8.5 x 11″. Pages per pad range from 25 to 100 or more, and some like to add distinctive details such as rounded corners. Choose easy-to-read fonts that are “sans serif,” such as Impact, Arial, Myriad or Verdana, and use white paper — it is usually more cost effective, and shows off any kind of pen, pencil or marker.

Visit our Post-it® Notes page for custom printed Post-it® Note Pads.

Part of a Total Branding Package

Notepads can be a stand-alone free perk for your clients, or part of a total branding package. This will likely include your business card, brochure, catalog and folder, and other marketing collateral. And many times, the only thing that doesn’t go into the trash are the business card and – you guessed it – the notepad. Custom notepads or scratch pads are a functional giveaway your clients will use on a daily basis, and the benefit is the reminder it provides for them to keep you in mind each time their pen hits the paper.

Get Instant Pricing on Notepads

Get 20% Off

Subscribe to our weekly newsletter and get an instant 20% off your first print project.

Name(Required)
This field is for validation purposes and should be left unchanged.

RELATED MARKETING & DESIGN TIPS

Mailing

Direct mail marketing is still a powerful marketing tool! Get Direct mail marketing tips and resources and take full advantage of your campaign. Learn more.

Read More >


Corporate Printing Solutions

Find a fast, cost-effective solution for your corporate printing needs by partnering with Printing for Less. Plus, save time and money with web to print!

Read More >


Leveraging Direct Mail Throughout the Customer Lifecycle

Direct mail can serve as a powerful tool across every stage of the customer lifecycle. With our exclusive guide, you’ll access 13 turnkey strategies that seamlessly integrate direct mail with your digital campaigns, helping you drive more revenue and enhance…

Read More >


Folding Options for Menus

Folding Options for Menus

folded printed menu
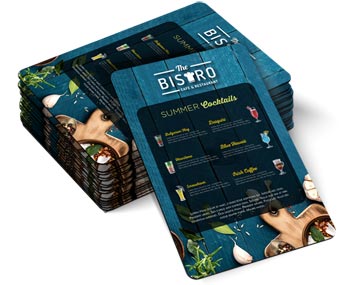
How you’ll fold a menu is an important decision. A fold affects both the aesthetics and function of the menu. It determines which dishes and beverages your customer sees first and affects the size of your menu. Folds can decrease the finished size of your menu without reducing the space for your message.

Standard folds include: single sheet, half-fold and tri-fold. In addition to standard folds, we can customize a fold to fit your menu design. Call our helpful experts to discuss the right fold for your project, 800-930-6040


Menu Panels:

Front Cover

Should be vibrant and easy to read. May include your company name and logo.

Inside Panels

Detailed information about your dishes including a description, price and possibly photo.

Back Cover

May be a continuation of your menu or an advertisement for your company’s products, services or locations.

Single Sheet

A single sheet menu does not have a fold. It is a two page, front and back menu. The top half of the front page is most often seen by your customer. Place cocktails and appetizers on the top half of the menu to increase sales.

Our standard single sheet sizes are:

  • 4.25″ x 11″
  • 5.5″ x 15″
  • 8.5″ x 11″
  • 8.5″ x 14″
  • 11″ x 17″
  • 11″ x 25.5″
 

Half Fold

half fold menu
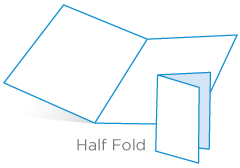
A half-fold is a single sheet menu folded in half. The half-fold is constructed by folding a sheet of paper to create 2 panels on each side of the paper.

Our standard half fold sizes are:

  • 8.5″ x 11″ folded to 5.5″ x 8.5″
  • 11″ x 17″ folded to 8.5″ x 11″

Recommended Applications:

Use the front cover of your restaurant menu for your company logo, address and name. With a half-fold, you still have two interior pages to display the bulk of your menu. The back page can be a continuation of your menu or used to display drinks, desserts or a kids menu.


Tri Fold

tri-fold menu
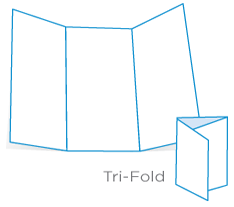
A tri-fold menu is a single sheet of paper printed on both sides and folded into thirds. A tri-fold menu is perfect for a large menu or a menu with a variety of options. With 6 panels, a tri-fold allows you to segment your menu more easily. You can have a separate panel for starters, small plates and entrees.
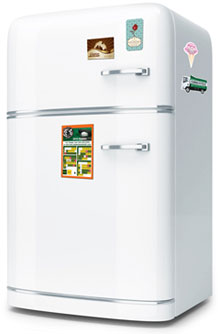
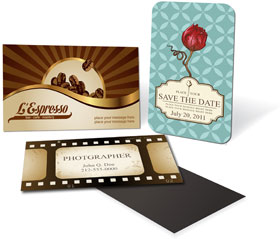
Our standard tri-fold size is:

  • 11″ x 25.5″ folded to 8.5″ x 11″

Recommended Applications:

Sushi restaurants can use tri-folds to create separate panels for rolls, sashimi and other hot dishes. Tri-folds can be used by Italian restaurants to categorize salads, pizzas and pastas.


Custom Menu Folds

The paper stock and weight you choose for your menu will have an impact on the type of folding options you have available. Are you looking for a unique design? We have a variety of custom options available, including a gate fold and Z fold. Call our helpful experts to discuss the right fold for your project, 800-930-6040.

View our article on Paper Folding Options for additional details.

Get 20% Off

Subscribe to our weekly newsletter and get an instant 20% off your first print project.

Name(Required)
This field is for validation purposes and should be left unchanged.

RELATED MARKETING & DESIGN TIPS

Personalized Coasters

Get custom personalized coasters for a practical way to share your branding or event. Lots of custom options, quick turnaround and great pricing

Read More >


Black and White Digital Printing

Uses and benefits of black and white digital printing are explained for cost effective business uses

Read More >


Hot Foil Stamping – Make Your Printing Pop

Foil stamping, hot stamping or hot foil stamping is the application of pigmented or metallic foil to paper using pressure and a heated die.

Read More >


Magnetic Calendars and Schedules Printing

Magnetic Calendars and Schedules Printing

Magnets are a fantastic way to market your sports team, professional services, and more. They are present on the fridge for the whole family to see, and drive top of mind brand awareness every time someone goes to the refrigerator. Are you making an impression that will stick? Magnetic calendars and schedules will surely help!

  • Be seen by everyone in the family
  • A kitchen-sized billboard in your customer’s home
  • Add utility to your marketing materials

Magnetic Calendar Features

  • Easy magnet templates for quick production
  • Digital printing for a wide variety of options
  • Full color

Magnet Product Examples

sports schedule magnet
Sports Teams

Sports fans are rabid and they don’t want to miss a single game. Use a magnetic game schedule to get and hold their attention.

photographer calendar magnet
Photographers

Graduations, anniversaries, weddings, birthdays – have your company name top of mind when they’re checking the date for their next photo-worthy event.

cocktail menu magnet
Food And Beverage

What better place to advertise your restaurant, bar, or grocery store than on the refrigerator? Your customers will always have that connection in mind when they are hungry.

travel magnet
Tourism / Travel

The weekends are coming, followed by vacation and holidays. Be right there when customers are daydreaming about a vacation fun.

music tour schedule magnet
AND MORE…

With Printing for Less, the sky and your imagination is the limit.

Don’t see the options you need?
We can print just about anything.
Call 800-930-2423 for answers.
 

Magnetic Calendar and Schedule Options

  • Magnets are printed on digital presses, so the options are nearly endless for customization.
  • Work with one of our professional designers to develop a magnet that will turn heads.
  • Upload your own artwork to any one of our three templates for quick turnaround–get it printed ASAP!

Don’t have a magnet designed and ready to print? Want something a little more flashy? You’ve got options!

Don’t worry, we’ve got you covered. From die cutting to variable data, we have options for the most particular customers in mind. If you dream it, we can do it. If you need help designing something that will surely turn heads, then our friendly and professional design team would love to tackle your toughest jobs! We have some of the best designers in the business, and everything we produce is backed up by our quality guarantee.

Magnet Marketing

How attractive is your brand? Marketing with magnets is a sure-fire way that your customers will keep you at the top of their mind daily. Adding your branding onto schedules and calendars will provide utility for your customers while driving brand awareness, a combination that is a recipe for success.

Not into the idea of calendars or schedules? No worries, we’ve got you covered. We have options for everything from magnetic business cards, to photo magnets, or practically any custom idea you could think of.

 
To learn about the wide array of magnetic printing options,
call our print professionals at 800-930-2423.

More magnet resources:

Custom Magnet Ideas
Magnetic Business Cards

Get 20% Off

Subscribe to our weekly newsletter and get an instant 20% off your first print project.

Name(Required)
This field is for validation purposes and should be left unchanged.

RELATED MARKETING & DESIGN TIPS

Gate Fold Brochure Design Review

How to use four color printing, unique folds and custom paper to reel in guests at a Montana guest lodge.

Read More >


Business Card Examples, Printing Samples and Design Ideas

See how professional printing and design can up the impact of your business card with these business card examples, printing samples, and design ideas.

Read More >


Video Library

Browse our video library for commercial printing techniques and helpful printing tips for professionals. We cover common services, printed materials, & more.

Read More >


Magnetic Business Card Printing

Magnetic Business Card Printing

magnetic business card examplesMagnetic business cards act like mini billboards in homes and offices, keeping you on people’s minds long after your first interaction.

We make magnetic cards by printing your business card design on a sheet of magnet stock which we then cut into individual cards. Standard cards are rectangular, but we can also die cut them to create rounded corners or shapes that give your magnets a distinct personality to tie in with your brand.

Magnetic cards make great promotional items because they tend to stick around longer – and more visibly – than ordinary business cards. People put them on refrigerators, file cabinets and memo boards, where they’ll likely be seen by more than one person every day.


Design Tips for Magnetic Business Cards

Magnetic cards are a clever way to get your brand or product seen and remembered. Here are some design tips to get the most out of them.

  • Magnetic cards tend to be read from a distance, so keep the text bold and easy to see. For better readability, make sure there’s a high level of contrast between the text and the background.
  • Use bold graphics and complementary colors to make the design visually appealing. An attractive card is more likely to end up in a prominent spot.
  • We offer three thicknesses of magnet stock, so you can choose the one that gives your magnet the “right” feel.
magnetic business cards

Using Magnetic Business Cards

With businesses increasingly focused on websites and social media, business cards can feel old-fashioned. But unlike a website, a magnetic business card is always visible. It’s a tangible and useful way to keep people thinking about your business.

When you use a magnetic card to promote your business, be sure to include your most important contact information:

  • Your business name and logo
  • A tagline that explains what your business does, if it’s not obvious from your name.
  • Your phone number and website URL.
  • Your address and hours of operation, if people might need to visit your physical location.
fridge magnets

Magnetic business cards are ideal for service businesses whose number people need in an emergency, like plumbers, mechanics and veterinarians. People stick the magnet on the fridge and when there’s a problem, you’re the one they call.

A magnetic card for a takeout restaurant makes it easy for people to phone you when they need a meal to go. Or a tourist attraction can give away souvenir magnets that remind visitors of their wonderful trip and promote the destination to the folks back home.

Magnetic business cards make effective calendars and “save the date” reminders for weddings, concerts, festivals and other special events. Use them for sports team calendars, or to remind people when they’re due for another service call.

To increase the chance that your magnetic business card will wind up on permanent display, combine it with die cutting. Our standard dies include a house, circle, oval, bandage and telephone, but we can also create custom shapes.

Use die cut magnets to suggest your products or service. Think of a magnet shaped like a Chinese takeout container, a garbage truck or a toothbrush. Or put a punch-out hole in the middle of the card, turning it into a perfect frame for the kids’ school photos and a mini-magnet to display someplace else – that’s twice the impact from just one card.

Business cards are a versatile way to get your company’s message across. Magnetize yours and you’ll attract more business than ever.

Have questions about printing magnetic business cards?
Give our helpful experts a call at 800-930-2423 or Get Pricing

Get 20% Off

Subscribe to our weekly newsletter and get an instant 20% off your first print project.

Name(Required)
This field is for validation purposes and should be left unchanged.

RELATED MARKETING & DESIGN TIPS

Envelope Printing and Design

Get envelopes printed online with sustainable printing options and visual flair to boost your response rates. Learn more on how to create effective designs.

Read More >


Scented Printing

Scented printing offers a whole new dynamic to the customer experience! Great for sampling fragrances or creating a lasting impression. Smell our options!

Read More >


File Upload

Read More >


Liquid Laminate

Liquid Laminate

Liquid laminate, also known as UV coating is an excellent way to add durability and visual impact to your printed materials. This coating protects from moisture, dirt, fingerprints, and sun exposure while providing a unique finish. Liquid laminate is a great fit for menus, brochures, signs, and business cards because it protects and enhances vibrant ink colors and quality paper. If scoring and folding are required, liquid laminate may not be the right fit because it can crack. Metallic inks look sophisticated under high gloss liquid laminate; however it is not a good fit for foil stamping.

Liquid laminate is poured on, pressed, and cured with exposure to ultraviolet light. This process guards printed pieces from moisture, scuffs, fingerprints, sun damage, and scratches.


High Gloss Liquid Laminate

Liquid laminate high gloss provides a vibrant shine that is often desired in top-shelf, commercial print projects. The sleek feel and brilliance lend to the appeal of the finished product. When your project requires a reflective, shiny surface, high gloss liquid laminate is the answer.

Matt Liquid Laminate

This elegant finish increases visual and tactile appeal by adding a smooth texture and depth to the ink. Applied in the same way as the high gloss, matt liquid laminate creates a rich, classy look that reduces shine. The finished paper has a “soft” feeling, like Egyptian cotton sheets.liquid laminate example

Liquid Laminate Spot Finish

Use special effects to add an extra pop to printed materials. Spot liquid laminate is an ideal method to add subtle highlights and unique textures. This is a cost effective way to add dimension. (NOTE: Achieve a similar, yet bolder effect, by combining a die with a clear foil. As pictured here. However, if you do not want to invest in a die, liquid laminate spot finish is a perfect alternative.)


Whatever your print goals, we can help you get that polished, professional piece that reflects well upon you and your business. Call one of our experts to get started: 800-930-6040.

Have questions about using Liquid Lamination on your project?
Give our helpful experts a call now at 800-930-6040.

Get 20% Off

Subscribe to our weekly newsletter and get an instant 20% off your first print project.

Name(Required)
This field is for validation purposes and should be left unchanged.

RELATED MARKETING & DESIGN TIPS

Bulk Mailing

Bulk mail and printing services with Printing for Less offers a variety of design options and is cost-effective! Learn more about our bulk mail services.

Read More >


Grow Your Small Business with Direct Mail

Think you don’t need mail if you market digitally? Direct mail now outperforms digital marketing by a staggering 600%.

Read More >


Brochure Marketing – A Vital Component for Your Business

Brochure marketing can be a vital piece of advertising for your business, so make sure you do it right. Get our tips on brochure layout, content and more.

Read More >


Going to Press Efficiently

Going to Press Efficiently

These best InDesign preflight practices will save you time and money.

by: Pariah S. Burke

InDesign has many uses, some of them surprising. For many, InDesign long ago replaced PowerPoint as a slide show creator—just export pages cum slide deck to PDF, and use Acrobat’s or Adobe Reader’s built-in presentation features to display it to an audience. Many print-turned-Web-designers are using InDesign to wireframe, or sketch, Web sites. Features that allow embedding of multimedia, such as QuickTime movies and sounds, and interactive elements, like buttons with rollovers and actions, have positioned InDesign as the tool of choice for developing rich user experience PDFs. Thanks to innovations in CS4, InDesign is even catching up to its main competitor as the non-Flash-savvy-user’s Flash content creation tool.


All of these uses, whether expected or not, are a testament to the versatility and ease of use of InDesign. They also attest to the expansion of even traditional print design workflows toward electronic publishing. Still, despite the Web, PDF, and Flash, the main purpose for which the majority of us employ InDesign is to create materials destined to become ink on paper.

offset printing press
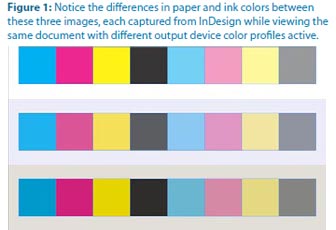
It’s startling, though, how little information there is on the subject of going to press these days. I don’t mean how to use InDesign’s Print dialog or why you should use CMYK instead of RGB color swatches. I’m referring to best practices for going to press. My friend Sandee Cohen recently mentioned that she’d met a woman who, within the last five years, had graduated college with a graphic design degree—which included at least one full year learning in InDesign—but without any instructor ever having defined the word “prepress” or having explained how layouts get from InDesign to ink on substrate!

Some people don’t even know why they should avoid the default and undeletable Registration color swatch; someone once said, “Don’t use it,” so they don’t use it, without knowing why.

In this edition of InTime, I’ll try to fill a few of those gaps. Hopefully even seasoned pressmen with ink embedded beneath their fingernails will find something herein to take away. And, I hope they’ll write in and share some of their wisdom and time tested prepress truisms and techniques with me, so I can pass along that information in a future InTime.


Consult the Wizard of Press

I’m often asked for my recommendation on the very best resource to give a designer the information she needs to send InDesign documents to press efficiently, with the best quality, highest color fidelity, fewest errors, and the least expense. Have you wondered the same thing? If so, you might be surprised by my answer because it isn’t this magazine, a book, Web site, or industry guru. Nor is the best resource Adobe itself.

The single most important resource you can consult regarding your InDesign (or any) for-print project is the printer who will output it for you. Your printer knows all, your printer sees all, your printer prints all. He can tell you more about your specific document, how to format this and configure that, than any of the gurus in this magazine. Why? Because we’re not RIPping and printing your job. We can give you general advice, specific techniques we’ve learned over the years, even best practices that will serve you in many, perhaps even most, situations, but not one of us can tell you precisely what will happen to your specific document when it goes to a particular print shop’s prepress and then press stages. The only one who can is the person who takes work like yours and processes it day in and day out on those very prepress and press systems.

offset printing press
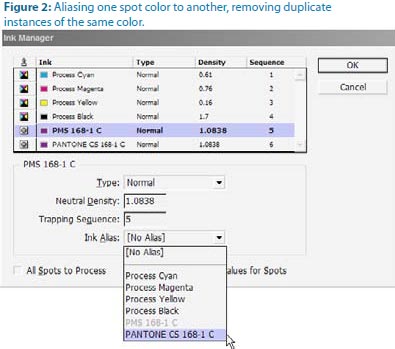
So what should you ask your printer? Everything. Pardon the banality of this, but it needs to be said: The only dumb question is the one unasked. No matter how much or how little experience you have in print design and working with print providers, every printer worth hiring will be happy to educate you about his shop’s unique processes, tell you what to do in InDesign (and other applications), to ensure that your job prints to the highest quality possible, on time, with the least amount of stress for you and the printer’s personnel. If there’s something you don’t know about the printing process, how to prepare your files for press, how the printer wants them delivered, ask.

Then, after you deliver your project, go visit the printer if possible. Watch the job RIPping and printing. Do press checks—examining printed examples of your job as they roll off the press to ensure output as expected. Ask more questions.


Decide Before You Design

Before you can choose File > New Document you must make crucial decisions about the content and output of your printed design. The below, used as a checklist, can help you ask yourself and your print provider the right questions, make the right decisions, and begin your project already halfway to producing a top quality InDesign document efficiently before you’ve even launched InDesign.

  • What kind of paper are you printing on? Or are you printing on plastic, fabric, or another substrate? Each of these require special printing processes.
  • What is the color of the substrate (see “White isn’t Always White” below)?
  • How heavy is the substrate?
  • Is it coated or uncoated?
  • What type(s) of ink will be used—process CMYK, premixed spot colors, Hexachrome, screenprint ink (typically for fabrics and other non-paper substrates), or another media?
  • Will the final piece be flat paper, multi-dimensional (like a box printed flat and then folded), or non-flat (such as directly labeling a bottle or can)?
  • If printed flat, will the final piece require folding or perforating?
  • Do any colors touch the side of the page? If so, you’ll have to set up a bleed.
  • Will the final printed shape be a rectangle or will it require cutting dies?
  • If the document will be bound, how will it be bound—perfect bound like a book, saddle stitched or -stapled like many magazines, wire- or GBC-bound to lay flat when opened, or another type of binding?
  • Because of the binding method, what are the required inside and outside margins?
  • If the artwork will run ink-to-edge (bleed), what size bleed guide do you need—how far out from the page edge will you need to extend your artwork?
  • What is the required live area inset? (That is, how close to the edge of the page is it okay to print text or important details?)
  • Will you need a slug area, and, if so, what will be its dimensions?
  • What is the ideal image resolution?
  • Does the printer have a PDF Print Engine (such as APPE) which can handle native transparency, or will you need to supply a flattened PDF version?
 

Files to Get

Before you begin each project, ask your printer for the files listed below. The printer will have at least some of them ready, though you may not need the rest, depending upon your output options and file delivery methods.

  • The ICC/ICM color profile for the output device and selected substrate. This is updated frequently, so get a fresh copy for every job, for every different medium you’re printing on.
  • While few printers want PostScript files anymore (it was an old 90s thing), if they do, ask for the output device’s PPD (PostScript Printer Definition file).
  • If you’ll be sending a PDF instead, ask for a custom PDF preset. If your printer doesn’t have one, he or she should be able to tell you what settings to use in the Export to Adobe PDF dialog box. Alternately, they might tell you to use PDF/X1-a, X3, or X4, which are standard presets that ship with InDesign.
  • A trap preset file. It’s pretty rare that the printer would have one of these for you, as they will likely prefer to handle trapping themselves, usually in- RIP. But it never hurts to ask.
 

There is No Generic Color Profile

If I had a dollar for every time I’m asked for the best color profile for “general use” I’d probably own Adobe Systems by now (and I’d have built in an option to hide that darn Registration color swatch). There is no best, ideal, default, or generic general use setting when it comes to sending documents to press. There are guidelines, though. For example, most printers in North America are used to receiving documents and images saved with the U.S. Web Coated (SWOP) v1 CMYK color profile (part of the North America General Purpose 2 preset in Creative Suite). That’s actually strange, because most printing is done on sheetfed presses, not web presses. If you’re printing to sheetfed, consider using the Coated GRACoL 2006 profile, which ships with CS4, as it will likely give you better results.

But these kinds of guidelines are if you don’t know have an accurate picture of how a document will be printed (which actual printing press, which inks, which paper, and so on). If you can find those things out, you could use a color profile generated specifically for that particular output device. The point of color management is that there are no typical settings. Every device renders color differently, and the entire purpose of color managing a file is to target your document’s colors to a specific device’s unique color rendering characteristics.

Where do you get the color profile for your output device? Your printer. A good printer profiles his output devices, generating custom ICC profiles. They should gladly send them to you free, and then, with a properly calibrated monitor, you can be confident that what you see on screen is pretty darn close what you’ll see in print.


ink paper differences

White Isn’t Always White

To paraphrase Bruce Willis in the Last Boy Scout, we all know that water’s wet, the sky’s blue, and paper is white, right? Well, no, not always. Frozen water isn’t wet, the sky changes color, and so does paper. Some white paper is whiter or brighter than others. Thus, not only will the unprinted “white” of your jobs differ from one stock to the next, so will the colors of your inks because the color of the paper will mix with them, tinting them (Figure 1). For that reason, you should proof your work from time to time onscreen using a color profile targeted not only to a particular output device but also to the specific substrate you’ve chosen. Once you have it (from your printer again), here’s how to use it.

  1. With InDesign closed, install the ICC/ICM file into the following path:
    Windows: \Windows\system32\spool\drivers\color
    Mac: /Library/ColorSync/Profiles
  2. Open your document in InDesign.
  3. From the View menu, choose Proof Setup > Custom.
  4. Select the newly installed profile from the Device to Simulate dropdown menu and check Simulate Paper Color, which will also automatically check Simulate Black Ink. Click OK and, if your monitor is properly calibrated (with a device such as the Datacolor Spyder or an Xrite Eye-One), you’ll see onscreen colors very close to what you’ll get off the printing press.

Changing the options in the Customize Proof Condition dialog automatically turns on color proofing. To turn it off, just toggle the View > Proof Colors command.


Use Best of Breed Printers

Like designers, printers tend to specialize in certain areas. A printer who cranks out the most beautiful magazines, catalogs, and brochures may not be equipped to do the best job on your promotional posters, business cards, or signage. Some may not print jobs outside their specialties at all, others will offer “full service printing” to augment their primary projects income or as a convenience to clients who need something outside the norm once in a while. Many of both types will vend out the job to other printers. This is particularly true of the highly specialized business card printing business. Few print shops actually do business cards; most vend them out to a handful of boutique business card printers. And, sometimes, you can get better quality and price by cutting out the middle man.

Unless you’re always producing the same types of printed projects, establish a stable of print vendors and vend to them only the jobs at which they excel in producing. That said, cultivate relationships with your printers. Gifts help. Bruce Fraser, the late co-author of Real World Photoshop, recommended offering a “pint of Haagen-Dazs sorbet or, for really big favors, Laphroiag.”


Cash Off the Top

Did you know that you can often pay 10-15% less for your print job? If the job is for you—your identity package or marketing material, say—you must pay full price. However, if you’re bringing a client job to press, you are acting as a print broker, not as a print client.
 
Many print shops will therefore charge you 10-15% less for the job. Why? So that you can make some money on the print job without having to raise the price. If your client calls the print shop directly, she’ll be quoted the full retail price, which is what you charge back to her, keeping the 10-15% difference for yourself. The print broker discount is a way to help you recuperate the costs of working with the printer on your client’s behalf and spending time checking proofs and transporting files and the printed job. Just let your print provider know at the time of order that you’re brokering the job for your client, and then ask for the discount.
 
Full disclosure: InDesign Magazine’s parent company, PrintingForLess.com, offers a print broker program called Printing for Less Pro. Learn More.
 

Why You Shouldn’t Use Registration Color

As we all know, the InDesign Swatches panel includes four undeletable swatches. Their names are bracketed and three of them have an obvious purpose—None is no color; Black is black; Paper is effectively no color, allowing the color of the paper or substrate to shine through or knockout ink. The fourth undeletable swatch is Registration, and, surprisingly, not many people know what it’s for, just that they should never use it for any object to appear on the printed page unless instructed by their printer.

Simply put, the Registration color is a magic swatch that will print on every ink plate. If you’re working strictly in CMYK, any object set in 100% Registration will print out at 100% of cyan, magenta, yellow, and black. If that’s cool to you, think again. The result is usually not a nice rich black but rather the color of old mud. Worse, ink is tacky and that much of it aggregating in too large of a place will make your printer very unhappy. If you’re working in CYMK and two spot colors, your Registration-colored object will print out in six colors. (That’s even uglier.)

So what is the point of the Registration swatch? To create such things as registration marks, those little cross hairs that enable press workers to identify when one or more colors don’t match up, indicating that something is misaligned on the printing press. The color is also used for other information or structures that need to print on all plates—usually in the slug area—such as the client name, job number, and other specific information. The easiest way to include that information on the film is to set it in the slug area, in the Registration color swatch.


PDF or INDD?

Most prepress pros are firmly in favor of sending only PDFs to the printer. Many printers are firmly in favor of you sending them the native InDesign document (packaged to include images and fonts). So which is correct? Send the PDF first. After all, the most common prepress problems, such as font embedding issues, alteration of trap and overprint settings, can be fixed directly in the PDF. That’s a whole lot better than the printer opening your file and possibly introducing accidental major changes like text reflow. But be prepared to package and send the InDesign file if the print shop insists on it.


spot colors in InDesign

Multiple Instances of Spot Colors

Working in a layout application like InDesign you often combine image assets from various sources, even different decades, into a single document. Well, if you haven’t noticed, ink libraries differ from application to application, one time period to another. An EPS image exported 10 years ago from QuarkXPress may contain a PANTONE color with a slightly different name than the same color added into the Photoshop PSD file last week. Placing both images into InDesign will bring in that same color as two separate color swatches— and it will output them as two separate color plates, doubling the cost and work involved in printing that one color.

How do you resolve such a situation? You can’t delete one swatch and replace it with the other, not if the spot color is part of a linked image. Should you pull the EPS into Illustrator or PSD into Photoshop and fix the mismatched ink there? Sure, you could, if you’re comfortable with those applications, but it’s not the most efficient way to fix the problem—particularly if you have multiple assets using the same conflicting spot colors. Instead, configure InDesign to overcome the problem internally, at print or export time.

  1. From the Swatches panel flyout menu, choose Ink Manager (Figure 2).
  2. In the Ink Manager dialog highlight the first duplicate ink, preferably the one with the older, more obscure, or otherwise undesirable name.
  3. From the Ink Alias dropdown menu select the other instance of the spot color, the one with the name you do want to keep. Click OK.

The first ink is now aliased or mapped to the second. All instances of either spot color will now output on the same plate, as the same ink.


Time and Money

Going to press efficiently—which includes preparing to design the right way—will save you time and expense. Maybe we should call this column InTime and InExpense? I’ll bring you more tips and techniques for going to press efficiently in future installments of InTime. In the meantime, open the April/May 2009 issue of this magazine for some great related advice from Steve Werner in “Will it Print? 10 Tips for Creating an InDesign File that Prints Perfectly.”


Pariah S. Burke is the author of Mastering InDesign CS3 for Print Design and Production (Sybex, 2007), and other books; a freelance graphic designer; and the publisher of the Web sites GurusUnleashed.com, WorkflowFreelance.com, and CreativesAre.com. Pariah lives in Portland, OR, where he writes (a lot) and creates (many) publications and projects for Empowering, Informing, and Connecting Creative Professionals.

More on InDesign Magazine. Each issue gives you tips, techniques, and time-savers by an all-star cast of industry experts.

Get 20% Off

Subscribe to our weekly newsletter and get an instant 20% off your first print project.

Name(Required)
This field is for validation purposes and should be left unchanged.

RELATED MARKETING & DESIGN TIPS

Repurposing Your Website for Print Marketing

Make your website content work for you and Learn how to effective repurpose your existing website content into you print marketing strategy. Learn more.

Read More >


How To Make A Super Brochure Or Mailing Piece

Super brochures or mailing pieces can be a great way to advertise your business, as long as you have the right design in place. Get tips from our experts!

Read More >


Printing Adhesives

Print adhesives are used when two print pieces need to be attached or when a single piece is connected to itself.

Read More >


  • « Go to Previous Page
  • Page 1
  • Interim pages omitted …
  • Page 3
  • Page 4
  • Page 5
  • Page 6
  • Page 7
  • Interim pages omitted …
  • Page 12
  • Go to Next Page »

Footer

Printing for Less

info@printingforless.com
100 P F L Way, Livingston, MT 59047

800-930-2423

  • Home
  • Products
  • Services
  • Industries
  • Get Samples
  • Direct Mail Marketing Resource Center
  • Printing Resource Center
  • Blogs
  • Templates
  • Terms & Conditions
  • Contact
  • About Printing for Less
  • About P F L
  • Our Team
  • Careers
  • Login

Copyright © 1998-2025 PrintingforLess.com. All Rights Reserved.

logo
  • 800-930-2423
  • Products
  • Direct Mail Marketing
  • Services
  • Industries
  • Direct Mail Marketing Resources
  • Printing & Mailing Resources
  • Get a Quote
  • Contact Us
  • My Login