• Skip to primary navigation
  • Skip to main content
  • Skip to footer
Printing for Less

Printing for Less

At Printing for Less, we've offered high quality online printing services since 1996. Shop business cards, booklets, stickers, and more!

My LoginMy Login
800-930-2423
  • Printing
    • Postcards
    • Business Cards
    • Catalogs
    • Brochures
    • Folders
    • Letters
    • Newsletters
    • Envelopes
    • Greeting Cards
    • Print Templates
    • All Products
  • Direct Mail
    • Why Direct Mail Marketing?
    • Every Door Direct Mail® Postcards
    • Direct Mail Letters
    • Catalogs & Booklets
    • Marketing Gifts & Kits
    • Direct Mail Automation
  • Services
    • Mailing Services
    • Pro Services
    • Design Services
    • Custom Printing Services
    • Reseller Program
  • Industries
    • Advertising & Design
    • Food & Beverage
    • Healthcare Payers
    • Healthcare Providers
    • Nonprofit
    • Real Estate
    • Retail
    • Technology
    • University
  • Resources
    • Direct Mail Marketing
      Resource Center
    • Printing Resource Center
    • Blogs
    • Templates
    • Video Library
    • Have a Question?
  • Get Samples
  • Get a Quote

Printing Methods & Materials

Using Die Cutting on Brochures

Using Die Cutting on Brochures

Die cuts use cookie-cutter technology to create a brochure that’s completely unique.


Die cuts are created with a sharp steel blade formed into a specific shape. When the blade presses onto paper, it makes a cutout of the shape – just like a cookie cutter slicing through fresh dough. Die cuts can produce ordinary shapes like circles, curves and stair steps, or custom ones like city skylines or palm trees.

A die cut brochure might have a curved edge or a flap shaped like a puzzle piece. It could have a cutout in front that offers a glimpse of what’s inside. It might be shaped like a product or combined with custom folds to create something that feels like a work of art.

Because they’re unique, die cuts have a “wow” factor that makes people want to save them and share them with family at home and friends on social media. That means that a single die cut  die cut folding brochure

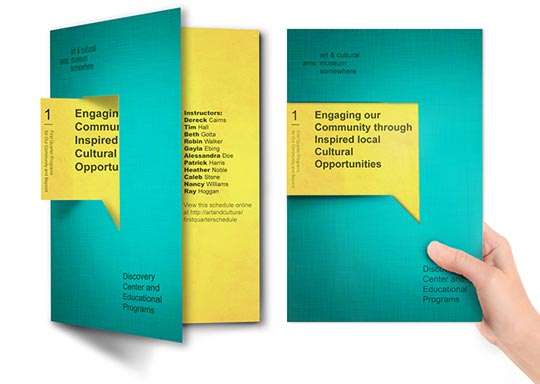
Tips for Creating a Die Cut Brochure

Die cuts can produce striking effects when they’re added to a brochure. Because of the way a brochure is folded, you can go beyond simple die-cuts and create interactive elements that act like a pop-up book when the brochure is opened. Imagine a finger the jumps out and literally points to your deal, address, or logo. As you can imagine, this is very technical to design but we can help you bring your vision to life.

  • Die cutting blades are razor sharp and can handle fine details.
  • Good design is especially important for die cut brochures because the die cuts, images and text must line up properly when the brochure is folded. Design your die cut flat and use reference points to make sure everything is aligned.
  • Take paper thickness and weight into account to avoid a misaligned image – die-cuts can work with a huge range of paper thickness but your paper should be on the stiff side.

Using Die Cut Brochures

Internet marketing may be popular, but people still respond to promotional pieces they can hold in their hands. With die cutting and special sizes, brochures can go far beyond describing tourist destinations and products and services.

Brochures make distinctive event invitations, maps, fundraising appeals, menus and coupon offers. Here are some other ways to use brochures:

  • Distribute brochures as presentation handouts.
  • Display your portfolio in a brochure.
  • Have everyone on your team keep a stack of company brochures in their car. You never know when you might meet a potential customer.

Die cutting is an opportunity to use brochures to brand your business. Die cut brochures look creative and luxurious, and they invite people to interact with them on a physical level. You can use a die cut to highlight part of your logo or draw a connection to your product or industry – like a rooftop outline for a building contractor or a cupcake shape for a bakery.

Use die cuts to create a sense of anticipation, so people can’t resist opening your brochure to see what’s inside. Cut out a shape or edge on the front of your brochure to reveal just part of the image underneath.

If you’re mailing your brochure, use a die cut to make it look and feel like an envelope, without the added postage and handling costs. Add personalization and your recipients will feel like you’ve written especially to them.

Brochures might seem old fashioned, but die cutting gives them a fresh, upscale look and lots of personality. Use die-cuts to create a custom brochure that will be the talk of the town.die cut brochure example

Need technical or creative advice on your die cut brochure project?
Give our helpful experts a call at 800-930-6040.
 
 
This field is for validation purposes and should be left unchanged.

Get 20% Off

Subscribe to our weekly newsletter and get an instant 20% off your first print project.

Name(Required)
RELATED MARKETING & DESIGN TIPS

Foil Business Cards

Add sleek eye catching flair to your business card! Custom foil accenting elevates your business card design to a whole new level. Learn more.

Read More >


The Scenery From Here

Read More >


Recycle and Reuse: Repurposing Your Printed Material for Use on the Web

Repurposing content effectively can maximize your ROI. Explore new avenues by repurposing your print marketing to your digital strategies like a pro.

Read More >


Spot UV Printing

Spot UV Printing

Spot UV Coating Example

Ready to take your printing to the next level of creativity and beauty? Have you been looking for a way to stand out from the crowd with printing that dazzles the eye? Among all of the custom printing options available, spot UV printing is one of the most brilliant effects you can add to your project. Offering eye catching designs that shine on top of printed inks, spot UV coating is an irreplaceable effect that is truly unique. Consider spot UV business cards as a great way to launch into the endless possibilities of spot UV.


What is Spot UV Coating

Due to its eye catching appearance and versatile applications, spot UV is one of the most popular printing techniques available. While it may sound futuristic, “Spot UV” is a relatively simple production method. The “UV” portion of spot UV comes from the ultraviolet light that’s used to instantly cure the glossy varnish you see shining in spot UV printing. UV coatings are environmentally friendly as they are free of solvents and do not emit volatile organic compounds, or VOCs when cured. The incredibly fast speed at which the UV varnish dries is exactly how Printing for Less can get such amazing detail in spot UV designs like the one you see above. While all UV coatings protect the paper they cover, spot UV is mainly used for its decorative effect as light catches the partially coated portion of the paper on a piece – rather than all-encompassing protective coverage.

Suggested Coating Applications

Spot UV will work on a wide variety of paper stocks, including everything from heavy 24pt cardstock, to thinner 100# text. Regardless of the thickness of paper stock, spot UV always has the greatest impact on a matte finished paper, whose muted background will contrast most highly against the extreme shine of the UV coating. In choosing the selected locations of your spot UV coating, consider a couple of different approaches.

Clear Impact

  • Clear impact is a technique where a solid color background is left blank, and decorated with spot UV to create the design or text itself. Arguably the best and most creative use of the spot UV effect, clear impact simply can’t be created with any conventional inks or papers. Take a look at the image above and ask yourself, have you ever seen printing like this before?

Image Accentuation

  • Another great way of utilizing spot UV is to coat a specific image or portion of a printed image on your project. For example, you could spot UV coat your logo on a business card or postcard for added pop. If you owned a water purification company, and you’re sending out a mailer with pictures of your delicious pure water – you might consider spot UV coating only the pouring water portion of the photograph. This kind of image accentuation is a pleasant surprise to the viewer, who’ll no doubt be wondering “how’d they do that?!”
Spot UV Example

Additional Custom Coating Effects

While you can always combine spot UV with any number of other custom printing effects like die cutting, embossing, or foil stamping; there are some custom techniques that best compliment spot UV. For example, soft touch coating your printing before adding spot UV creates an ideal matte finished background that really makes the shiny varnish pop. Basic matte finished paper stocks will also help this effect, but soft touch also adds value by creating its own unique physical feeling to the piece. This combination of soft touch and spot UV is commonly referred to as “Silk Spot UV”.

Video explaining how Spot UV Coating is used.
 
 
Have questions about using Spot UV for your next printing project?
Give our print experts a call at 800-930-2423.
 
 
This field is for validation purposes and should be left unchanged.

Get 20% Off

Subscribe to our weekly newsletter and get an instant 20% off your first print project.

Name(Required)
RELATED MARKETING & DESIGN TIPS

Custom Size Catalog Printing

Get catalogs printed in custom sizes and shapes to make them more functional and memorable

Read More >


Choosing the Best PDF Preset in InDesign

Choose the best Adobe InDesign PDF presets for printing. This guide covers ‘high quality print’, PDF/X-1a, PDF/X-4 presets, and custom Adobe PDF presets.

Read More >


Preparing Photos for Print Projects

You’ll learn how to use resolution and sharpening to improve digital photos so that they look crisp and sharp in your printed projects

Read More >


SmartFlex® Synthetic Printing

SmartFlex® Synthetic Paper

What in the world is Synthetic Paper?


waterproof paper menu that is spill-proof and tear-resistant
 
The quick answer is plastic. But there’s much more to that story because SmartFlex® Synthetic Paper changes the game of printing. Traditional paper from wood pulp can be manufactured to have a lot of great qualities. The look and feel of premium paper can really improve the image of your company. Any business that wants to present a quality product needs quality marketing and sales materials to convey that message. SmartFlex® Synthetic paper has that premium look and feel along with rugged durability, while being tear resistant and waterproof. With standard paper, the pages of the menu pictured to the right, would tear off easily and stain with the first splash.

SmartFlex® is a durable paper alternative extending the life of your investment. Printed synthetic pages clean with soap and water and won’t tear apart from the stand.

What about the environment, you ask? We take great pride in sourcing printing materials that are friendly to the environment. From our wind powered facility to the use of sustainably sourced paper and soy inks, our commitment to preserving our amazing landscape is clear. Printing on plastic gives you the best of both worlds:

Reduce – Using SmartFlex® in your print allows you to reduce your consumption because it will last longer and still look great.
Reuse – Images won’t fade over time like standard paper and even tough, sticky stains clean off with soap and water.
Recycle – Synthetic paper is made from 100% recyclable materials.
 
 
Just watch us try to make a mess of these SmartFlex® synthetic menus!

Printing menus on SmartFlex® synthetic paper makes perfect sense, but what else is it good for?

  • 6 pt, 8 pt, & 12 pt: Thin and flexible, these thicknesses are great for – Brochures, Map Printing, Travel Guides, Manuals, Bellybands, Product Labels and Packaging, Posters, Hang Tags, Door Hangers
  • 15 pt: More rigid like a card stock, this size is great for – Menus, Packaging that needs structural stability, Placemats, Business Cards, Identification Cards, Door Hangers, Parking, Vehicle and other Permits and Passes. Because it holds its shape so well, this size can have half folds only.
  • 20 pt: Technically, this isn’t SmartFlex® but a Styrene board. It is incredibly thick and strong, so it can’t be folded at all. Otherwise, it has all the great properties of SmartFlex®. Great For – Window Signs, Storefront Lightbox and Advertising Signs, Bus/Transit Shelter Signs, Trade Show/Event Graphics, Coasters.
synthetic paper menu example
SmartFlex® synthetic paper menus last much longer than laminated paper and look great for longer.
Anything that needs to stand up against heavy use can be printed on synthetic printing paper.
SmartFlex waterproof tag
 
 
Gone are the days of putting your paper through a laminator to squeeze a few more uses before the edges peel apart. Lamination was the best we could do to waterproof your print before. You no longer need to accept low quality, cheap feeling solutions to this problem. Synthetic paper has made it possible for durable printed material to also look and feel like a premium, high quality product. Make print that lasts.
 
 
Have questions about using SmartFlex synthetic paper on your project?
Give our Print Consultants a call at 800-930-6040.
This field is for validation purposes and should be left unchanged.

Get 20% Off

Subscribe to our weekly newsletter and get an instant 20% off your first print project.

Name(Required)
RELATED MARKETING & DESIGN TIPS

Shipping and Delivery

Everything you need to know about getting your order shipped to you when you need it, including making shipment changes and tracking your order

Read More >


Image Resolution for Printing

There’s nothing more disappointing than ordering printed work only for it to come out blurry. Learn how to maximize image resolution for quality prints.

Read More >


Custom Printing with Metallic Ink

What you need to know to use metallic inks in your custom printing to make your printed pieces stand out

Read More >


Paper Folding

Paper Folding Options for Commercial Printing

paper folding type chart
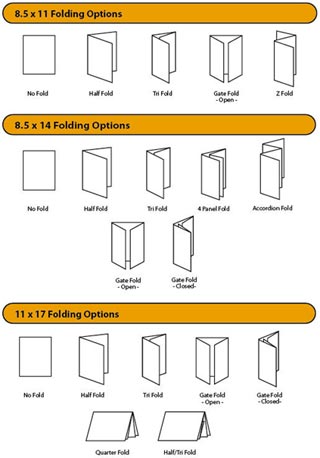
Most of the marketing materials that we print fall into what can be called the ‘standard’ fold types. Some of the standard paper folds that we do every day include the:

  • Half fold
  • Tri fold
  • Gate fold – open
  • Gate fold – closed
  • Z folds
  • Parallel fold
  • Accordion fold
  • Quarter fold
  • Half/Tri fold
  • Tri/Half fold

See images to the right to better understand the names of the folds. Or, see paper folding in action in the video below.


Custom Folds

While most of the marketing materials you see fall in the common ‘standard’ paper fold category, the possibilities really are endless – you’re only limited by your imagination. Paper can be scored and folded into some pretty crazy shapes and sizes. Plus, creative folding can be a great way to stand out from the crowd with your next marketing piece.
 
A wonderful source for ideas on creative folding is Trish Witkowski – the self-proclaimed “Folding Fanatic”. Check out her website at www.foldfactory.com. She provides several examples of creative folds, including the ones listed below:
 
Carrier Combo
This fold is a combination of one folding style nesting into another. There is some flexibility here in choice of folding style, but the overall concept is that the “carrier” piece has an outside or inside inverted short fold – basically a short fold that folds up from the bottom, visible from either the inside or the outside of the piece. The short fold creates a “pocket” that can hold an additional nested piece (folding style optional). The end result is innovative and truly impactful.
 
Stepped Double Parallel
The stepped double parallel fold type is a fun modification on an old standard – the double parallel fold. The concept is simple – by shortening the cover and adjusting the lengths of the trailing panels, you can create a “tabbed” effect along one side. It’s a fairly easy layout adjustment that will offer a lot of mileage from a creative standpoint.
 
Wrapped Stepped Accordion with Short Cover
Another great accordion folding option (budget beware) is a wrapped stepped accordion with short cover. This is an innovative way to close one edge on the challenging stepped accordion fold, while maintaining the “tabbed” appearance that is so appealing. The short cover is optional – you could always make it flush if you needed to close the right edge, too, but the short cover really showcases the stepped panels.
 
Asymmetrical Accordion
Imagine this: an accordion fold where some panels are shorter (in pairs), creating an interesting and varied zigzag profile while maintaining a flush appearance when folded. This is very exciting for promotional pieces or other special projects.
 
Tapered Roll Fold
Have fun with diecuts! Take the standard roll fold and apply a creative, tapering diecut to the roll-in panels and see what you end up with. The panels overlap and layer to create a wonderful visual texture. Whether the shape is simple and geometric, or varied and organic, this style has a lot of character.

The paper you choose for your folded print piece is by far the most important factor in the folding process. Paper choice is not only for looking good, but also for functionality. A bad paper choice on a folded piece can have very disappointing results.
 
For example, a large-sized brochure printed on thin paper will be droopy; a big, folded poster printed on card-stock will be wrinkled and won’t lay flat. Give some consideration to paper choice – ask your printer for advice if you have questions about the best paper for your folded piece. It’s essential to understand the characteristics of paper before you can understand how it will perform in the folding process.
 
From a manufacturing perspective, folding paper can get a little tricky. Thanks to our veteran manufacturing employees here at Printing for Less, you can rest assured that things like paper type, how the paper was milled, the fibers in the paper, and the grain of the fibers in the paper are all considered when your print piece is folded.
 
We don’t put up with bad printing folds! You can trust that the edges of your piece won’t crack or tear, and your folds will be crisp and clean – your folded paper project will look like a million bucks!
Need creative or technical advice on using custom folding?
 
Talk to a print expert now at 800-930-6040, or Request a Custom Print Quote.
 
 
This field is for validation purposes and should be left unchanged.

Get 20% Off

Subscribe to our weekly newsletter and get an instant 20% off your first print project.

Name(Required)
RELATED MARKETING & DESIGN TIPS

Templates

Download free printing templates for business cards, presentation folders, door hangers, notepads, table tents, hang tags and other printing products.

Read More >


Repurposing Your Website for Print Marketing

Make your website content work for you and Learn how to effective repurpose your existing website content into you print marketing strategy. Learn more.

Read More >


Fair and Square Binding

Get Square Back Binding on your catalogs and booklets for added usability and class

Read More >


Offset Printing FAQs

Offset Printing FAQs

Offset Printing Press
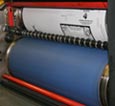
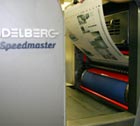
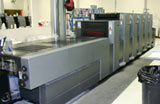
Commercial Offset Printing is the standard commercial printing method used around the world since the 20th century. Also called offset lithography, this form of printing produces the bulk of mass printing production used by businesses and organizations of all types.


PrintingForLess.com uses traditional offset commercial printing on genuine Heidelberg printing presses for most of the products we offer. While the concept isn’t new, the state-of-the-art technologies on our 21st century equipment enable fast, reliable and affordable printing.

offset press cylinders

What is Offset Printing?

Offset lithography operates on a simple principle: ink and water don’t mix. Image information (art and text) is put on thin metal plates which are dampened by water and ink by rollers on the press. The oil-based ink adheres to the image area, the water to the non-image area. The inked area is then transferred to a rubber cylinder or “blanket” and then onto the paper as it passes around the blanket. The process is called “offset” since the image doesn’t go directly from the plates to the paper, but is offset or transferred to another surface as an intermediary.


Why is it called 4-Color Printing?

Offset commercial printing presses and inkjet desktop printers both use four basic ink colors: CMYK. Where inkjet printing puts all the different ink colors on the paper in one pass through the printer, in offset printing each color of ink is applied separately – one plate per color. Small dots of the four inks – cyan (blue), magenta, yellow, and black (K) – are deposited in specific patterns that make our eyes believe we are seeing a wide range of colors. That’s why the standard offset printing process is often called 4-color process lithography or 4-color printing.

Offset printing can also use premixed inks in specific colors including metallic and fluorescent colors, called spot colors, to obtain hues outside the normal color range of process printing.


Why Use Offset Printing?

The advantages of traditional commercial offset printing are higher quality and the best cost-effectiveness for quantities over a few hundred, especially high volume quantities.

  • Low price per piece. The more you print, the less you pay per piece, since most of the cost is in the setup. With a commercial printer, any additional quantity costs only a few cents per sheet for the paper and ink.
  • Brilliant quality. Offset printing produces rich, accurate color and high-quality images and photographs, with sharp typefaces and fine details.

When you need 250 to 500 or more business cards, postcards, posters, glossy brochures, flyers or catalogs, offset printing is tough to beat for high-end quality at an affordable price. 4 color offset printing enables small businesses to compete with the “big guys” by providing professional-looking marketing materials.

Printing plate being mounted

What’s involved in setting up an offset printing run?

To start a press run, the imaged plates are clamped onto the plate cylinders and the ink settings are adjusted for the density of ink needed for the particular run. The press operator then runs a batch of initial sheets through the press at low speed and carefully checks registration (alignment) of the colors and the ink/water balance to ensure full and steady ink flow for accurate color reproduction. The operator can adjust the plate positions and ink density while the press is running at low speed. This set up process is called a “make ready,” where highly-skilled operators prepare the press for perfect offset printing.


Are there different types of offset printing presses?

Yes. “Sheet-fed” offset printing presses run individual sheets, ranging from “full size” sheet-fed presses running sheets that are about 28 x 40 inches, to “half size” and “quarter size” which use proportionately smaller sheets. “Web-offset” presses are fed from a large roll of paper, which goes through the press in a continuous length of paper, called a “web.” Sheet-fed presses are generally used for business marketing printing, while web presses are more cost-effective for high volume printing of catalogs, newspaper inserts and magazines (around 50,000 quantity or more depending on the size and type of piece).

This field is for validation purposes and should be left unchanged.

Get 20% Off

Subscribe to our weekly newsletter and get an instant 20% off your first print project.

Name(Required)
RELATED MARKETING & DESIGN TIPS

Design Postcards in InDesign to Connect

Make sure your message is delivered by laying out and printing postcards correctly.

Read More >


Liquid Laminate

Liquid laminate is a great way to add durability & visual impact to paper & digital prints. We created a guide on how to effectively use liquid laminate.

Read More >


Get our Idea Book

Unlock endless print marketing ideas in our Idea Book. Get inspired, gain attention & gain affinity. Start crafting your standout print campaigns today!

Read More >


Business Card Examples, Printing Samples and Design Ideas

Business Card Examples, Printing Samples and Design Ideas

1 Sided Business Cards Samples

These design examples show how well designed business cards with professional quality printing can have more impact and be remembered more than a plain card, enhancing the success of your branding, marketing and sales efforts.
 

business card sample business card example color business card sample full color business card sample full color business card example business card design idea biz card sample picture business card printed business card example business card sample 2 sample business card business card example 3 business card sample 3 printed business card business card idea


Double Sided Business Card Samples

These design ideas show how doubling the real estate and presentation space with a two sided business card gives you a lot more opportunity for making the case for your business services or product.

2 sided business card sample double business card sample 2 sided business card 2 sided color business card 2 sided business card example sample 2 sided business card double business card example double business card exmple


Vertical Business Card Examples

Full color vertical business card designs allow for different design presentations and can be more unique and interesting.

vertical business card sample vertical picture business card vertical business card design vertical business cards sample vertical business card example vertical business card vertical business cards example printed vertical business card

Folded Business Cards Examples

Get four times the space to share your business information and marketing message. These can be used like a mini-brochure or catalog, getting a lot more information into the hands of your prospective clients and contacts.

folded business card folded business card sample

For quality business card templates use Freepik.com

This field is for validation purposes and should be left unchanged.

Get 20% Off

Subscribe to our weekly newsletter and get an instant 20% off your first print project.

Name(Required)
RELATED MARKETING & DESIGN TIPS

Shipping and Delivery

Everything you need to know about getting your order shipped to you when you need it, including making shipment changes and tracking your order

Read More >


Packaging: Box Dimension Guidelines

How to determine and specify the length, width and height for a folding box for product packaging design.

Read More >


Graphic Design

So you have the coolest design idea for print, but do you have the right colors for print or coating or fold? Our graphic design resource center has it all.

Read More >


  • « Go to Previous Page
  • Page 1
  • Page 2
  • Page 3
  • Page 4
  • Interim pages omitted …
  • Page 8
  • Go to Next Page »

Footer

Printing for Less

info@printingforless.com
100 P F L Way, Livingston, MT 59047

800-930-2423

  • Home
  • Products
  • Services
  • Industries
  • Get Printing Samples
  • Direct Mail Marketing Resource Center
  • Printing Resource Center
  • Blogs
  • Templates
  • Terms & Conditions
  • Contact
  • About Printing for Less
  • Careers
  • Login

Copyright © 1998-2026 PrintingforLess.com. All Rights Reserved.

logo
  • 800-930-2423
  • Products
  • Direct Mail Marketing
  • Services
  • Industries
  • Direct Mail Marketing Resources
  • Printing & Mailing Resources
  • Get a Quote
  • Contact Us
  • My Login
Postcard Printing & Mailing
This field is for validation purposes and should be left unchanged.

Get 20% Off

Subscribe to our weekly newsletter and get an instant 20% off your first print project.

Name(Required)

*Some exclusions apply. See details