Image Resolution for Printing
When talking about image printing, resolution is one of the most important factors to keep in mind. Resolution is the measurement of how many dots/pixels fit into once inch, which is already referred to as DPI (dots per inch). High quality image prints rely on the provided images having high resolution and enough DPI to provide clarity.
The higher resolution, the sharper the image will be. At Printing for Less, we recommend a resolution of 300 DPI (dots per inch) for crisp, clear results. Lower resolution images appear fuzzy, jagged and blurry.
The following image is available with a 300 DPI resolution, and therefore will translate well into print. A zoom of the same image, also at 300 DPI, will print with equal quality.
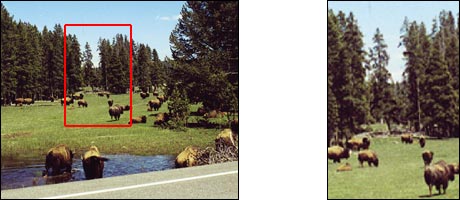
Will print well
Will print well
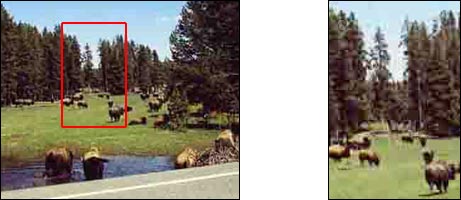
Will not print well
Will not print well
The low resolution of 72 DPI for this image and zoomed image means they will not print well.
Take the below font resolution as another example. The version on the left has a resolution of 400 DPI, and it comes out nice and crisp.
The version on the right, which only has a resolution of 72 DPI, is fuzzy and appears blurred.

Image resolution rules:
- Images should be at least 300 DPI (dots per inch) at the final size in the layout.
- Images which include text should be 400 DPI at the final size in the layout.
- Resolution and image size are inversely proportional to each other. Enlarge an image, the resolution decreases; reduce an image, the resolution increases. Example: a 2 x 2″ image at 300 DPI (acceptable) enlarged to 4 x 4″ has a new resolution of 150 DPI (unacceptable).
- Low resolution images print fuzzy, jagged and blurry.
- The settings used during the original “capture” of an image (ie: scanning, digital camera, etc) determine its base resolution. Resolution can only be improved by decreasing the image size, or by recapturing the image at a higher quality setting.
- Recommended minimum resolution for printing is 300 DPI; computer monitors generally have a display setting of 72 DPI or 96 DPI. If we indicate that some of your images have low resolution, they may not look bad on your monitor but will likely print blurry or jagged.
Things to avoid:
- Web images are predominately low resolution (72-96 DPI) GIF or JPEG files. This resolution is good for quick transmission over the internet, but is not acceptable for use in printing. Do not save images or graphics from a website to use in your print project!
- Upsampling is when a low resolution image is saved to a higher resolution with no changes in dimensions. Upsampling adds more pixels/dots per inch (DPI), but creates blurry images, ugly blocks of color, and high contrast in images. The only way resolution can be improved is by decreasing the image size, or by recapturing the image at a higher quality setting.
How to get images with good resolution from your digital camera:
- If you have not yet taken the digital image, adjust your camera to the highest quality setting.
- Taking the photo on the highest setting will maximize both the quality of the image, as well as the range of sizes at which you will be able to use it in printing projects. If possible, save your image as a lossless TIF or EPS file before doing any editing to best preserve color and sharpness.
- Determine the resolution and maximum usable dimensions for any images you want to use in your project. Images should have resolution of 300 DPI at their final size in the file; 400 DPI if the image includes text. Resolution and image size are inversely proportional to each other. In other words, enlarging an image will decrease the resolution and shrinking an image will increase the resolution.
- To determine resolution from pixel dimensions, divide pixel width and height by 300 to determine the maximum size at which you will be able to use the image, while maintaining a quality resolution of 300 DPI. Divide by 400 for images that include text.
- Start with 1200 pixels x 1600 pixels as the dimensions for an image with no text.
- Divide 1200 ÷ 300 = 4, and 1600 ÷ 300 = 5.33. If this image had text, you would divide by 400 instead of 300.
- So, the maximum usable dimensions for the image are 4 x 5.33″. It will print crisp and clear at this size or smaller.
Things to know about image color
Cameras primarily use the RGB color space. To print on a four-color printing press, all RGB images need to be converted to CMYK.
When we receive RGB images, we do a standard-value conversion to CMYK, which may not be perfectly to your liking. You have more control if you do the color conversion yourself- see our RGB – CMYK information page for important instructions on getting the results you want.
How to scan your image for printing
Before you scan, you need to know what size your image will be in your design layout. If in doubt, overestimate the size you will need.
-
-
- If the original image is larger than the size it will be in your file, simply scan at 300 DPI. Scan at 400 DPI if image includes text.
- If the original image is smaller than the size it will be in your file, you need to adjust your scanner settings. You will not get acceptable results if you scan the photo at 300 DPI and then enlarge it in your layout program.
-
To calculate the necessary scanning resolution, you’ll need to do a little math to match the new resolution with the size of the enlarged image:
-
-
- Increase the scanning resolution (300 DPI if image doesn’t have text; 400 DPI if it includes text) by the same percentage you will be enlarging the original image.
- If you need to enlarge anything more than 300%, it is best to contact your local service provider for a professional scan.
-
Example:
-
- Start with a 2 x 3″ image with no text that will display at 5 x 7.5″ in the layout.
- This is an 2.5x enlargement, or 250% of the original image (5 / 2 = 2.5).
- Multiply the magnification factor (in this case, 2.5) by the desired DPI of the final image (in this case, 300 DPI) to get the DPI at which you will need to scan the original image (750 DPI) (2.5 x 300 = 750). This will allow you to print the 5 x 7.5″ image without loss of crispness or quality.
Save your scanned images as lossless TIF or EPS files to best preserve color and sharpness.
File formats like GIF or JPEG are best for web usage, as they compress color and pixel resolution to enhance transmission speed. If you’re going to be printing your image, you need to save it in the lossless format to keep the high resolution that will result in quality prints.
Most scanners save images in the RGB color space. To print on a four-color printing press, all RGB images need to be converted to CMYK.
When we receive RGB images, we do a standard-value conversion to CMYK, which may not be perfectly to your liking. You have more control if you do the color conversion yourself-see our RGB – CMYK information page for important instructions on getting the results you want.
Using stock photography in printing
If you’re going to be creating printing products using stock photography, there are a few things to keep in mind.
- Image size in your design layout
- Royalty specifications
- Color values of the image
- Before purchasing a stock image for printing, make sure you know what size the image will be in your design layout so you can purchase appropriately. If in doubt, overestimate the size you will need.
- Read all the “fine print” prior to purchase as it will determine price, color, file size, copyrights, resolution and quality. Images should have a resolution of 300 DPI (400 DPI if the image includes text) at their final layout size.
- Royalty-free: Purchased images can be used as many times as you want and for almost any purpose. Royalty-free images cost less than rights-protected images, however you have no control over who else uses that image.
- Rights-protected: Images are purchased for a specific use. Cost varies depending on how image will be used (circulation size, production medium, etc.) and cannot be used in any way other without permission. A certain level of exclusivity is usually guaranteed.
- Get the image in CMYK if possible. To print on a four-color printing press, all RGB images need to be converted to CMYK.
- When we receive RGB images, we do a standard-value conversion to CMYK, which may not be perfectly to your liking. You have more control if you do the color conversion yourself-see our RGB – CMYK information page for important instructions on getting the results you want.
What are lossless image file formats?
Photographic and scanned images can be saved in different file formats. We recommend saving in a “lossless file format,” one that does not lose color quality, contrast or file size.
- GOOD: TIF or EPS files are examples of lossless file formats. They are designed to maintain identical color and image data throughout multiple uses.
- BAD: JPEG/JPG or GIF files are examples of lossy file formats. They are designed for easy file transmission and Internet use, not for printing. When a lossy file format is saved over and over again, the process exaggerates blurry, jagged edges and creates extra pixel garbage that you do not want printed.
- If you start with a JPEG or GIF file that needs to be edited, save it as an EPS or TIF file before you make any edits. Then edit the EPS or TIF file to maintain image quality.

Recap: Image resolution + standard DPI = High quality image printing
Don’t let yourself be disappointed by low quality printed images. Remember these key pieces of information to get the best printed images, every time:
- Standard image resolution needs to be 300 DPI for images, and 400 DPI for images containing text
- Save images in lossless file formats (TIF or EPS), not as low resolution GIF or JPEG files
- Make sure your image uses CMYK color, not RBG