Transform Ho-Hum Images with Photoshop
This whitepaper is one in a series of helpful how-to's from PrintingForLess.com, America's Print Shop
®. The paper introduces you to easy yet powerful treatments for images that would benefit from a little jazzing up.
Fill Text with Images
A picture's worth a thousand words. And when your words are a picture, it's worth a million! Here's how to make it happen quickly and easily using Photoshop's clipping masks.
Step 1
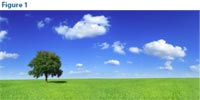
Open a landscape photo with definite color. Avoid
something with too much of one solid color in one area, or
with the same color as the background of the page you'll
eventually be placing the word on. Something like Figure 1
(© iStockphoto.com / konradlew) is a good candidate for
this technique.

Select Photoshop's Text tool and click somewhere in
the photo. This will create a new text layer. Type in the
text you want the image to show through (Figure 2). If
necessary, change the font size to something larger by
either selecting the text and changing the size on the
Options palette, or by clicking-and-dragging a corner of
the text with the Move tool. (Make sure Show Transform
Controls is selected up in the Options palette). For manual
resizing, hold Shift to maintain proportion, and press
Enter to apply changes.

Change the typeface to a strong, thick font. I chose
Impact. Next, double-click the Background layer to convert
it to a normal layer. Name it something -- I've called mine
Layer 0 -- and press OK (Figure 3).
Step 2

In the Layers palette, click-and-drag Layer 0 above the text
layer. Carefully hover your cursor in between the two layers
in the Layers palette and press Option (PC: Alt). The cursor
should turn into a different icon, with two circles. Click
once. Your text should now contain the pixels of the photo,
but the shape of the text (Figure 4).
If you don't like which part the photo shows through
the letters, select the Move tool and click-and-drag the text
layer around the canvas.
Now it's time to save your image. If you save the file as
a JPEG, Photoshop adds a white background. To preserve
the transparency, save the file as a transparent GIF. To
preview what a background will look like with the text,
click Add New Layer on the Layers palette, and click and
drag the new layer to the bottom. Then, click the
Foreground color and select a color for the background,
such as white. Press Option-Delete (PC: Alt-Backspace) to
fill that layer with the color.
Step 3
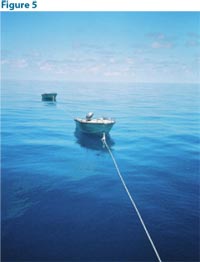
Let's try something slightly different example. For this example, I've used an image by David Freund, ©iStockphoto.com (Figure 5).
Now you'll add three text layers separately. Select Photoshop's Text tool, click in the photo, and enter the word "Ocean." Resize the text as desired.
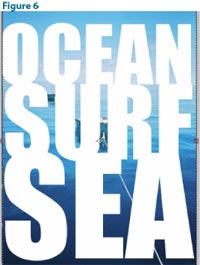
Option-Click (PC: Alt-Click) to duplicate the text and
then select the Text tool to change the text to "Surf".
Option/Alt-Click again to change the text to "Sea". Position
the words as you see in Figure 6, then select all the text
layers in the Layers palette and go to Layer > Merge Layers
(or press Cmd-E (PC: Ctrl-E).
Double-click the photo layer to make it a normal layer.
Click-and-drag the merged text layer below the photo
layer. Option-Click (Alt-Click) with the cursor in between
the two layers. Add a white layer as you see in Figure 7, or
keep the background transparent.
Step 4
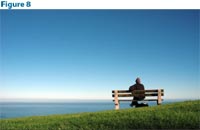
You can also add text with a clipping mask to part of
a design, as I did in Figure 8 using a photo by Henk
Badenhorst (© iStockphoto.com).
Create the clipping mask the same way you did for the
first two examples, but also duplicate the photo layer by
pressing Cmd-J (PC: Ctrl-J) after selecting it in the Layers
palette. Then, drag that new copy of the photo layer to the
background, and select the area for the text to show by
clicking-and-dragging around that area with the Marquee
Selection tool.
Finally, press Delete (PC: Backspace) to
delete those pixels. You may want to drag a guide from
the top ruler to see where the selection should be while
temporarily turning the visibility of the copied photo layer
off to see where the text begins.
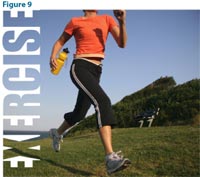
Figure 9 is one more example to spark your own creativity, this time using an image by Josef Volavka (©iStockphoto.com).
You can also fill type with artwork using InDesign and QuarkXPress and get similar results. For tutorials, see
http://www.creativepro.com/article/indesign-how-fill-typewith-
artwork (InDesign) and
http://www.creativepro.com/article/quark-how-to-fill-type-with-artwork-in-quarkxpress (QuarkXPress).
Turn Color Photos into Duotones
You can transform one photograph into a wide
variety of duotones. This makes it look more like
an illustration, which can be a plus when your
original photo is not of the highest quality. As
a plus, a duotone's simple color scheme can be
easier to coordinate with an overall design.
Step 1

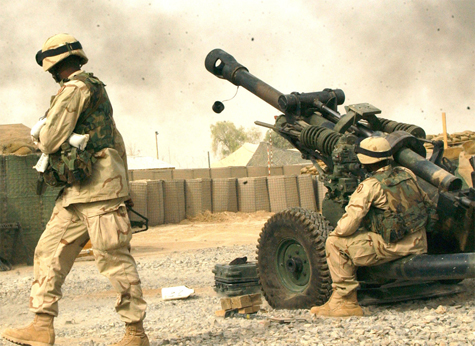
Download a higher resolution copy of Figure 1 by clicking on the image then saving it to your computer by right clicking on it. Name
that file "before.jpg". This photo is in the public domain
because it's from the United States Army's image database.
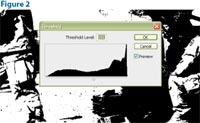
Open "before.jpg" in Photoshop and go to Image >
Adjustments > Threshold.
Click and drag on the Threshold's bottom slider to
adjust its levels (Figure 2). The farther you move the slider
to the left, the whiter the image will be. The farther you
move it to the right, the blacker the image will be. The key
to a successful duotone is to have a good balance between
the dark and light pixels. You want the important parts of
the photo to show, and good detail and balance between
the two tones. Set this image's level to 151 and click OK.
Step 2
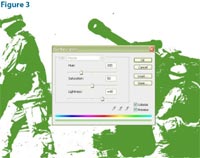
Now that you have a black-and-white duotone look, let's add some color. Go to Image > Adjustments > Hue/Saturation.
The hue/saturation dialog has three settings to adjust: hue, saturation, and lightness. To preview the effect the settings will have, check the Preview box. Next, check the Colorize box.
Now, let's create a duotone with white as the background. For this example, adjust the Hue to 100, the Saturation slider to 50, and the Lightness slider to +40.
Click OK (Figure 3).
When you're trying this technique on other images,
drag the sliders right and left and watch the results.
Moving the Hue slider changes colors. Dragging the
Lightness slider to the left lightens the color, and dragging
the Saturation slider to the left increases saturation.
Save the image (File > Save As) and name it "green.jpg."
Close that file.
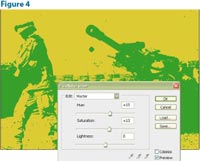
Step 3
Now let's make another duotone, this time with a black background. Close "before.jpg" without saving, then reopen it.
Go to Image > Adjustments > Threshold and adjust the slider to 155. Click OK.
Go to Image > Adjustments > Hue/Saturation again. Check the Preview and Colorize boxes by clicking on them. Set the values to Hue=40, Saturation=63, and Lightness=-47 (Figure 4). Click OK. Name this image "brown.jpg" and keep it open.
Step 4
Let's say you want a duotone made out of two color hues,
instead of one color plus black or white. Easy!
Open "green.jpg," the file you created earlier in this tutorial.
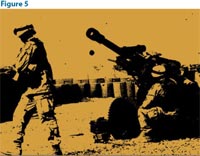
You should have two open files that look like Figure 5.
Click on "brown.jpg" to make it active and go to Select
> Color Range. Hover your mouse over the brown area
and click to sample it with the Color Range's eyedropper
tool. Click OK.
Go to Edit > Copy or press Cmd-C (PC: Ctrl-C) to copy
the selected pixels. Open the "green.jpg" file and go to
Edit > Paste or Cmd-V (PC: Ctrl-V) to paste the pixels.
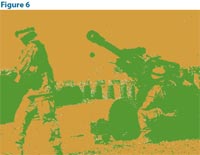
You'll notice that there are some white pixels you'll
want to make green or brown (Figure 6). The white
pixels are there because the two images have slightly
different ranges.
Click the eye icon next to the Background layer
(the green pixels) in the Layers palette to turn off
its transparency. Then turn the transparency for the
Background layer back on by clicking its eye icon in
Photoshop' Layers palette. Select the Eyedropper tool
from the toolbox.
Select the Background layer in the Layers palette by
clicking on it. Click somewhere on the green to sample
the green color. You can now turn off the transparency of
the Background layer by clicking its eye icon in the Layers
palette. Click the New Layer icon on the bottom of the
Layers palette to insert a new layer, Layer 2, in between the
Background layer and Layer 1.
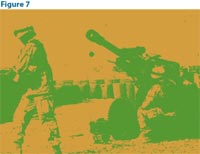
Press Option-Backspace (PC: Alt-Backspace) to fill the
new layer with the green color in the foreground (Figure
7). Now you have a green-and-brown duotone. Save it as
"duotone.jpg."
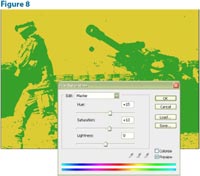
You can adjust the hue, saturation, and lightness by going to Image > Adjustments > Hue/Saturation again
(Figure 8). However, Photoshop won't give you a black/ color hue or white/color hue combination; instead, it will
rely on the relationship between the two hues used.
This whitepaper is based on materials written by Chad Neuman for CreativePro.com.
Knowledge Center: Printing Tips
Topics

 Download a higher resolution copy of Figure 1 by clicking on the image then saving it to your computer by right clicking on it. Name
that file "before.jpg". This photo is in the public domain
because it's from the United States Army's image database.
Open "before.jpg" in Photoshop and go to Image >
Adjustments > Threshold.
Click and drag on the Threshold's bottom slider to
adjust its levels (Figure 2). The farther you move the slider
to the left, the whiter the image will be. The farther you
move it to the right, the blacker the image will be. The key
to a successful duotone is to have a good balance between
the dark and light pixels. You want the important parts of
the photo to show, and good detail and balance between
the two tones. Set this image's level to 151 and click OK.
Download a higher resolution copy of Figure 1 by clicking on the image then saving it to your computer by right clicking on it. Name
that file "before.jpg". This photo is in the public domain
because it's from the United States Army's image database.
Open "before.jpg" in Photoshop and go to Image >
Adjustments > Threshold.
Click and drag on the Threshold's bottom slider to
adjust its levels (Figure 2). The farther you move the slider
to the left, the whiter the image will be. The farther you
move it to the right, the blacker the image will be. The key
to a successful duotone is to have a good balance between
the dark and light pixels. You want the important parts of
the photo to show, and good detail and balance between
the two tones. Set this image's level to 151 and click OK.