• Skip to primary navigation
  • Skip to main content
  • Skip to footer
Printing for Less

Printing for Less

At Printing for Less, we've offered high quality online printing services since 1996. Shop business cards, booklets, stickers, and more!

P F L.com
My LoginMy Login
800-930-2423
  • Printing
    • Postcards
    • Catalogs
    • Brochures
    • Folders
    • Letters
    • Newsletters
    • Envelopes
    • Greeting Cards
    • Print Templates
    • All Products
  • Direct Mail
    • Why Direct Mail Marketing?
    • Every Door Direct Mail® Postcards
    • Direct Mail Letters
    • Catalogs & Booklets
    • Marketing Gifts & Kits
    • Direct Mail Automation
  • Services
    • Mailing Services
    • Design Services
    • Custom Printing Services
    • Reseller Program
  • Industries
    • Advertising & Design
    • Enterprise
    • Food & Beverage
    • Healthcare Payers
    • Healthcare Providers
    • Nonprofit
    • Real Estate
    • Retail
    • Technology
    • University
  • Resources
    • Direct Mail Marketing
      Resource Center
    • Printing Resource Center
    • Blogs
    • Templates
    • Video Library
    • Have a Question?
  • Get Samples
  • Get a Quote

Blog

Outlining Fonts Isn’t Usually Necessary

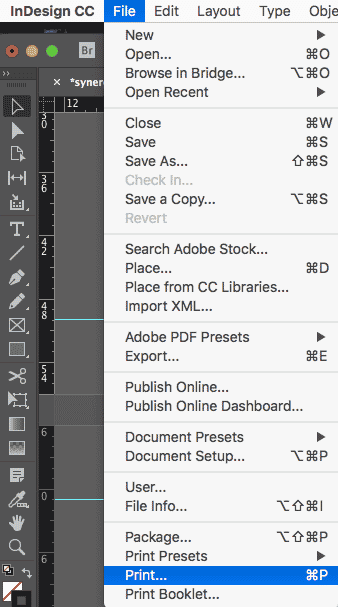
Sometimes a person writes that they have been asked to outline fonts by a printer. Or they think that if the person they’re sending a file to doesn’t have the fonts used in a PDF document, that other fonts will be substituted.

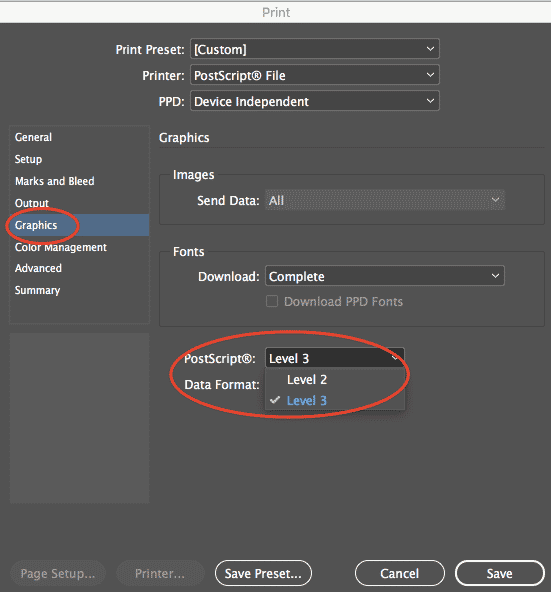
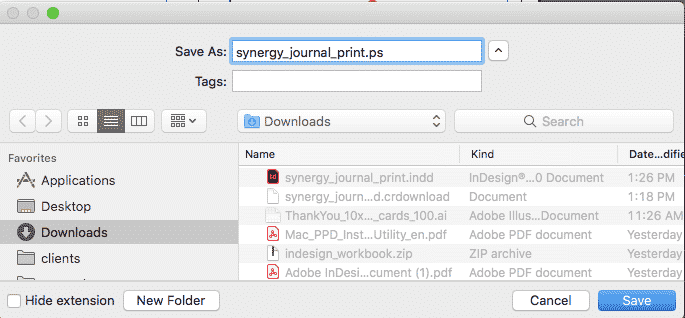
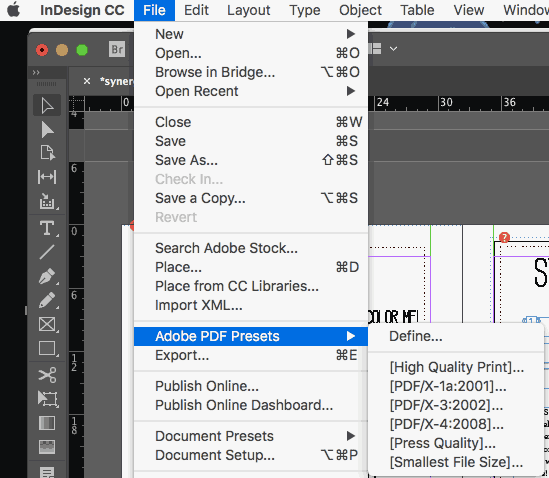
If you create a PDF file from your document, all the Adobe Creative Suite applications (and most other applications) will embed all the fonts. Outlining in almost all cases is not necessary.

There are some good reasons not to outline fonts:

• The outlining of text will degrade the typographic quality of the text. The glyphs are turned into ordinary graphics that lack the intelligence fonts have (called hinting) to look good on different kinds of printers. Look at the word “blanket” below after it has been outlined. Outlined type will look thicker.

• Certain attributes will be lost because they are not part of the font itself. The underscore in the URL below below was lost, and the words in the bulleted list were outlined but the bullets were not.

original fonts vs outlined fonts

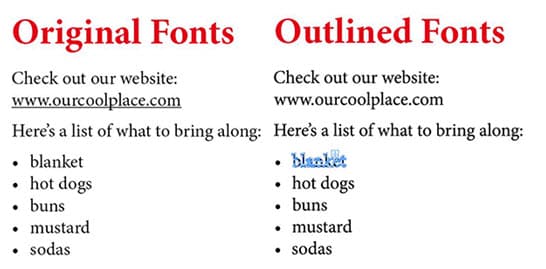
So the best advice is: Keep type in its native format. Resist outlining if possible.

Need help with your print? Talk to a live print expert today: 800-930-7978.

Get Professional Print Design Help

Use the Correct PDF Viewer Application

It’s important to use the correct settings to create a PDF file when it’s intended for commercial printing. It’s also critical to select the best PDF viewer application in which to look at your PDF. There are many choices of PDF readers, and not all of them are created equally. Many of them may work for everyday use but cannot display attributes that are important for printing.

Shown below is an example. When a customer creates a document for print, they turn on the overprinting attribute on some type. They switch the color of the type to white and when they create a PDF file, it looks like this:

pdf file example


But when the printer looks at the file in Adobe Acrobat or Adobe Reader, which are designed to accurately preview PDF files for print, they see the way the file will really print:

printed image example

When the VIGC, the Flemish Innovation Center for Graphic Communication, tested PDF readers like Apple Preview or Foxit Reader, they found that they couldn’t display critical features like transparency, overprinting, color accuracy or interactive PDF elements.

The most reliable PDF readers are Adobe Reader (free from the Adobe website) and Adobe Acrobat, and they are what you should use to preview your PDF files.

Need help with your print? Talk to a live print expert today: 800-930-7978.

The Latest InDesign Postscript Advice for Mac OS X

If you’re creating an Adobe Acrobat PDF to send to your printer from Adobe InDesign, it’s now best to avoid Acrobat Distiller. These days, there is no reason a printer should be asking you do use it. And frankly, if they’re making such a request, you may want to find an updated printer.

When you’re ready to send your InDesign document to print, there are three main ways you can deliver your file: delivering the file in its native InDesign format, delivering the file as a print-ready PDF, or delivering a Postscript file.

Regardless of the file you choose to deliver, always make sure that you’ve double checked everything in your document before saving the final version. Once the document goes to the printer, it’ll be much more difficult (and expensive) to make changes.

If you decide to send the InDesign file, be careful. It’s impossible to know what version of InDesign your printer is running (even though InDesign boasts backward compatibility, a perfect translation between versions isn’t guaranteed). Will your provider set up the registration marks correctly? Do they have the same versions of the fonts you’ve used? At the very least, your text may change if your file is opened in a version other than the version in which you created your document.

Instead of creating a Postscript file and then distilling it, you can simply export a PDF from InDesign (specifically “Export” — don’t use the PDF printer driver). Most printers these days actually prefer not to receive Postscript files, and request PDFs instead.

Many printers won’t accept Postscript files at all because there’s too much room for error. It’s too easy for clients to make errors when creating Postscript files. Plus, changes are more difficult to make once the document is written as Postscript, so PDF seems to be the way to go.

Creating Postscript in Mac OS X Using InDesign

There used to be a different process to use Adobe InDesign for creating a Postscript file (.ps file) on a Mac, but with recent updates in technology and software technology, it’s a much simpler process.  Also, PDF files are generally preferred these days. But if you have to create a Postscript file, the Print Dialog box will be your best friend.

InDesign Print Dialog Settings

It’s always better to set printer driver settings from within the Print Dialog box, as opposed to modifying the driver (oftentimes, the same settings are duplicated in both places, and it’s best to avoid possible override confusion and conflicts. InDesign is able to accurately print to other printers, but prefers Postscript 3 and the PDF print engine. They’re Adobe’s printing technologies, after all, so it makes sense!

When making your printer selection from the Print Dialog box, InDesign will look at the PPD for any printer you choose, which it will display in the PPD popup menu.  If you want to create/save a Postscript file instead of printing directly to a physical printer, you’ll choose “Postscript file” from the Printer popup menu. You’ll then need to choose a PPD file that describes your output device (assuming you know it), or choose “Device Independent.”

What Does “Device-Independent PostScript” Mean?

  • You’ll get a “100% DSC-compliant” file, which means that your file will be able to support any required functions (like trapping or imposition) post-processing
  • You’ll have a file that will print to just about any output device, because all dependencies on specific devices or drivers have been stripped. (That said, if you need to take advantage of any special printer features like different media sizes or screen frequencies, you won’t be able to choose Device Independent Postscript.)
  • The file will need color separations created in post-processing software (or at the RIP, with in-RIP separations), because the color output includes spot colors AND composite CMYK.
  • Any trapping you want will have to happen at the RIP or through post-processing software. InDesign won’t allow trapping in a Device-Independent Postscript file.
  • InDesign can only print a Device-Independent Postscript to a file. This file format can’t be used if you’re going directly to another device or application.
  • If trapping and separations will happen later in the production process (like during imposition, trapping, or at the RIP), Device-independent PostScript file is a solid choice.

Steps to Create Your Postscript File on a Mac with InDesign

  • If you don’t already have your file open in Adobe InDesign, now’s the time to open it.
  • If you’re ready to create your Postscript file, open the Print Dialog box (Cmd + P) or File → Print

print screenshot

  • In the “Printer” dropdown, choose “Postscript file”.

postscript file screenshot

  • A “PPD” dropdown will appear right under the “Printer” dropdown. Select “Device Independent” unless you have another PPD you’ve been told to use.

device independent screenshot

  • Navigate to the “”Graphics” tab in the left hand menu and choose either Level 2 or Level 3 (if you don’t need to use level 2, just keep it set to Level 3).

graphics screenshot

  • Click the “Save” button at the bottom right of the Print Dialog box, and you’ll then be prompted to choose where to save your Postscript file. Be sure to change the file extension to “.ps” even though it defaults to “.indd”.  

finder screenshot

  • If you forget to change the file extension, don’t worry; InDesign will prompt you with the following error popup:

indesign warning message screenshot


Using a PPD from Your Printer

If you‘re being required to create a Postscript printer file,  your chosen printer may have actually given you a specific PPD to use for file setup. If you’ve already installed a specific PPD on your Mac and don’t see it as an option in the PPD popup menu, you may need to first decompress it (using an application such as Stuffit Expander).

Okay, So What About Encapsulated Postscript?

Encapsulated Postscript (EPS) is still widely used, but it’s quite an outdated file format. EPS is no longer evolving, and because Adobe Creative Cloud and Creative Suite software has become the industry standard, it makes more sense to use Adobe’s native formats instead. Adobe has made it seamless and simple to place files from one of its applications into the next and the Adobe file size tends to be both smaller and editable.

Continuing to use EPS as an intermediate file format just doesn’t make practical sense. It may be easier to use EPS files with non-Adobe applications, but most up-to-date printers have Adobe on hand.

That said, if you have folders and folders of old EPS files on hand, you don’t have to trash them. Adobe’s Dov Isaacs promised (via the PrintPlanet website) that Adobe will support EPS as a legacy graphics format, even though using EPS format isn’t recommended.

Printing for Less (Printing for Less) has been an industry leader and provider of high-quality, unique printing services since 1996. Though we are a large company with customers across the globe, we treat our customers with the attention and care you’d expect from a luxury printing boutique. From business cards and banners to letterhead, flyers, and beyond — Printing for Less knows printing like no other. Let’s talk about your project! Our print consultants are available 8am-5pm MT Monday through Friday at (800) 930-7978.

Choose the Best PDF Preset for Printing

Choosing the Best PDF Preset in InDesign

InDesign provides PDF presets so that you have fewer choices to make (and fewer details to actively remember). Presets group multiple panels of choices into the most common combinations for various workflows, such as commercial printing, desktop printing, and digital publishing.

But can you really trust a preset to take care of the piece you worked so long and hard to create? At the same time, how in the world would you expect to remember all of the available print options every single time you need a PDF?

Don’t worry about the learning curve; InDesign’s PDF presets aren’t standalone. If you’ve used other Adobe Creative Cloud applications to generate PDFs, you’ll likely notice something familiar about InDesign’s available preset options. You’ll find the presets in similar places when creating PDFs from both Illustrator and Photoshop.

You can quickly access InDesign’s PDF presets right from a flyout in the File menu. Go to File → Adobe PDF Presets, and you’ll see all of your options right there.

adobe pdf presets dialog

If you ever need a quick reminder of what a particular preset does from within your InDesign document, you can choose File → Adobe PDF Presets → Define, and as you choose each preset, you’ll see a straightforward “Preset Description” right there in the dialog box.

pdf quality settings

Let’s go ahead and look at the best applications for each.

“High Quality Print” PDF Preset

According to InDesign, this preset will produce PDF files suitable for “high-quality printing on desktop printers and proofers.” What settings are most suitable for this particular application? Both color and grayscale images above 300 ppi will be downsampled to 300. Colors are left alone, so RGB and CMYK images will each remain in their native color spaces.

All transparency settings will also be left alone. Note that Acrobat and Acrobat Reader 5 are the minimum versions required for compatibility with these preset settings (which shouldn’t be a problem these days).

pdf presets high quality

What is PDF/X?

PDF/X standards are the best choice when your printer hasn’t provided you with specs. They’re a safe bet if you want to be sure your printer will be able to open your file, while also minimizing any printing errors. Adobe developed this set of ISO standards for print workflows by addressing input from other industry professionals and vendors. Because these standards are geared toward producing more universal print-ready PDFs, printers will often take the easiest route and encourage clients to choose the PDF/X presets.

“PDF/X-1a:2001” PDF Preset

PDF/X-1a:2001 takes away compatibility with Acrobat 5 and downgrades it to Acrobat 4. All of your colors (whether RGB or CMYK) will automatically be converted to CMYK, although any spot colors you’ve set will stay intact.

You’ll also need to be proactive about transparency flattening, and may want to specify your own settings for transparency treatment.

To do this, you can go to File → Adobe PDF Presets → Define as shown above, then choose “PDF/X-1a:2001” and click the “New” button.

pdf presets pdf/x-1a:2001

Then, select “Advanced” from the left menu and use the “Transparency Flattener” down to make your choice.

pdf presets transparency flattener

The “High Resolution Transparency Flattener” preset will best maintain the quality of your text and vectors, if that’s what you want. All images above 300 ppi resolution will be downsampled to 300 ppi if you have they’re higher.

adobe pdf presets settings

“PDF/X-3:2002” PDF Preset

Again, with this preset, your transparency will be flattened. If you want to choose your transparency settings proactively, you can follow the same instructions as above. PDF/X3:2002 is like the previous PDF/X setting, except it allows embedded RGB profiles to remain (no automatic conversion to CMYK).  

It’s a helpful setting if your printer is planning on optimizing the color based on the printing environment.  European printers tend to make more use of this format than American printers.

pdf presets pdf/x-3:2002

“PDF/X-4:2008” PDF Preset

With this PDF/X present, since compatibility is set to the more recent Acrobat 7, you’ll be able to  keep any transparency in your document intact.

This is the biggest advantage of the PDF/X-4:2008 formatting. You’ll also be able to maintain the quality of any high resolution images. Color-wise, you’re allowed to use RGB, CMYK, and greyscale. Your spot colors will stay intact, and you can even continue to use LAB or ICC profiles.

pdf presets pdf/x-4:2008

“Press Quality” PDF Preset:

This is another bundle of settings that’s often commonplace when working with high-quality commercial printers. This preset will allow you to keep all transparency live in the document (no flattening required). Adobe Acrobat works well with live transparency, and also creates satisfying separations, so a printer who works out of Acrobat will be happy with any file output this way. It will be compatible as far back as Adobe Acrobat 5. Any RGB values will be converted to CMYK, and all images will be downsampled to 300 pp in cases where the actual resolution is higher.

adobe pdf presets press quality

“Smallest File Size” PDF Preset:

“Smallest File Size” is most important where size matters, and size matters most on the web. In order for your document to be accessible to as much of your audience as possible, you’ll want to choose this preset for anything you’re planning to send via email or display on a screen.

Anything that’s both color and high resolution will automatically be downsampled to 100 ppi.  Grayscale images can stay as high as 150 ppi. You’ll be able to play well with anything as far back as Acrobat 6, and you can keep your transparency and any layers intact.

pdf presets smallest file size

Custom InDesign Presets

The above settings will satisfy your print-worthy document needs almost all of the time, especially when you’re part of a professional environment using a typical print workflow. If, however, you have special considerations (or just want to get fancy), there’s more than one way to customize presets for your needs in InDesign.

We don’t need to cover every possible preset customization, but here are a couple of suggestions for more common needs:

  • If you need to make your InDesign files interactive once saved as PDFs, you can go to File → Adobe PDF Presets → Define, then choose your preset setting and hit “New.”
adobe pdf presets define


pdf presets new preset
  • Then, choose “General” from the left side menu and pick your desired Hyperlinks and Interactive Elements from the bottom of the dialog:
pdf presets new export preset
  • If your printer is asking you for crop marks, bleed marks, or other printer’s marks, you can go to File → Adobe PDF Presets → Define, then again choose your preset setting and hit “New.”
pdf presets pdf/x-1a:2001 new preset
  • Then, in the dialog box, choose “Marks and Bleeds” from the left side menu and check the box for “All Printer’s Marks” in the top section.
adobe pdf presets all printers marks

Saving Your PDF Preset

Once you’ve added your additional customizations to any of the PDF Presets in InDesign, you’ll want to name your preset in the top field of the dialog box.

pdf presets save preset

Then, click the “OK” button at the bottom right of the dialog box.

pdf presets ok

Your preset will have automatically been added to the Adobe PDF Presets dialog.

pdf presets list of presets

Congratulations, and happy customizing!

Need help with your printing? Talk to a live print expert today: 800-930-7978.

Get A Quote on PDF Printing Services

Turn on Overprint Preview Before Printing

overprint preview screenshot

If you’ve ever sent something to print and it came back looking far from what you expected, overprinting settings could be the culprit.

What is Overprinting?

Overprinting means that one color gets printed directly on top of another color.  Sometimes in printing, it makes sense to allow the top objects in a piece to print directly on top of other fully printed objects. For example, if you’re trying to add some sort of finish to your print products, you’ll need to make sure you have overprint options selected for the objects that will be printed on top.

When you want things to overlap, the object on top must be set to “overprint” instead of “knockout.”

When normally setting up files with one color on top of another, the color underneath gets “knocked out” by the printer, meaning no colors get mixed. This “knocking out” process prevents colors from mixing and getting muddy or overly saturated. The printer won’t print any parts of objects that lie underneath other objects; the overlap won’t be printed with overlapping inks. Instead, it’s as if each part of the visual overlap becomes its own object.

With overprinting though, once the “overprint fill” and/or “overprint stroke” settings get toggled, the first color will be printed, and then the second color will print directly on top of that, so you’ll see a blend of the two colors instead of two colors each in their pure, unblended, intended state.

Why Choose to Overprint?

Some people choose to use overprinting as a sort of insurance policy against the white halos that are possible where two colors meet — that is, if the document registration is less than perfect.

Others choose overprinting for the resulting visual effects – for example, simulating a screen printing effect where an overprinted top layer (such as a shape and/or large block letters) will interact with the colors, textures, and images on the layers below it. Such an effect can give a printed piece much more depth than if it were simply solid color on top. Notice the difference between the following two examples:

overprint preview is off
overprint preview is on

As you can see, when used intentionally, overprinting can add extra visual interest (and even textural interest) to your finished pieces. Overprinting really only becomes a problem when you didn’t realize it was active and your final printed piece arrives looking completely different than your expected design.

Getting Your Overprint Settings Just Right

Overprint settings need to be corrected before your piece goes to print, so that you notice any potential overprinting problems early on in the process. You’ll know what settings need to be corrected once you’ve enabled Overprint Preview. Overprint Preview simulates the printing result of the overprints you’ve set, so that you can be confident your final result comes as close to your expectations as possible — BEFORE sending it to print.

Confirm Document and Color Settings

Make sure that your Document Color Mode is set to CMYK, because overprinting only works on spot colors or 100% of process colors C (cyan), M (magenta), Y (yellow), or K (black). If you create spot colors, you’ll see the results you expect. Know that if you use a blend mode (like screen or multiply) or add transparency to spot swatches, you may get unexpected results.

To check your document color mode:

  • In Illustrator, go to File → Document Color Mode → CMYK
document color mode selection screenshot


  • In InDesign, go to Edit → Color Settings → North America Prepress 2 and then choose “Convert to Working Space” for Color Space
custom color settings screenshot

color management policies screenshot

Choosing Overprint Options and Overprint Preview

Overprint Preview mode will produce a good visual estimate of how your piece will look when it prints with the selected overprint settings. Overprint Preview WILL require a lot of your computer memory, so realize that your computer performance may slow (depending on your machine) if it’s continually taxed with rendering a high-resolution display. Overprint Preview is still a great method to preview your piece (and double check the visual display of your settings) before sending a job to print.

Before turning on Overprint Preview, you’ll need to set your overprint options:

  • Choose an object that you’d like to have overprint
  • Make sure the object is active/selected.
  • In Illustrator, choose Window –> Attributes so that the Attributes panel becomes visible
Illustrator attributes screenshot

The options you see in the Attributes panel will depend on the object you’ve selected. In this example, the bike has both a stroke AND a fill, so you’ll be able to check a box for either or both. Go ahead and check the box based on your needs/preferences.

overprint fill stroke screenshot

You’ll then go to View → Overprint Preview to check your intended display.

overprint preview selection screenshot

Illustrator overprint example

In InDesign, choose Window → Output → Attributes

Illustrator attributes output

The options you see in the Attributes panel will depend on the object you’ve selected. In this example, the turquoise box has both a stroke AND a fill, so you’ll be able to check a box for either or both. Go ahead and check the box based on your needs/preferences.

overprint fill screenshot

You’ll then go to View → Overprint Preview to check your intended display.

match pasteboard to theme color screenshot

overprint fill overprint stroke screenshot

If you expect to be using Overprint Preview frequently and you’d prefer to memorize the shortcut, the shortcut to turn on Overprint Preview mode from within Illustrator or InDesign (it’s the same shortcut in both programs — isn’t Adobe great?!) is Option + Shift + Command + Y (Mac) or Alt + Shift + Ctrl + Y (PC).

Double Checking Overprints in Acrobat Pro

Even after activating and previewing your file’s print display using Overprint Preview, you may want to double check your final file in Adobe Acrobat Pro to make sure you’ll be able to achieve your desired print result. With Acrobat Pro (already included with the Adobe Creative Cloud subscription), you’ll be able to confirm whether your design file can be printed error-free.

Using the Output Preview in Adobe Acrobat

  • Open Acrobat and select the “Tools” tab.
  • Once in the Tools tab, scroll down to the “Protect and Standardize” section and choose (double-click on) “Print Production.”
acrobat print production output

  • You’ll see a sidebar pop up to the right of your document pane. Choose (single-click on) “Output Preview.”
acrobat output preview screenshot

  • Under the simulation profile, set the corresponding color space: U.S. Web Coated (SWOP) v2 and check the box next to “Simulate Overprinting” so that you can confirm whether the overprint settings are correct, and any print finishings are set up sufficiently.
swop simulation profile screenshot

  • You can further preflight your document  (or double check your previous preflighting) via the Output Preview “Show” dropdown menu.
acrobat output options

  • You can check whether any graphics or images are still set to RGB by choosing “Non-device CMYK” from the “Show” dropdown. Acrobat will then hide anything in the document that’s in CMYK, so that any graphics still displayed are NOT CMYK (and therefore still need to be converted).
not device cmyk screenshot

Especially with overprinting, while you’re here in this dialog you’ll want to make double sure that total ink coverage is less than the maximum value (usually 300%). You’ll need to check the box next to “Total Area Coverage” and set the value to 300. Anything in your document over 300 will appear in the selected color (based on this dialog screenshot, that would be green).

total area coverage screenshot

If you need help with designing professional print marketing, Printing for Less’s print consultants are available 8am-5pm MT Monday through Friday at (800) 930-7978.

Get Professional Print Design Help

Fixing Corrupt InDesign Files

Sometimes you find an InDesign file that seems to cause problems. It could crash unexpectedly. It may be acting bizarre. Or it may just have something like a “phantom font” or a spot color that appears even though it’s really not there.
A good troubleshooting technique is to export an IDML file (in InDesign CS4, CS5 or CS5.5) or an INX file (in InDesign CS2 or CS3). These are XML files that contain all the information in the file (but not the graphics). Saving them is sort of like giving your file a deep cleaning.
In InDesign CS4, 5 or 5.5, choose File > Export. In the Format menu select InDesign Markup (IDML). Save the file.

In InDesign CS2 or CS4, choose File > Export. In the Format menu select InDesign [Version] Interchange (INX). Save the file. (The version will be the number of the previous version.)
Then re-open the file in InDesign, and see if it fixes the problem.
These formats were designed to save backward to the previous version of InDesign. But sometimes they can also get rid of hidden corruption.

Remember that these files don’t contain the graphics so to reopen them you still have to have access to the linked graphics referenced in the file.

Need help with your print? Talk to a live print expert today: 800-930-7978.

Get Professional Print Design Help

  • « Go to Previous Page
  • Page 1
  • Interim pages omitted …
  • Page 33
  • Page 34
  • Page 35
  • Page 36
  • Page 37
  • Interim pages omitted …
  • Page 43
  • Go to Next Page »

Footer

Printing for Less

info@printingforless.com
100 P F L Way, Livingston, MT 59047

800-930-2423

  • Home
  • Products
  • Services
  • Industries
  • Get Samples
  • Direct Mail Marketing Resource Center
  • Printing Resource Center
  • Blogs
  • Templates
  • Terms & Conditions
  • Contact
  • About Printing for Less
  • About P F L
  • Our Team
  • Careers
  • Login

Copyright © 1998-2025 PrintingforLess.com. All Rights Reserved.

logo
  • 800-930-2423
  • Products
  • Direct Mail Marketing
  • Services
  • Industries
  • Direct Mail Marketing Resources
  • Printing & Mailing Resources
  • Get a Quote
  • Contact Us
  • My Login