Begin with Finishing
Folds are everywhere: brochures, direct mail, fold-out covers, folded inserts bound into books. Although it can be simple and standard or fun and creative, even the most basic of folds can require careful thought and planning. There s a technical side to folding that s rarely talked about, yet understanding how to design folded materials is a critical career skill. Once you re in the know, you’ll feel more confident about the files you send to the printer, be happier with your finished projects, and save money in the process.
This article covers the basics to consider before you fold and takes you step-by-step through creating a common (yet often bungled) folded document. We’ll also supply scripts that free you from some of the tedious manual work.
Before we talk tech, let’s back up a bit. When you begin to work on something like a brochure, you probably start with a sketch, then come up with a cool layout, get the client’s OK, and finally choose a printer and send off the file. Basically, you do the fun stuff first and worry about the details later.
The drawback to that workflow is that folding, even though it happens after your project comes off the press, has to be planned for if you don’t want to send your costs sky-high.
Not all folds are created equal. Some require special folding equipment, skilled bindery professionals, slower run speeds, longer make-readies, and hand work (translation: $$$).
If you have an unlimited budget, you have nothing to worry about, but otherwise, you need to be sure your fold not only can be produced but can be produced at a cost you can afford to pay. Talk to your printer early and often in the concept stages, or you may get burned.
The other reason that finishing (anything that happens to the sheet of paper after printing) is so important is because of its place in the process. A mistake caught at the finishing stage is the most expensive mistake you can make. At that point, the job has been through prepress, proofing, and the pressroom. For each step in the workflow, the cost of the error gets exponentially higher. A mistake caught in the bindery almost always means a reprint, or an undesirable work-around.
With that in mind, here are some things to think about before you start a project that involves folding.
Do you know your audience?
You wouldn’t choose a delicate paper for a piece intended for children, or a complex fold for an elderly audience. Sometimes the folding style or materials that would look best (and maybe even win design awards) are inappropriate for the end user. Think about who will receive the piece, have a paper dummy made up, and test it.

Do you know your budget?
Before you show that creative fold to your client, run it by your printer first. No client appreciates being sold something they can’t afford, and the budget- conscious compromise will never be as good as the original in their eyes. Be upfront with your printer about your budgetary constraints; they may even be able to help you get what you want. For example, reducing the finished size of the piece slightly may fit more of them on the press sheet, or may allow you to drop your press sheet size. There may be a comparable paper that is less expensive, or a trimming trick that could make a nice effect without adding much cost to the job.
Do you know your content? This is really important. The way your content should be organized has everything to do with how the sheet is folded. Content placement isn’t always an intuitive decision; the reader may not open or read the document in the order you intended.
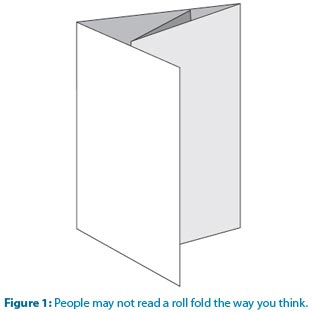
For example, often when working on a roll fold (Figure 1), designers usually put the most important information on the two roll-in panels. The perception is that people will open the piece and read the first roll-in panel, then open it a little further to read the second roll-in panel, and lastly open it out flat to view the inside spread. The reality is that when most people open a roll fold, they flatten it almost immediately. They might eventually turn it over and read the material on the roll-in panels, but the critical real estate for the roll fold is the inside spread. If you have text flowing from one panel to another, be sure the reader knows where to go next or, no matter how nice it looks, your design fails. The easiest way to find out how the reader will respond is to make a folding dummy of your layout and pass it around, watching how people open it.
Do you know your method of distribution?
Will it be a self-mailer? If so, there are postal regulations and wafer seal or glue requirements. Talk to the post office, which has staff dedicated to qualifying mail. If your piece will be mailed in an envelope, auto-insertion can be a problem for some folding styles, particularly the accordion fold, so ask your printer about that. Do you know the size of the envelope, and how small your piece needs to be to fit in the envelope? If other pieces will go in the envelope with the brochure, you may need to make the main piece a little smaller than the recommended enclosure size since the added bulk will take up space.
You can boil down folding guidelines into four areas: compensation, edges (trims, margins, pages), and setting fold marks.
Compensation.
Folding is dimensional, and because of this, if panel 1 is to fold into panel 2 and lie flat, panel 1 must be slightly smaller. That’s called compensation. If you don’t compensate, the folded piece will telescope, or have a roundish profile because the panels are too long and push against each other. No bindery will let telescoping happen. Rather, they’ll adjust the fold placement so that the brochure will lie flat, but margins and color breaks may shift noticeably. Not good!
To truly understand compensation, let’s make a four-panel roll fold dummy. Start with a standard sheet of paper and divide it into four equal panels. Fold the farthest right panel in, fold it in again, and close the cover. It will telescope because the farthest right panel must fold into the next panel, which folds into another. So the farthest right panel gets twice the compensation of the panel to its left, and the last two panels, since they’re not folding into anything, don’t require any compensation.
Now flip the dummy over and you’ll notice that the narrowest panel now falls on the left—everything reverses for side two of the brochure.
There’s a simple rule for calculating the panel differences: Shorten the fold-in panel by 3/32″ to 1/8″. If the fold-in panel is broadside (two-sheet thickness) or in heavy cover stock, increase the compensation to 1/8″ to 3/16″.
The step-by-step how-to on page 13 gives you valuable techniques and tools for creating the digital document that includes these calculations.
Trims, margins, pages, etc.
We’ve seen many ways of building a digital file for folding. Some float the brochure on a larger page with crop marks, some create separate documents for side one and side two, some build the file in viewing spreads. We recommend creating a single two-page document. Build the document size to the final trim size of the piece. Trim size (also called flat size) is the size of the final brochure—including folding compensation—when laid out flat. Pull the bleed past the edge as you would with any other print project.
There are no rules regarding what margins should be. The key is not to question the margin amount, but rather the width and placement of the text frame when a panel is compensated. It can add up to a noticeable difference when not adjusted correctly.
Setting fold marks.
Placing one of InDesign’s guides is not enough to show the printer where to fold the sheet. You need to create fold marks. Once you’ve set fold guides, draw a short, vertical dotted or dashed line directly above the first guide, making sure it’s in the slug area and not crossing onto the document edge. Then, follow the guide straight down and make another vertical line just below the guide, off onto the slug area. Zoom out, group both lines, copy and paste, and place them on the next guide. Continue this until all folding guides have fold marks above and below. Want to save time? Run a fold mark script instead. (See the “Scripts” sidebar on page 17 for details, including directions for getting the scripts.)
When you’ve finished, print the document with bleeds and crop marks, trim it, fold it down and make sure you didn’t miscalculate or misplace any of the folds. If everything looks good, you’re ready to start designing.
Enough theory—let’s build it. By the end of this how- to, you’ll have an InDesign document for a four-panel, eight-page, roll folded piece with a finished folded size of 5″ X 8″ (Figure 2).
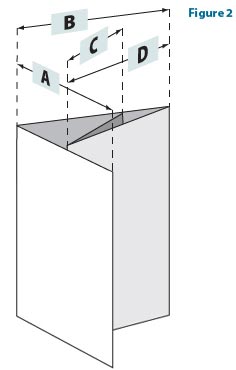
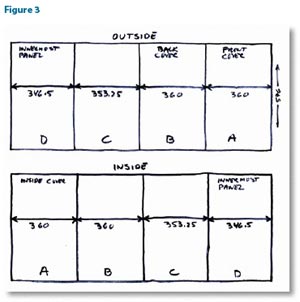
Once you know the desired width for each of the panels, make a simple sketch you can refer to while building your document. In Figure 3, both sides of the piece are shown with Panel A (the front cover) on the right of the outside page and on the left of the inside page.
Using the standard compensation values, the panel widths should be as follows:
C. 4-29/32″
B. 5″
A. 5″
Flat size vs. finished size
The flat size is the exact dimension of the piece when laid flat. This measurement should include all folding compensations, but should never include bleed allowances because bleed is pulled past the edge of the page in the digital document. Digital document page dimensions and flat size should always be the same measurement. Finished size is the exact dimension of the piece when completely folded.
Mechanical fold vs. hand fold
A mechanical fold is any fold that can be done by machine. Hand folds must be done completely or partially by hand. Often, printers take folds as far as they can go by machine, then bindery workers do the last fold or two by hand. Some folding styles that are considered hand folds can be done by machine at specialty binderies. Hand folding is very expensive and requires a die-score and more time built into the finishing schedule.
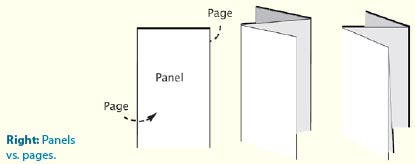
Panels vs. pages
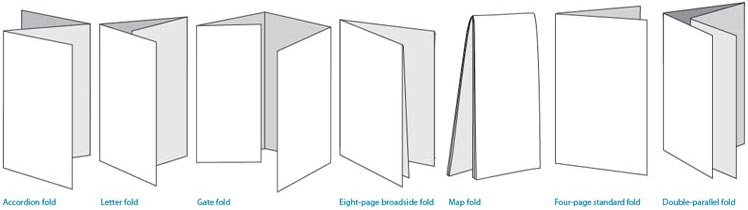
Panels are two-sided sections of the final folded piece. A page is one side of a panel. The Accordion fold below is three panels; each of the panels is two-sided, and each side is a page. So, the three-panel Accordion has six pages. If you take that fold and make it a Broadside Accordion—a broadside fold doubles its area by folding in half on itself before any characteristic folding style is created—the fold changes to six panels and the page count rises to twelve. Left: Flat vs. finished size. Right: Panels vs. pages.
To avoid dealing with fractions or lots of decimal places in InDesign, and also to minimize InDesign rounding errors, use points to define your document and create the guides that will denote the panel boundaries. Since there are 72 points per inch, multiply each of the four panel widths in inches by 72. Also multiply the finished 8″ height of the piece by 72. These are the values marked on Figure 3.
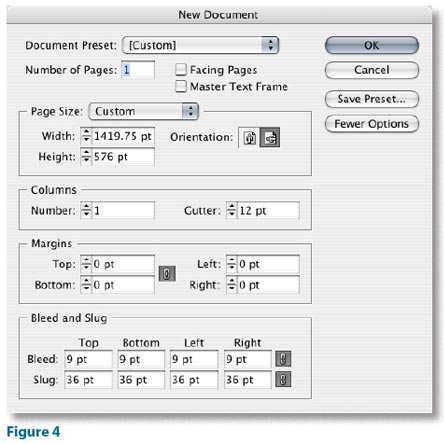
Add the widths of the four panels (346.5 + 353.75 + 360 + 360) to calculate the desired width of the document: 1419.75 points. Its height will be 576 points.
Enter the values in the New Document dialog box (Figure 4). If you use our utility scripts (see the “Scripts” sidebar on page 17), you only need to create a one-page document; you’ll use the mirroring script to automatically create the second page after you’ve made the guides on the first page.
In the New Document dialog box, specify the amount of bleed you want, and add a slug area to contain the fold marks. (Our fold mark utility script will expand the slug as necessary to hold the folding marks, so you can omit this now if you plan to use the supplied script.)
It’s a good idea to place marks and guides on their own layer beneath all other layers in the stacking order. Now’s the time to create and select this layer. (After you’ve created all the guides and marks, you may want to lock this layer to prevent accidentally moving anything.)
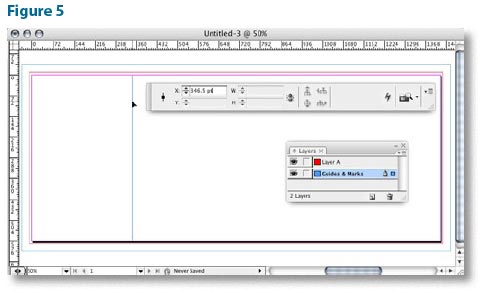
Drag a vertical ruler guide from the left ruler of the document window. Release the mouse when the guide is in the vicinity of the desired position (346.5 points).
To precisely position the first guide after dragging it on to the page, make sure it’s selected (it will be just after you’ve created it) and enter its desired position in the numeric field in the Control panel/palette (Figure 5).
You can also use the Edit > Step and Repeat menu option to duplicate a guide at a precise horizontal or vertical offset. To create the second guide, select the first one by clicking on it with the Selection Tool, and choose Step and Repeat… from the Edit menu. In the Step and Repeat dialog box, enter “1” for the Repeat Count, and enter the width of panel C (353.25 points) in the Horizontal Offset field. We also like to turn on the Preview checkbox (Figure 6).

Select the second guide, and Step and Repeat it by the width of panel B (360 points) to create the final guide on page 1.
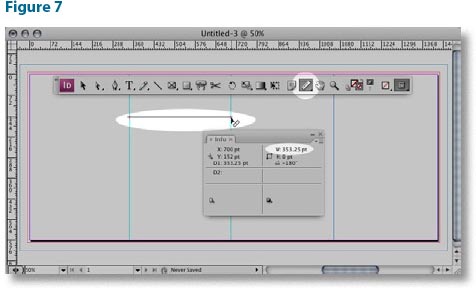
Before moving on to page 2, double-check that all the guides are in the correct position. Make sure Snap To Guides is turned on (under the View > Grids & Guides menu), and use the Measure Tool and Info Panel to measure the distance between each pair of guides (or page edges) and compare to your sketch for accuracy (Figure 7).
Your document needs a second page, and its guide positions need to be horizontally mirrored relative to page 1—that is, panel A (one of the 360 point panels) is on the left of page 2, and panel D (the narrowest) is on the right.
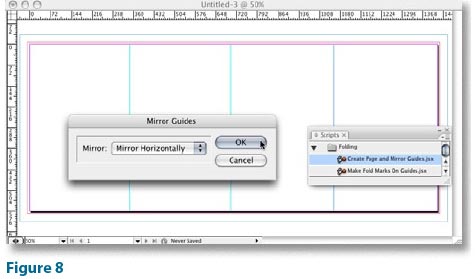
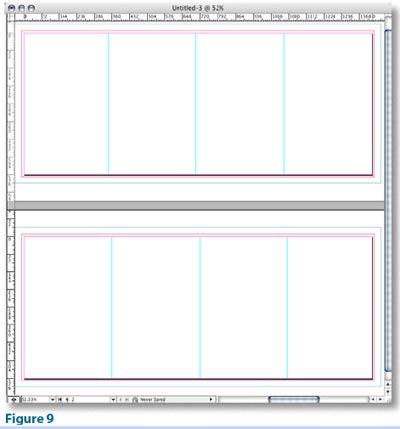
You could manually create a second page, and follow the previous steps to create the guides. However, it’s a lot easier to use our script attached to this article (Create Page and Mirror Guides.jsx). This script will create a new page, and create a new set of guides on it, mirroring the position of all the guides on page 1. When you run the script (by double-clicking it in the Scripts Panel), it will display a dialog box with a popup menu in which you select the direction(s) in which you want to mirror the guides (Horizontally, Vertically, or Both). In this case, we want to mirror horizontally (Figure 8). The result will look like Figure 9.
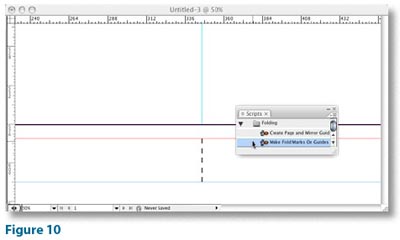
The final step in building your document is to create fold marks in the slug area. You could create these manually, but once again, InDesign scripting comes to the rescue, eliminating the need for tedious, error-prone work. Our script Make Fold Marks on Guides.jsx will first expand the slug area (if necessary to accommodate the marks it’s going to create), and then create fold marks in the slug area for all guides on visible layers in your document (Figure 10).
With your document set up this way, you’re well-prepared. Time to place text and images!
A successful folded project and a smooth workflow process take thought, planning, and some technical know-how. But with a little practice, you’ll feel confident about what you’re doing. If you remember only one thing from this article, make it this: Think finishing at the beginning. Resist the temptation to design in a vacuum and get your printer’s opinion early. Then have fun creating your masterpiece.
Search the Web for InDesign templates and you’ll get a lot of hits like these:
- www.stocklayouts.com
- www.ideabook.com/indesign_templates.html
- Also, some printers offer a wide variety of folded product templates.
- Don’t forget the templates that ship with InDesign. Access them by going to Help > Welcome Screen…, and click on Create New…From Template.
- For custom digital folding templates in a snap, check. out the new FOLDRite Template Master plug-in for InDesign (available November 2007). Visit www.foldfactory.com for more information and to view a demo. If you visit the site and pre-register, you’ll be eligible for a special promotional price and other offers.
- FOLD: The Professional’s Guide to Folding, by Trish Witkowski
- Forms, Folds, and Sizes: All the Details Graphic Designers. Need to Know but Can Never Find, by Poppy Evans
- The Packaging and Design Templates Sourcebook, by Luke Herriott