Customizing Microsoft Word Brochure Templates
Thank you for downloading one of Printing for Less’s free Word brochure templates. To make creating your project even easier, here are a few tips to help you customize your Word brochure with images that you would like to use. As always, if you have questions, please feel free to call us at 800-924-2041 or email us at info@printingforless.com.
Inserting a Picture from a File
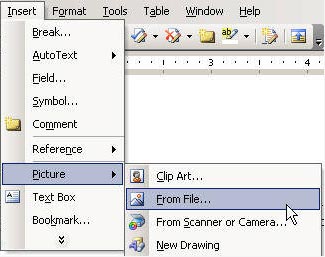
There are several ways to insert a picture into your Word brochure template. Refer to the image above as you insert a picture using the Insert menu:
1. Click Insert
2. Select Picture
3. On the Sub-menu, select From File
Next step, Selecting the Picture…
Selecting the Picture
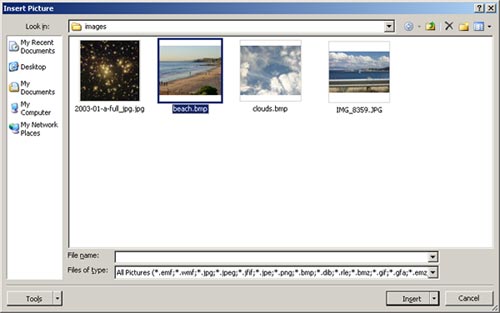
If you opt to insert a picture from the Insert menu, the Insert Picture dialog box opens. Select your picture by highlighting it and clicking Insert. Or, you can simply double-click the picture file. The picture will appear in your document.
Changing the Picture Size
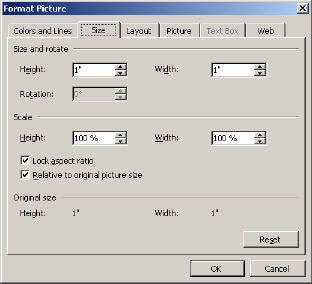
If possible, format your picture in a photo-editing program, such as Photoshop or Photoshop Elements. Or use Word’s built-in photo-editing tools for simple changes to size and position within the document. To resize a photo, you can click the image and use the corner boxes to resize it by “dragging” it, making it larger or smaller. Or, if you need more precision, you can use the Format Picture dialog box:
1. Right-click the picture and select Format Picture
2. In the Format Picture dialog box, click the Size tab
3. You can use the Height and Width boxes at the top to enter a size in inches
4. You can also use the Height and Width boxes in the scale section to specify the size as a percentage
5. Deselect Lock aspect ratio if you don’t want to retain the current width to height ratio
6. Click OK
Changing Picture Layout Options
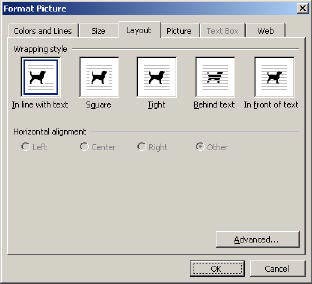
The Word program provides you with a variety of options for changing the layout of your picture. For example, you can have the text wrap around the picture, or you can insert the picture in line with the document text.
To change the layout options, follow these steps:
1. Right-click the image
2. Select Format Picture
3. Open the Layout tab
4. Select “Square“, and click OK. This will allow you to click and move the image around the template easily, positioning the image exactly where you want it.
5. For advanced options, such as the amount of space around the picture, click Advanced.
Editing Text in Word Documents
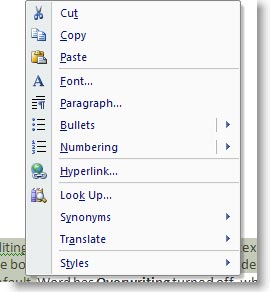
Editing text in Word is as easy as entering text in a blank document – just start typing! By clicking within the body of the document, you can add or delete text as needed. One thing to keep in mind is by default, Word has Overwriting turned off, which means text to the right of the cursor, or wherever you are starting to enter text, will be moved to the right. It is important to note, however, that if you highlight part of the text within your document and start typing, the highlighted portion will be deleted and the new text will appear in its place. What happens if you delete something accidentally? No worries – you can use the Undo feature (the shortcut is ctrl+z) to undo up to one hundred changes you have made to your document. If you want to delete whole portions of your document or blocks of text, you can simply highlight the portion you would like to delete by clicking and holding down your mouse and press the delete key. To delete individual elements of your document, you have two options: The delete key will delete objects to the right of the insertion point or where your cursor is, while the backspace key will delete objects to the left of the cursor.
Copy and Paste
Many times you will need to grab text from one document and put it in your brochure or template. Instead of re-typing all of the text, using copy and paste will save you time. There are several ways to copy and paste a section of text, whether from one document to another, or from within the same document.
- First, highlight the text or block of text you want to copy. Then, select the Copy command using one of the following methods:
- Select Copy from the Edit menu
- Click your right mouse button while on the highlighted text, and select Copy from the right-click menu list

- Use the shortcut feature Ctrl C (hold down the Control button, while pressing the C button) and to paste what you have copied, press Ctrl V.
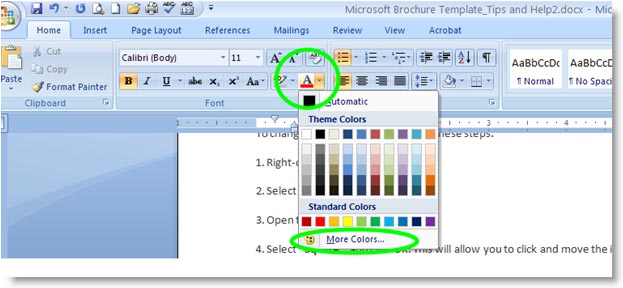
Changing Text Color in Word
To change the color of your text within your document, first click on the font color on the Formatting toolbar. From the Colors palette, select the color you would like to use. You can pick from Theme, Standard, or you an open up a full palette, to fine-tune your selection.
![]() If you have questions, or need help designing or laying out your brochure, call our design experts at 800-924-2041 or email us at info@printingforless.com. Learn more about using Word on the Microsoft website. More helpful brochure printing, design and marketing resources: Brochure Printing Options
If you have questions, or need help designing or laying out your brochure, call our design experts at 800-924-2041 or email us at info@printingforless.com. Learn more about using Word on the Microsoft website. More helpful brochure printing, design and marketing resources: Brochure Printing Options
Brochure Samples and Design Ideas
Brochure Design Concepts
Microsoft Brochure Templates for Word
Brochure Fold and Layout TemplatesFull Color Brochure Printing and Mailing
Political Campaign Brochures
Creative Brochure Designs
Brochure Marketing Ideas
How to Write a Super Brochure