Preparing Photos for Print Projects
This whitepaper is one in a series of helpful how-to’s from PrintingForLess.com, America’s Print Shop®. In this guide, you’ll learn what resolution is, how much you need when printing, and how to change it without lowering image quality. You’ll also learn how to edit digital photo files so that they look crisp and sharp in your printed projects.
Image resolution can be a tough concept to wrap your brain around. When referring to an image, resolution is the number of pixels displayed per unit of printed length. It’s a measurement used in printing and it’s stated in dots per inch (dpi). This makes sense because printers print dots, and that’s what a printed image is composed of. When referencing an image onscreen—on a computer monitor, TV, or projector—resolution is stated in pixels per inch (ppi). This too makes sense because digital images are displayed in tiny individual blocks of color called pixels. How Resolution and Pixels Work Together The resolution measurement dictates how closely an image’s pixels are packed together. Increasing an image’s resolution means the pixels will be packed together more tightly, resulting in a smaller physical size, but generating a smoother, higher quality print. Lowering an image’s resolution means loosening the pixels, resulting in a larger physical image size, but generating a blocky, lower quality print.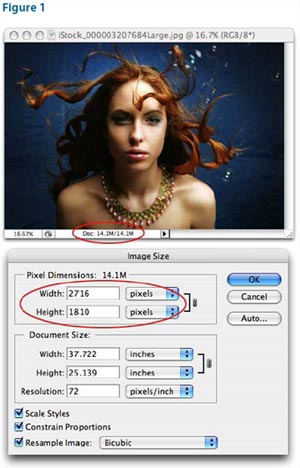
Think of the resolution measurement as density. For example, the tighter a substance is packed, the denser it is and the less surface area it takes up (like brown sugar). The more loosely a substance is packed, the more surface area it consumes and it becomes less dense.
The confusing part is that when it comes to imagery, printers are the only devices that can do anything with the resolution measurement. Because our eyes can process only so much information, a 72ppi image onscreen looks identical to a 600 ppi image onscreen. However, a printer isn’t hampered by the human eyeball and can take advantage of resolutions much higher than 72.
How Much Do You Need?
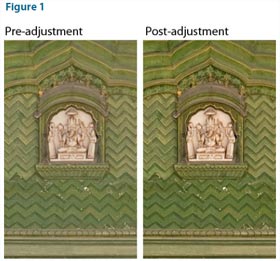
The resolution necessary for a good print depends on the printing device itself. For instance, consumer inkjets do a nice job at 225 to 250 dpi. For a black and white laser printer, you need between 150 to 200 dpi. For business cards, brochures, and other PrintingForLess.com products, you’ll do best with 300 dpi or higher. Let’s put theory into action on a photo from a high-end digital camera. I opened Figure 1 in Adobe Photoshop, then chose Image > Image Size (Command+Option+I/ Alt+Option+I).
This photo (courtesy of iStockphoto.com/Lisa Gagne) is measured at 72 ppi. But that doesn’t mean it’s a low-quality image. It’s 14.1 megabyte, and its pixel dimensions are 2716 x 1810. That means you have a lot of pixels to work with. In fact, if you tried to print this image at its current resolution, you’d need a piece of paper more than 37 inches wide by 25 inches tall.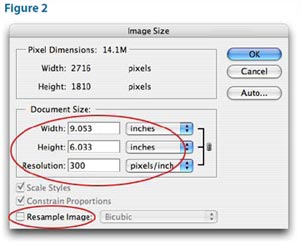
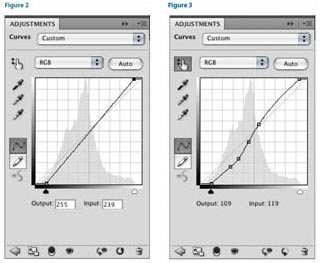
At the bottom of Photoshop’s Image Size dialog, uncheck the Resample Image option. This locks the pixel data, thereby locking image quality. Watch what happens in Figure 2 (next page) when you enter 300 into the resolution box. The physical size of the image changed! It decreased to roughly 9 x 6 inches—much more manageable!
However, look at the pixel dimensions toward the top of the dialog. They didn’t change, and that is the power of the Resample Image option. I just successfully changed the resolution without altering image quality. The number of pixels is exactly the same as it was before, but now the pixels will be packed more tightly together when the image reaches a printer.
Upsample with Caution
If you leave Photoshop’s Resample Image box checked and increase the resolution of an image, you’ll be adding information (pixel data) to the image that wasn’t originally there. That’s called upsampling. It’s usually an extremely bad idea, but there may come a time when you have no choice; for example, maybe the only available image is a small, low-resolution one from the Web, and you have to print it.
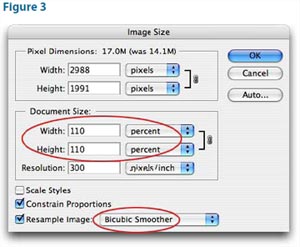
Here’s how to add enough pixels for printing: Open the Image Size dialog in Photoshop and leave the Resample Image box checked. Choose Bicubic Smoother from the pop-up menu to its right and change the document dimension pop-up menus to Percent. Enter 110% in the width box and press OK (Figure 3).
Repeat this process as many times as necessary to enlarge the image. Resist the urge to increase the size more than 10% at a time. Adding data 10% at a time doesn’t cause a huge amount of quality loss. If you must upsample low-resolution images frequently, you may want to buy a plug-in, such as Genuine Fractals by onOne Software, Blow Up by Alien Skin, or PhotoZoom Pro by BenVista. They manage to increase pixel data without totally destroying the image.
Sometimes you want to print an image with enough resolution, but the photo is a little blurry. You can’t take something that’s completely out of focus and make it a masterpiece of clarity, but you can significantly improve an average photo.
Optimize Image Contrast
When you see a sharp edge in an image, it’s because the difference between dark and light—that is, contrast—is higher along that edge than in other areas. When you apply a sharpening filter in a program such as Photoshop, you boost contrast only along edges, creating the illusion of heightened sharpness. But it isn’t just edge contrast that affects whether you perceive an image to be sharp. Every adjustment that affects overall contrast contributes to what looks like sharpness. You can apply contrast to the entire image, to specific tonal ranges within the image, and to specific areas.
Shape the Tonal Range to Enhance Details
Sharpening will be more effective if you first enhance the definition of image details by adjusting the photo’s tonal range.
Set a proper black point and white point. Setting the darkest and lightest tones in the image is the first stage in affecting how much an image pops (Figure 1). In Photoshop CS3 and CS4 (Figure 2), you do this by dragging the black and white triangle sliders in the Levels or Curves dialog box or panel (in Photoshop CS2 or earlier, the sliders are in Levels only). In Adobe Lightroom and Adobe Camera Raw, the black point is controlled by the Blacks slider and the white point is controlled by the Exposure slider. In all cases, you can Option-drag (Mac) or Alt-drag (Windows) a slider to preview which tones are clipped.
Shape the tone curve for details. The next level of contrast adjustment involves shaping a tone curve, which lets you boost or cut contrast in specific ranges of tones. If you want to make certain image details more distinct and you can isolate that part of the image by tone, steepening that part of the tone curve will help differentiate image details in those areas (Figure 3).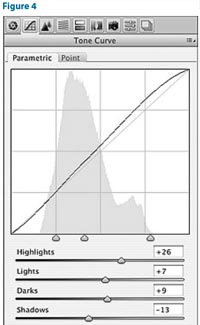
In Photoshop CS4, create a new Curves adjustment layer by clicking the Curves button in the Adjustments panel. In Photoshop CS3 and earlier, click the Create New Adjustment Layer button at the bottom of the Layers panel and choose Curves. To increase contrast within a specific range of tones, click two points on the curve where that tonal range begins and ends, and drag the points to steepen the curve there.
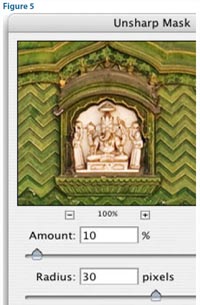
In Camera Raw, click the Tone Curve tab to view the Parametric curve. In Lightroom, use the Tone Curve panel in the Develop module. In both programs, drag horizontal sliders that control four segments of the tonal range (Figure 4). In Camera Raw, you can edit the curve as in Photoshop by clicking the Point tab.
Enhance Local Contrast
Sharpness is ultimately about contrast. More specifically, sharpness is ultimately about local contrast. Unlike a tone curve, which lets you adjust contrast among different ranges of tones within an image, a local contrast adjustment affects areas of tones within an image. When you boost local contrast, you boost the difference between all adjacent dark and light areas in the image (Figure 5).
 of sharpening, the way you control local contrast in Photoshop is by applying the Unsharp Mask or Smart Sharpen filters.
The basic technique is simple: Set a high Radius value and a low Amount value compared to those you would use for sharpening edges.
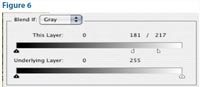
These values provide a subtle contrast boost in areas extending some distance from the edges of image content, instead of at edges as in normal sharpening. (In normal sharpening, the Amount is closer to 100% and the Radius is closer to one pixel.) The Radius value controls how far from an edge the contrast boost is applied. Local contrast changes are most effective in the midtones. You may want to keep local contrast adjustments from affecting highlight detail. If you’re using Smart Sharpen in Photoshop, click the Advanced button, click the Highlights tab, and increase the Fade amount. If you use Unsharp Mask, after applying the filter, double-click the layer thumbnail in the Layers panel, and in the Layer Style dialog box, drag the white Underlying Layer slider to the left to hide the effect of the layer from the highlights (Figure 6). Option-drag (Mac) or Alt-drag (Windows) one half of the white slider to split it, feathering the transition.
 In Camera Raw and Lightroom, controlling local contrast is easy—just increase the Clarity value. Applying Clarity is like applying the high-Radius/low-Amount technique above but includes automatic protection of image quality so that there’s much less need to manually protect highlights.
By now, the details in your image should appear much clearer, even before you’ve applied any traditional sharpening settings.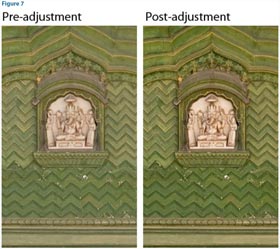
And Finally, Ready for Advanced Sharpening
If you’ve performed the previous steps correctly, you should have images that respond easily to the sharpening features in Photoshop, Camera Raw, Lightroom, and other image editors. In Figure 7 is the final image after sharpening was applied, compared to the same amount of sharpening applied to the image in the beginning where no contrast optimization was applied. You can see that manipulating contrast contributed as much to better definition of image details as sharpening did.
Advanced Sharpening Workflow
If you’re ready for some heavy lifting in Photoshop, read Out of Gamut: Thoughts on a Sharpening Workflow by Bruce Fraser on CreativePro.com.
This whitepaper is based on materials written by Lesa Snider and Conrad Chavez for CreativePro.com.