How to Set Up Canva Files for Print, Export and Use Printing for Less Templates in Canva
Canva is a popular tool used by everyone from designers to marketers, and we’ve created a guide to help you seamlessly submit your design files. This comprehensive resource ensures that your creations transition smoothly from screen to print, maintaining the integrity of your vision every step of the way. Whether you’re fine-tuning a business card or crafting a full-scale marketing campaign, our guide is here to make your process as straightforward as possible. Start exploring today and elevate your Canva projects to professional-quality prints!
How to set up files to start designing in Canva:
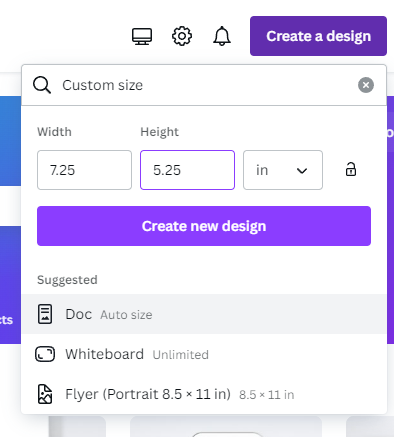
After logging in to Canva, select ‘Create a design’ and choose the ‘Custom’ option.
Before entering your desired dimensions, ensure the measurement is set to inches. Add an additional 0.25 inches to both the width and height of your document. This extra 0.25 inches accounts for bleed, which will be trimmed off during printing, ensuring no white space remains around the edges of your printed piece.
For example, if you need a 5” x 7” postcard, enter 5.25” x 7.25” as the dimensions to include bleed.
*Please ensure that critical elements within your artwork, such as text or QR codes, do not extend to the edge of your artboard. We require a .125 bleed on all sides for trimming purposes. Additionally, we recommend maintaining a .125 ‘safe zone’ inward from each trim edge.
When you’ve finished designing, please follow these steps to export print-ready files:
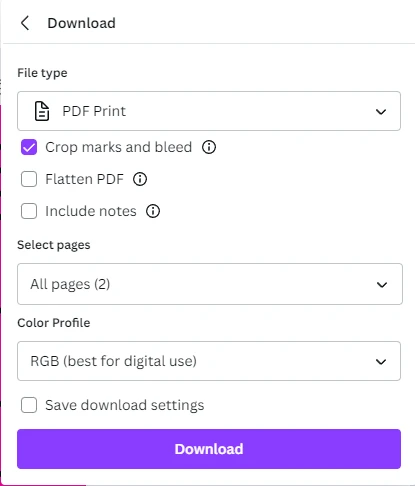
When you’re in the download area change the settings to:
- File type: PDF Print
- Check: “Crop marks and bleed”
- Select Pages: Select “All pages” (unless there are additional pages that you do not intend to be printed).
- Color: Select “RGB (best for digital use)” unless you have Canva Pro, then select CMYK
- If you do not have Canva Pro, Printing for Less can convert the color space from RGB to CMYK for you. Please note that some colors may shift slightly during this conversion.
Finally, select to download your file, and now you’re ready to upload your file to your Printing for Less portal.
Tips for creating in Canva:
Use images that are 300 DPI or higher for optimal image quality.
Please be aware that when using images of text, low-resolution images can significantly impact legibility and may result in blurriness.
Using Printing for Less Templates for Document Design
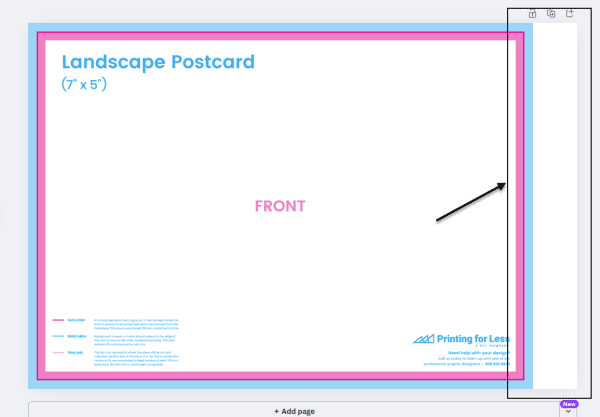
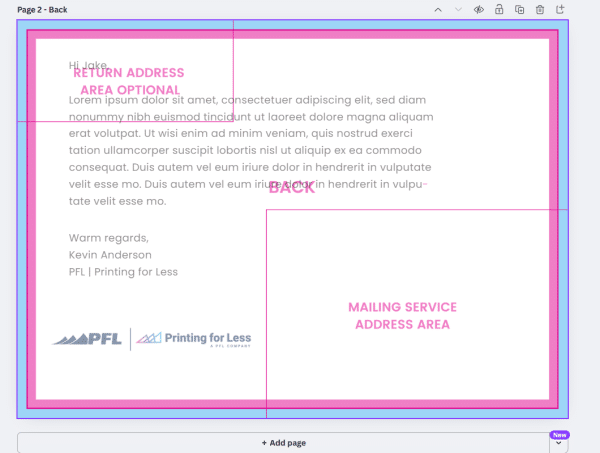
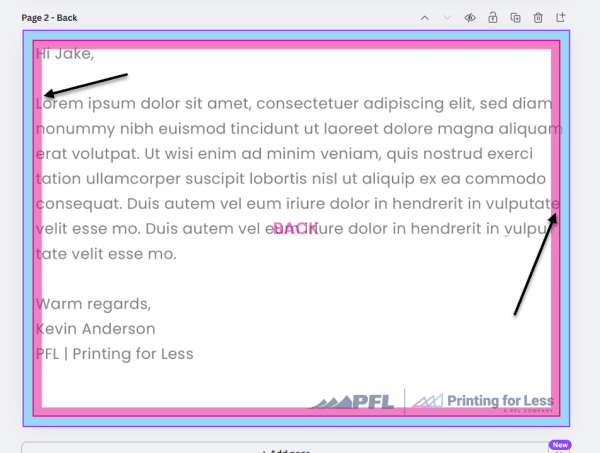
Printing for Less offers templates for documents of any size to help you create print-ready files with precision. These templates clearly indicate two important areas:
- Bleed Area (blue): This is the portion that gets trimmed off during printing.
- Safe Zone (pink): Keep all critical elements (like text and logos) within this area to prevent accidental trimming.
Templates are especially helpful in ensuring your design doesn’t extend past the trim edge or sit too close to it. Some templates also include a designated mailing address area, which must remain completely clear of any artwork and must be 100% white to comply with USPS regulations.
Using Templates in Canva
To ensure the template functions correctly, your design file must be set to the proper size, including a bleed (an extra 0.25″ added to both the width and height). If the file is at the correct size the template will work how it should.
If you’re working in Canva and need a template, request a transparent PNG template. If we know you’re using Canva, we’ll typically send a PNG version by default. If not, please let us know you need one.
To use the template in Canva:
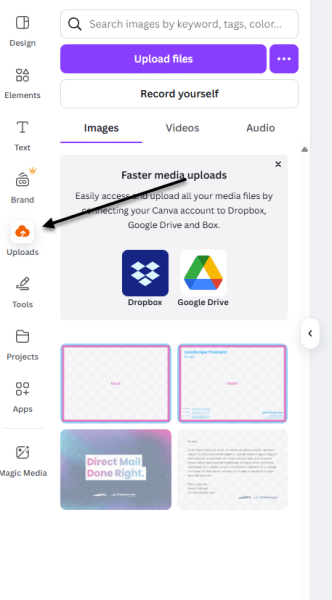
- Go to the Uploads tab and click Upload Files.
- Locate and upload the template file.
- Once uploaded, drag the template onto your design.
Upload Files
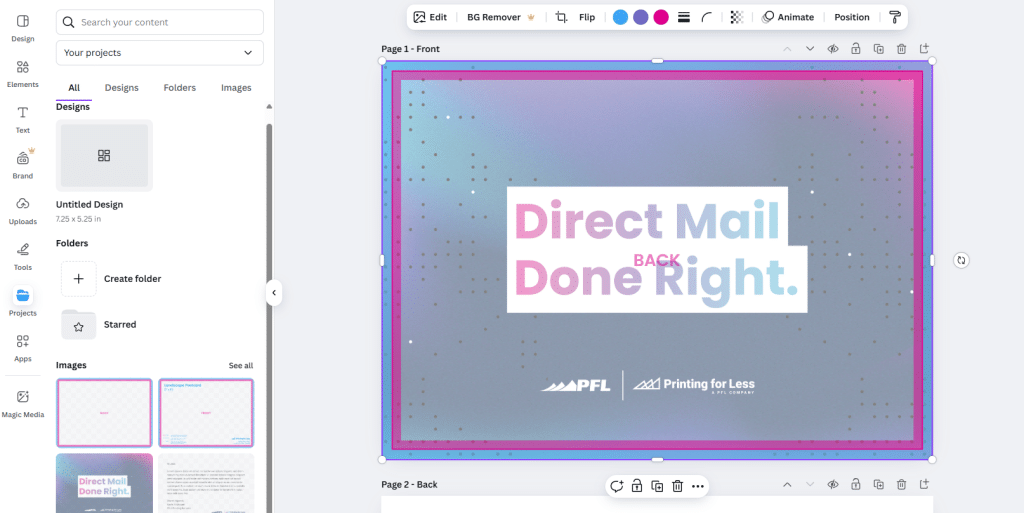
4. Resize it to match your document using the corner handles only to maintain proportions. The blue bleed edge should align exactly with the document’s outer edge.
Drop File Over Art

Resize Template
Important: The template must be removed before final submission. It’s for your reference only; we apply mailing and folding templates on our end, optimized for our production system.
Common Issues
Bleed and Safe Zone Violations:
In the example below, text appears within both the blue (bleed) and pink (safe zone) areas. Text in the blue area will be cut off, and text in the pink area is at risk. Be sure to move any critical content out of these zones.
Bleed and Safe Zone Violations
Incorrect Document Size:
Another common issue is a mismatch between your file size and the template. For example, applying a 5″x7″ template to a 6″x9″ document won’t work. If your template doesn’t fit your design:
- If you need a different size template, contact us and we’ll provide the correct one.
- Double-check the dimensions of your file.
- If your file is the wrong size, resize it to match the template.
File Too Large for Template