• Skip to primary navigation
  • Skip to main content
  • Skip to primary sidebar
  • Skip to footer
Printing for Less

Printing for Less

At Printing for Less, we've offered high quality online printing services since 1996. Shop business cards, booklets, stickers, and more!

P F L.com
My LoginMy Login
800-930-2423
  • Printing
    • Postcards
    • Catalogs
    • Brochures
    • Folders
    • Letters
    • Newsletters
    • Envelopes
    • Greeting Cards
    • Print Templates
    • All Products
  • Direct Mail
    • Why Direct Mail Marketing?
    • Every Door Direct Mail® Postcards
    • Direct Mail Letters
    • Catalogs & Booklets
    • Marketing Gifts & Kits
    • Direct Mail Automation
  • Services
    • Mailing Services
    • Design Services
    • Custom Printing Services
    • Reseller Program
  • Industries
    • Advertising & Design
    • Enterprise
    • Food & Beverage
    • Healthcare Payers
    • Healthcare Providers
    • Nonprofit
    • Real Estate
    • Retail
    • Technology
    • University
  • Resources
    • Direct Mail Marketing
      Resource Center
    • Printing Resource Center
    • Blogs
    • Templates
    • Video Library
  • Get a Quote

Using Custom Flattener Presets

Your commercial printer’s workflow may require that transparency be flattened.  We discussed flattening transparency in this blog post.

The printer may have created a custom Transparency Flattener Preset which has the settings they require for their workflow. This post explains how to use such a preset.

The first step is to load the preset. In Adobe InDesign, choose Edit > Transparency Flattener Presets. In Adobe Illustrator, choose Edit > Transparency Flattener Presets. In the dialog that appears, there will usually be three standard presets called [Low Resolution], [Medium Resolution] and [High Resolution]. Click the Load button, navigate to the preset the printer provided, and select it. It will then appear in the dialog as shown below (here labeled “Platesetter”).

Using Custom 1

The printer will then request that you create an Adobe PDF file using the Adobe PDF preset they requested. We discussed PDF presets here.

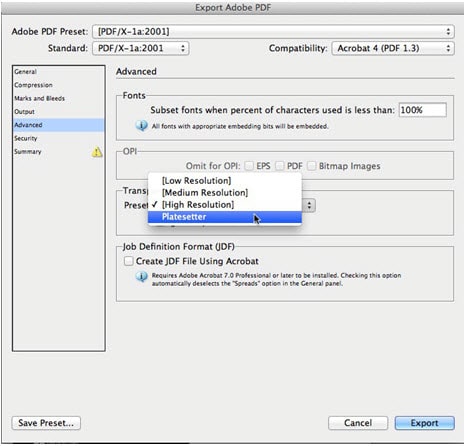
For example, if they asked you to choose the PDF/X-1a PDF preset, you would choose it from the Adobe PDF Preset menu in the Export PDF dialog box. On the Advanced panel, you would select the Flattener Preset from the list. If you’ve installed the custom preset, it will appear there as shown below.

Need help with your print? Talk to a live print expert today: 800-930-7978.

Using Custom 2

Get Professional Print Design Help

Primary Sidebar

Subscribe to our weekly newsletter and get an instant 20% off your first print project.

Name(Required)
This field is for validation purposes and should be left unchanged.

Footer

Printing for Less

info@printingforless.com
100 P F L Way, Livingston, MT 59047

800-930-2423

  • Home
  • Products
  • Services
  • Industries
  • Get Samples
  • Direct Mail Marketing Resource Center
  • Printing Resource Center
  • Blogs
  • Templates
  • Terms & Conditions
  • Contact
  • About Printing for Less
  • About P F L
  • Our Team
  • Careers
  • Login

Copyright © 1998-2025 PrintingforLess.com. All Rights Reserved.

logo
  • 800-930-2423
  • Products
  • Direct Mail Marketing
  • Services
  • Industries
  • Direct Mail Marketing Resources
  • Printing & Mailing Resources
  • Get a Quote
  • Contact Us
  • My Login
Catalog Printing

Subscribe to our weekly newsletter and get an instant 20% off your first print project.

Name(Required)
This field is for validation purposes and should be left unchanged.

*Some exclusions apply. See details